We evaluated three leading local container management solutions to uncover their strengths and weaknesses.
Building microservices applications requires developers to work closely with containers not just in the cloud, but locally on their development machine. In this article we will focus on finding the best tools when it comes to building and running a containerized application locally, specifically evaluating Docker Desktop, Rancher Desktop and Podman Desktop. All three of which give you the ability to run both Docker and Kubernetes environments locally, but vary in many ways from their licensing to their ease of use.
At Acorn, we have been building an open source AI-powered CLI assistant for devops caled Clio, and as part of that we use a lot of local container management tools in our testing. We’ve tested all of these and thought we’d share what we learned.
Sample application
Unlock your DevOps potential with this sample app by trying out Clio, our AI CLI assistant! Let Clio guide you through the complex CLI processes, helping you work faster and more efficiently.
Clio works by running local commands and can help you manage your cloud resources, deploy apps and manage Kubernetes clusters, check the status of your Docker containers, interact with GitHub repos, automation, scripting, secrets management and much more. Try Clio today—where technology meets simplicity.
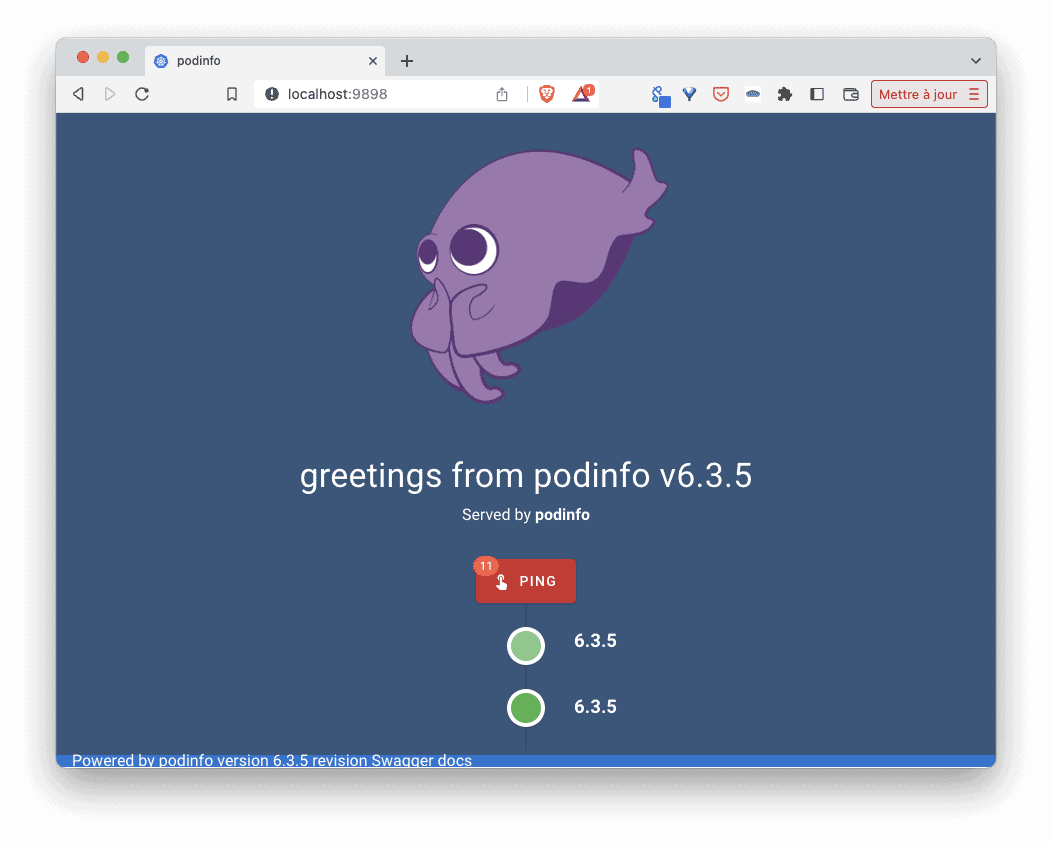
We will consider the following application https://github.com/stefanprodan/podinfo which is a simple web app written in Go. It is usually used to demo Kubernetes concepts. We will focus on the frontend part but additional components (backend and cache) could also be deployed alongside the frontend.
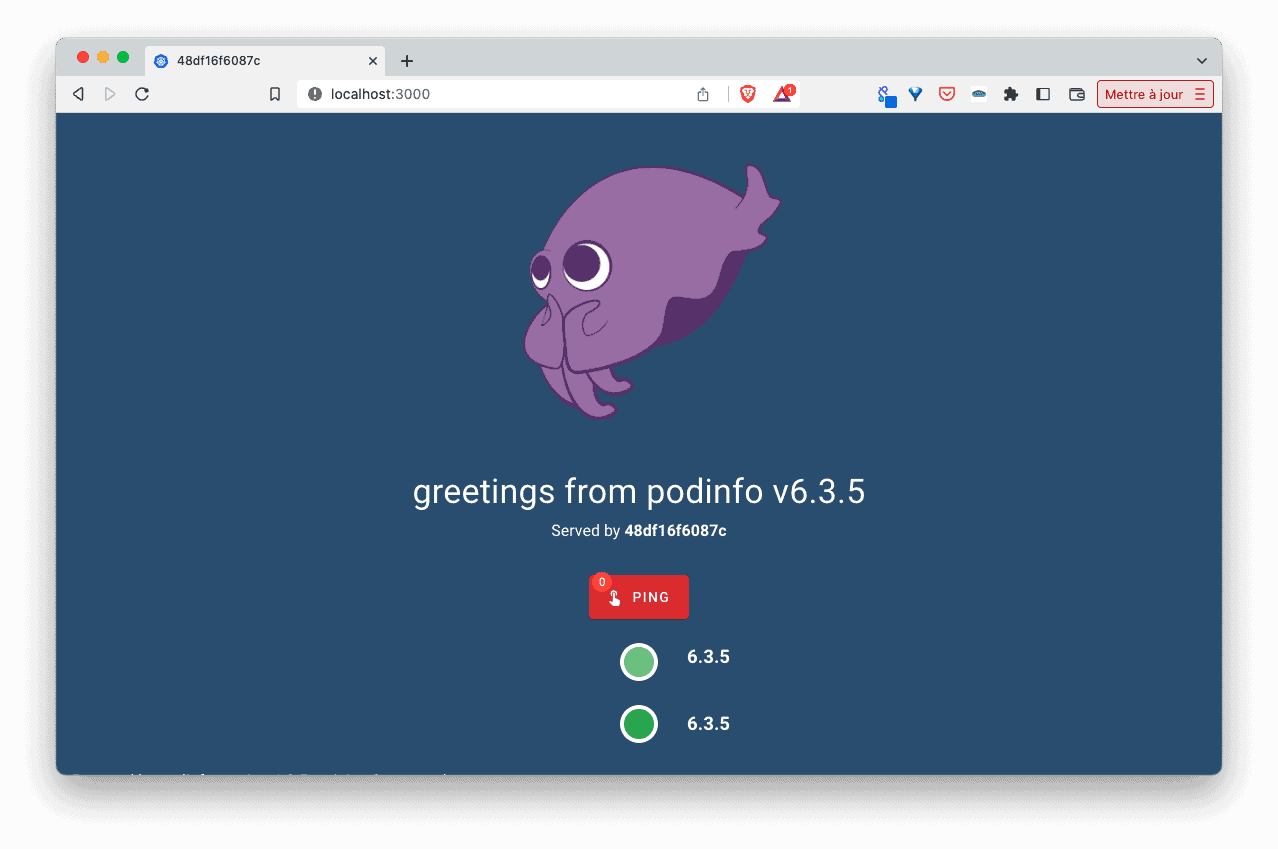
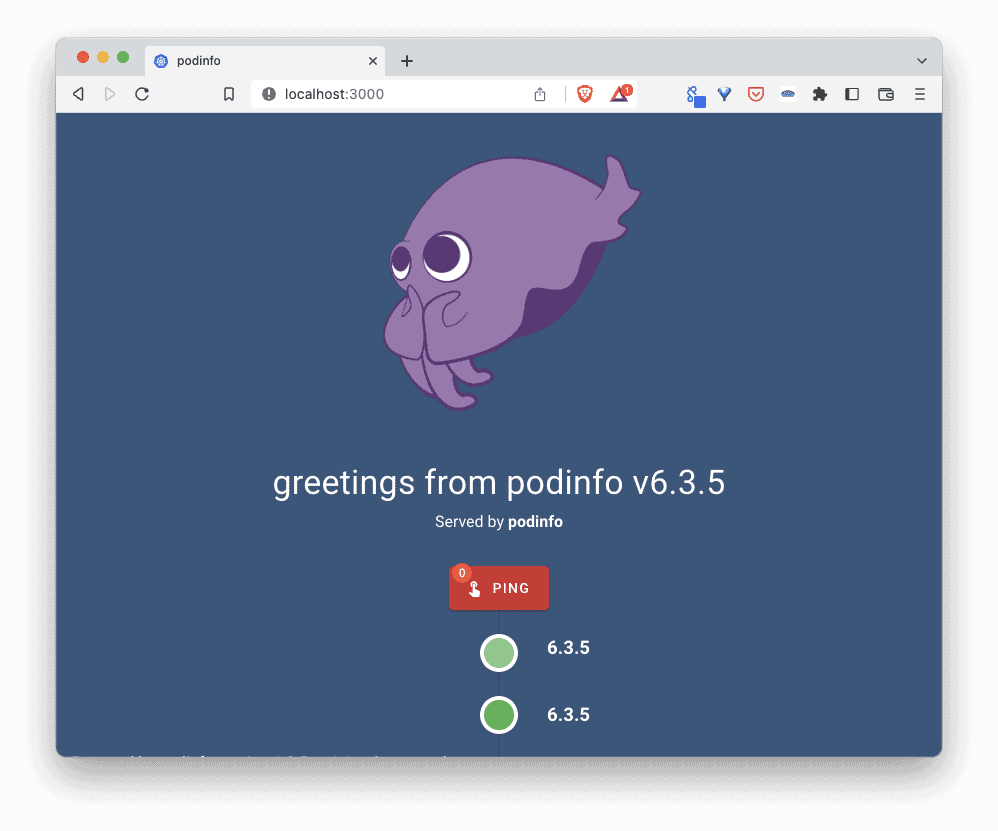
Once launched it displays the following web interface.
The GitHub repository of the application contains the Dockerfile used to package the app into a container image. In the following sections we will use this Dockerfile to build an image of the podinfo application and run a container from this one. When applicable we will also run this application as a simple (1 container) Compose application
Local environment to run a containerized application
Many people think that running a container can only be done using Docker tools. There is no doubt that Docker, Inc is the company which democratized the usage of the container technology, but today it is focused on the delivering of tools designed to help developers to develop, build and distribute applications. Docker Desktop is a tool that many developers use locally, and this is the first tool we will illustrate in this article. Other alternatives exist such as Rancher Desktop and Podman Desktop to list the major ones.
To compare these solutions, we will detail how each one of them can:
- build a container image
- run a single container
- run multi-containers application
We will also detail how these solutions can be integrated with Kubernetes (if applicable).
Docker Desktop
Docker Desktop is available for MacOS, Windows and Linux and can be downloaded from https://www.docker.com/products/docker-desktop/. It installs the docker client, the docker daemon (dockerd aka Moby) and configures the client to communicate with the local docker daemon though a unix socket.
Note: On MacOS and Windows, Docker Desktop runs the docker daemon in a Linux VM.
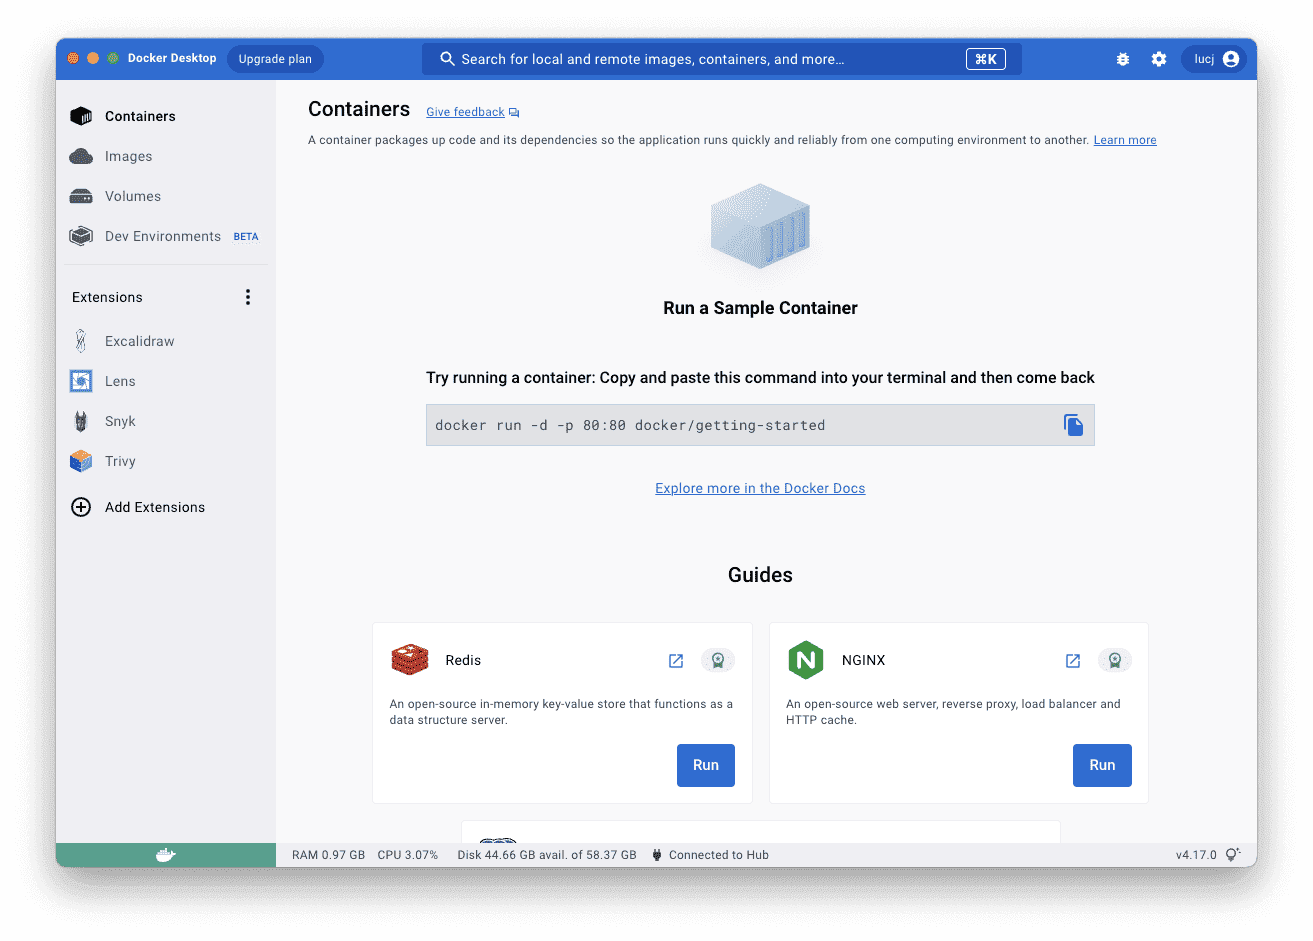
Overview of the Dashboard
Docker Desktop offers a dashboard to manage the containers, the images and volumes as illustrated on the screenshot below.
Docker Desktop is dedicated to development teams and should soon release additional features to help developers in the application development cycle. One of those functionalities is the possibility to share a development environment between several team members.
Docker Desktop also provides a way to be extended through the usage of extensions developed by the ecosystem.
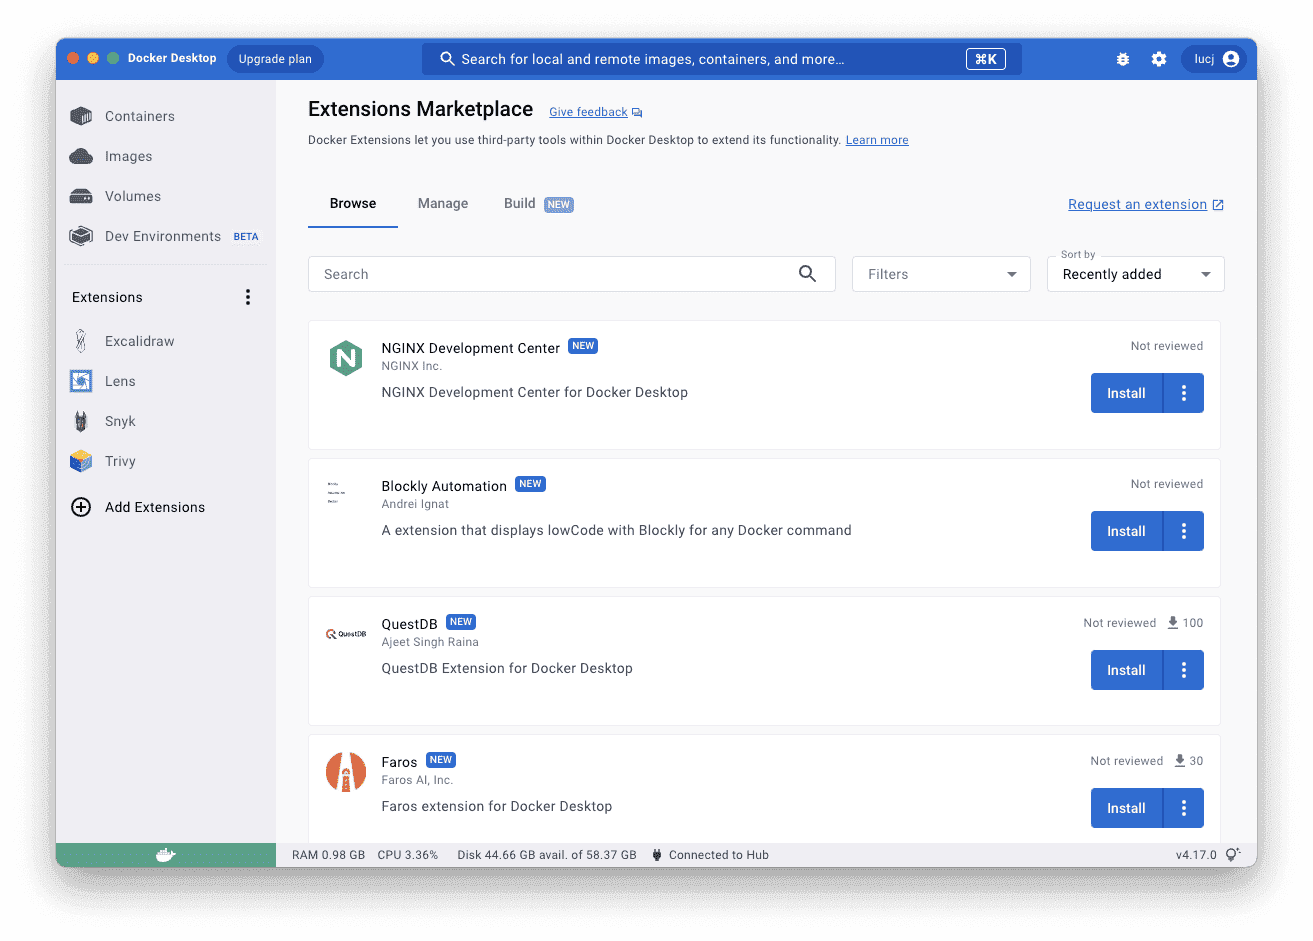
Note: a couple of extensions have already been added on the screenshot above.
To name a few of the extensions currently available:
- Lens: Kubernetes dashboard
- Portainer: container management platform
- Aqua Trivy, Snyk, JFrog: vulnerability scanners looking for vulnerability in images
- Drone CI : engine allowing to run CI pipeline in Docker Desktop
- Excalidraw, a virtual whiteboard for sketching hand-draw like diagrams
The list of extensions is updated quite often as developers release new ones. Installing an extension is a one-click step, the installation triggers the retrieval of the image the extension is packaged in and runs a container out of it.
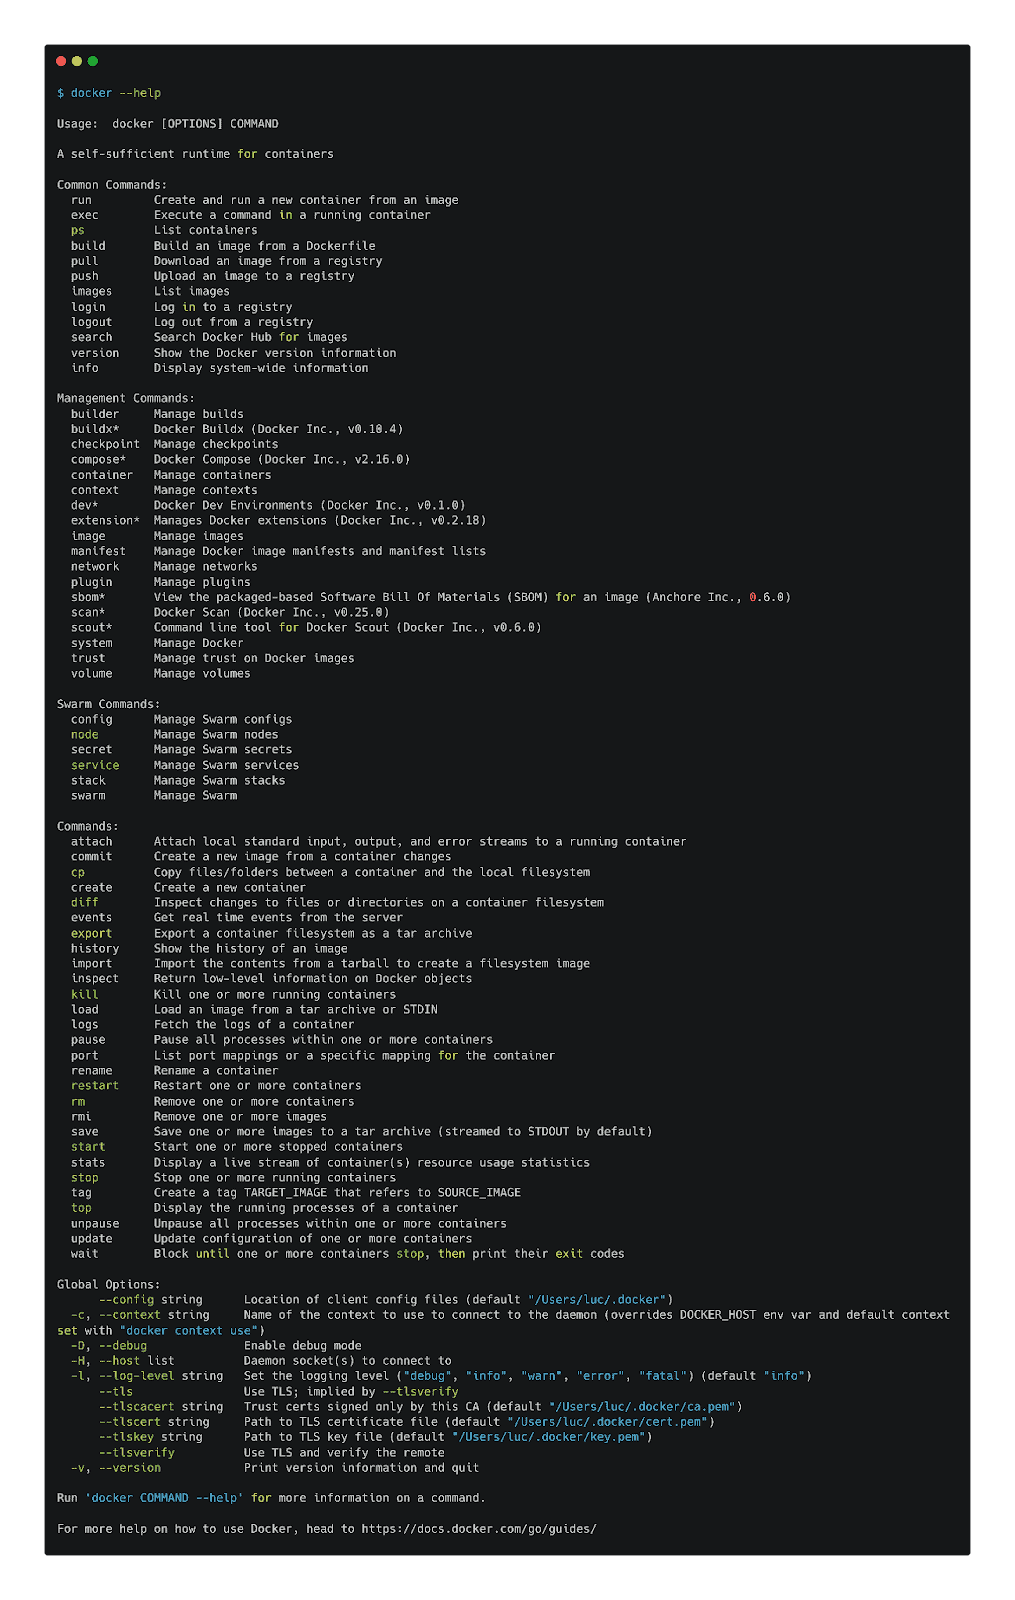
Once Docker is up and running we can use the docker client to perform many different actions
Building an image
From the command line we first build an image of our demo app:
docker image build -t podinfo:0.1
Once built we can see the image appears in the Images section of the Dashboard, alongside the images each extension is built into. Images can also be listed from the command line:
docker image ls
Running a container
From the image we can run a container exposing podInfo’s default port on the host:
docker container run -p 9898:9898 podinfo:0.1
The interface is then accessible on localhost:9898

We saw the simple commands to:
- build an image of the application (docker image build)
- run a container out of this image (docker container run)
Docker allows you to do much more as it also provides commands to:
- manage networks, the way containers can communicate
- volumes so containers can store data
- Swarm clusters, an alternative to Kubernetes little used nowadays
Multi-containers applications
Along with Docker Desktop comes Docker Compose, aka as Compose. This is a tool widely used in development to run multi-containers applications. The Compose Spec (https://www.compose-spec.io/) is the format used to define an application in the Compose way.
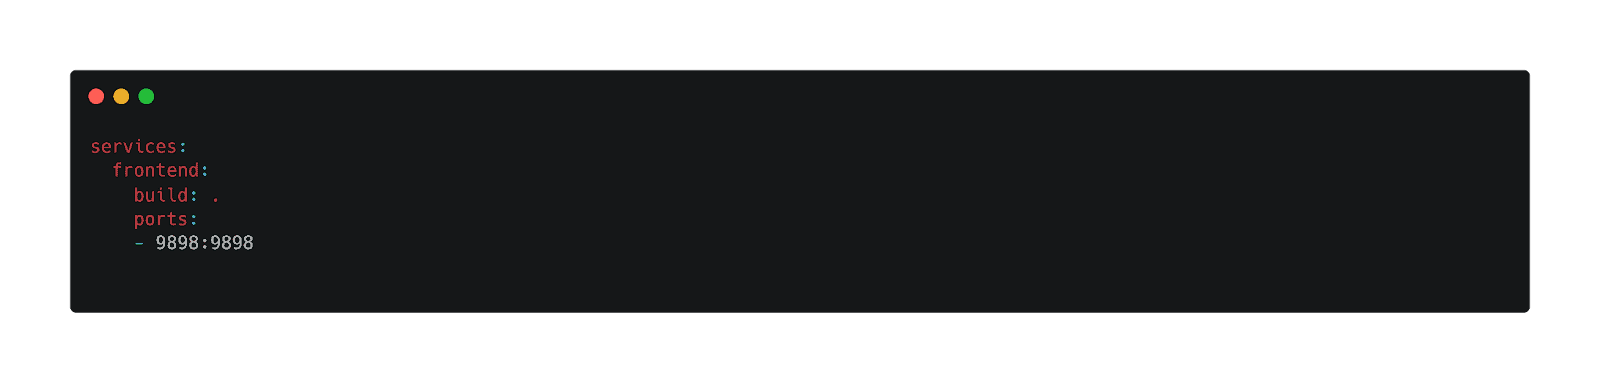
In the example of our demo application, we use the following compose.yaml file to define the app as a Compose application. This over-simplified specification only runs a single container but we additional containers can be defined under the services property:
compose.yaml
services:
  frontend:
    build: .
    ports:
    - 9898:9898
Running the application is as easy as
docker compose up -d
Docker Compose first builds a new image based on the Dockerfile in the current folder, then it runs a container out of it. Via the definition of the ports the application is available on localhost port 9898.
The compose application can be removed with
docker compose down
In the development environment, Docker Compose allows to run a whole microservice application in containers and make sure (via init process and volume mounts) that each time a code is changed from the local IDE the application is automatically reloaded taking into account those changes. This allows to speed up the development process.
An application defined in the Docker Compose format (thus following the Compose Spec) can almost be deployed asis in a Docker Swarm cluster. Swarm might not be the future of the orchestrators but its simplicity might make it a good candidate if you do not want to mess up with Kubernetes right now).
Kubernetes
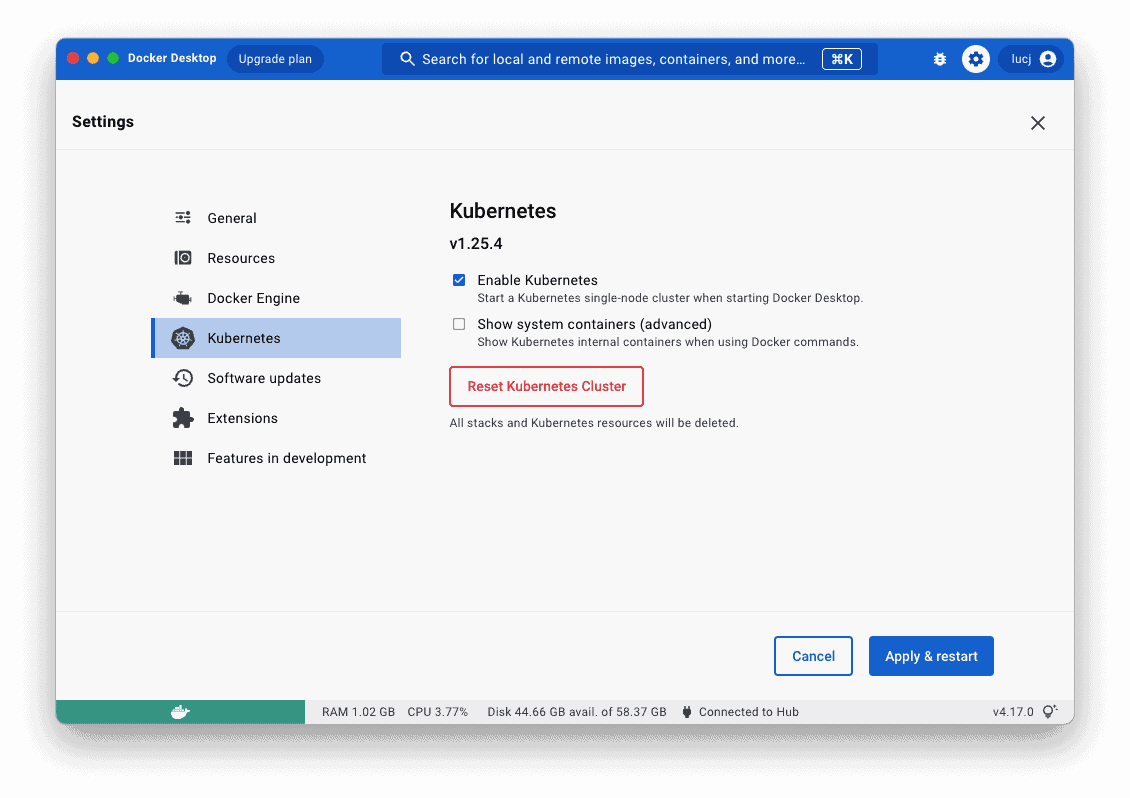
Docker Desktop also comes with a Kubernetes distribution which can be activated from the settings menu.
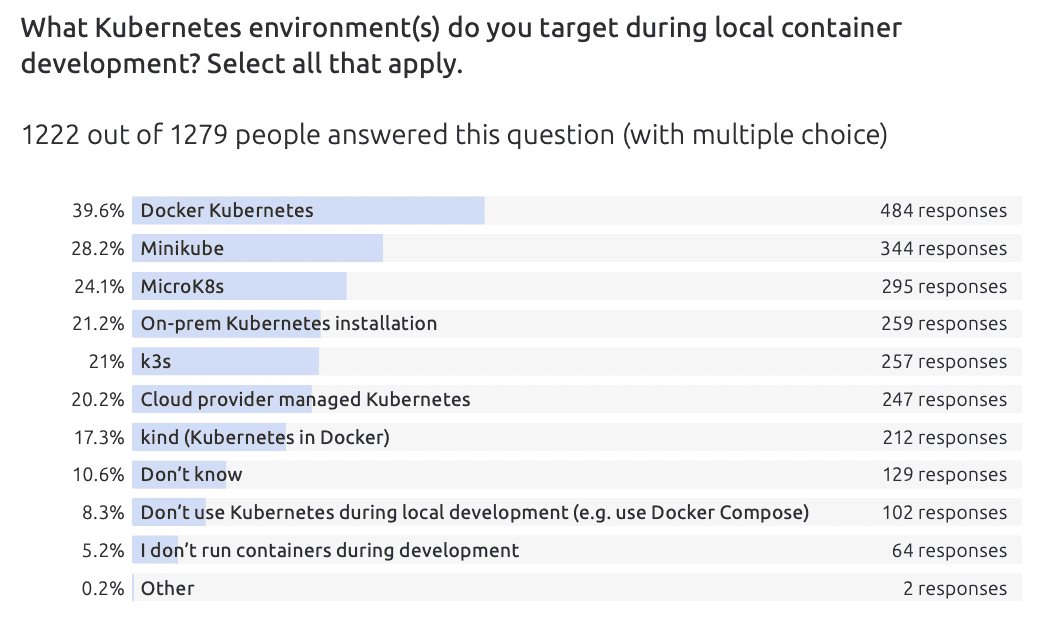
From the Cloud Native Report 2022, the Kubernetes distribution packaged with Docker Desktop is the most used in a development environment (among the 1200+ participants in the survey):
Once Kubernetes is activated, any new shell will end up in the docker-desktop Kubernetes context. The demo application can then be deployed in this one-node cluster. This would require creating a Kubernetes yaml specification first as Kubernetes does not understand a Compose specification (at least so far).
As defined in this repo https://github.com/stefanprodan/podinfo/tree/master/deploy, the frontend part could be deployed to Kubernetes using the specification of a Deployment resource similar to the following one (this specification is minimalist and would need much more details and properties when deployed in a production environment though):
apiVersion: apps/v1
kind: Deployment
metadata:
  name: frontend
spec:
  selector:
    matchLabels:
      app: frontend
  template:
    metadata:
      labels:
        app: frontend
    spec:
      containers:
      - name: frontend
        image: ghcr.io/stefanprodan/podinfo:6.3.5
        ports:
        - name: http
          containerPort: 9898
          protocol: TCP
On top of the Deployment a Service resource needs to be created to expose (read: make the application available) to the outside world. For that purpose we could use the following specification which makes the podInfo application available on localhost port 30000
apiVersion: v1
kind: Service
metadata:
  name: frontend
spec:
  type: NodePort
  selector:
    app: frontend
  ports:
    - port: 80
      targetPort: 9898
      nodePort: 30000
Using the kubectl binary we can then create the Deployment and the Service
kubectl apply -f deploy.yaml -f service.yaml
The web frontend is then available on localhost port 30000
One of the major drawbacks (at least for me) with Docker Desktop is the fact we cannot use the same specification to deploy the application on a Docker host (we use Docker Compose for that purpose) and on a Kubernetes cluster (we need to define Kubernetes yaml specifications first). This means a developer uses Docker Compose to develop / test his application and then needs to create other types of yaml resources to deploy the same application in a Kubernetes cluster.
Note: At the end of 2021, Docker announced a pricing change for Docker Desktop, which was previously free. Companies using Docker Desktop must now purchase a license if the number of developers using the platform is greater than 250 or if the company has a net turnover greater than $10M. This new price model, even if you think it is justified (it should be remembered how Docker has radically changed our daily lives as dev/ops/sysadmin/…), made many companies look at Docker Desktop alternatives.
Why should you use Docker Desktop?
- you are used to docker and want to stick with docker related tools
- you do not want (or do not need) to use Kubernetes right from the development environment
- you develop and deploy the app locally with Docker Compose and deploy them on Swarm clusters in production
- the number of developers using Docker Compose in your company is less than 250 and your company has a net turnover less than $10M
Why shouldn’t you use Docker Desktop?
- you want to use the same tools and define your application in the same way for both development and production environments
- you want to deploy your application on a Kubernetes cluster right from the development phase
- your company does not allow to use Docker Desktop anymore because of the pricing change
Rancher Desktop
Rancher Desktop is one of Docker Desktop alternatives. It is available for MacOS, Windows and Linux and can be downloaded from https://rancherdesktop.io. Rancher Desktop allows us to:
- manage images and containers using a docker client and a dockerd daemon in the same way we can do it with Docker Desktop
- manage images and containers using containerd via nerdctl, the containerd command line tool. Note: containerd is a CNCF graduated project, it’s the container runtime used by dockerd itself to run containers
- deploy containers in Kubernetes Pods using standard kubectl and helm tools
As detailed in the picture below, Rancher Desktop embeds several clients to communicate with several types of backend:
- docker client
- nerdctl (contaiNERD CTL)
- kubectl and Helm
The image below gives a high level view of Rancher Desktop architecture
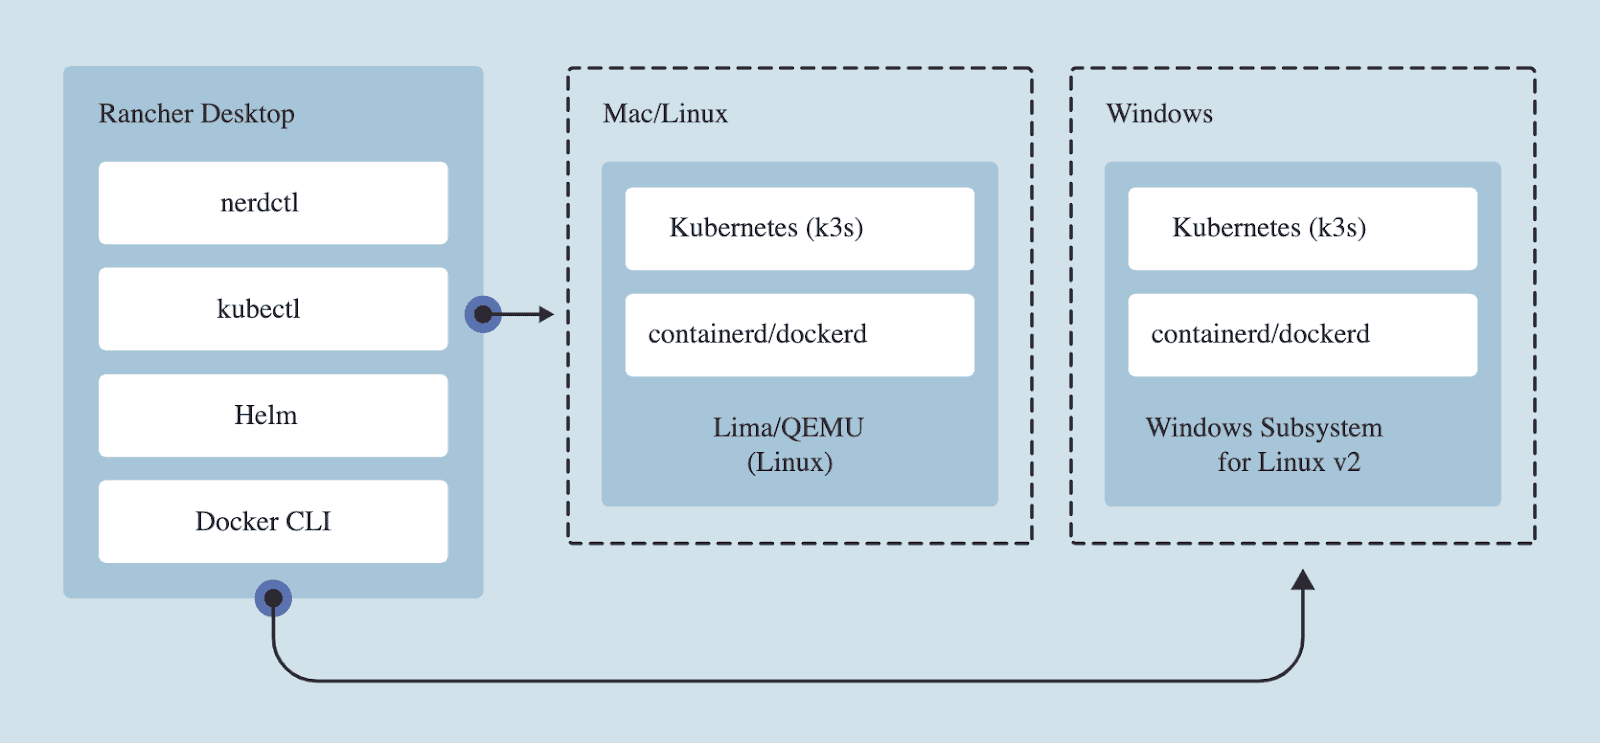
On MacOS and Linux, Rancher Desktop runs a Lima Virtual machine (https://github.com/lima-vm/lima) whereas on Windows it uses WSL2
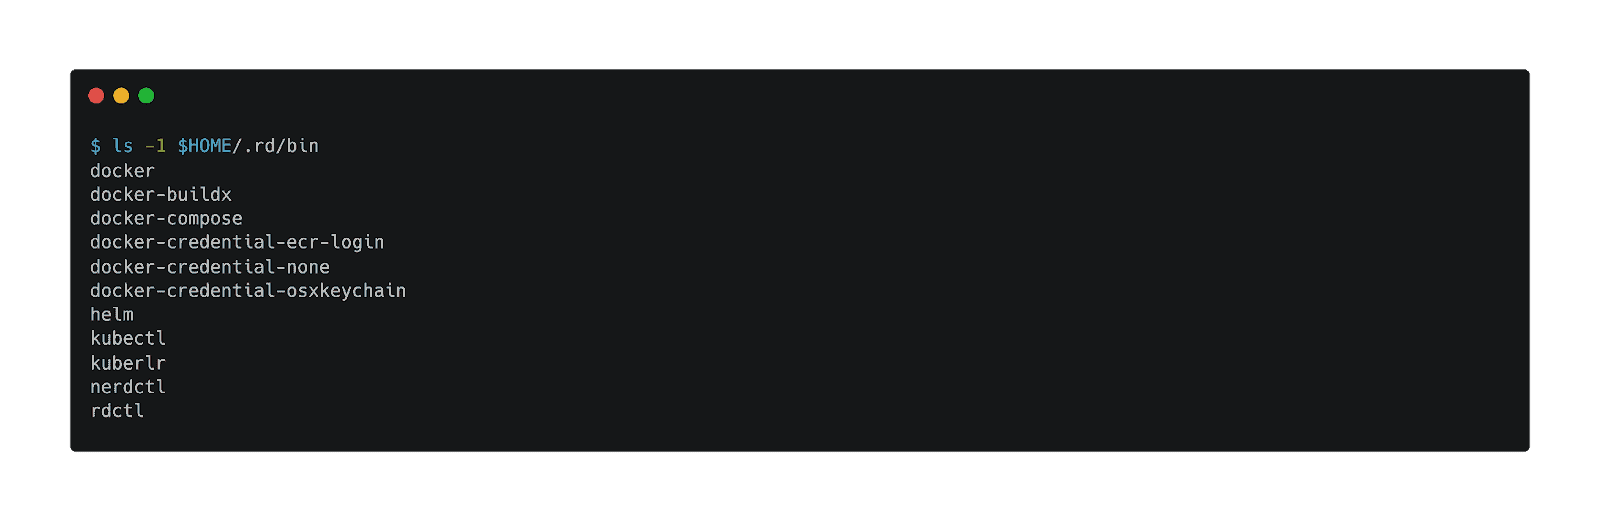
Rancher Desktop comes with several binaries available in the $HOME/.rd/bin folder:
When starting Rancher Desktop we must specify the container runtime we want to use among containerd and dockerd (moby). We can also enable Kubernetes and select the version we want to use.
Using a docker client with docker daemon
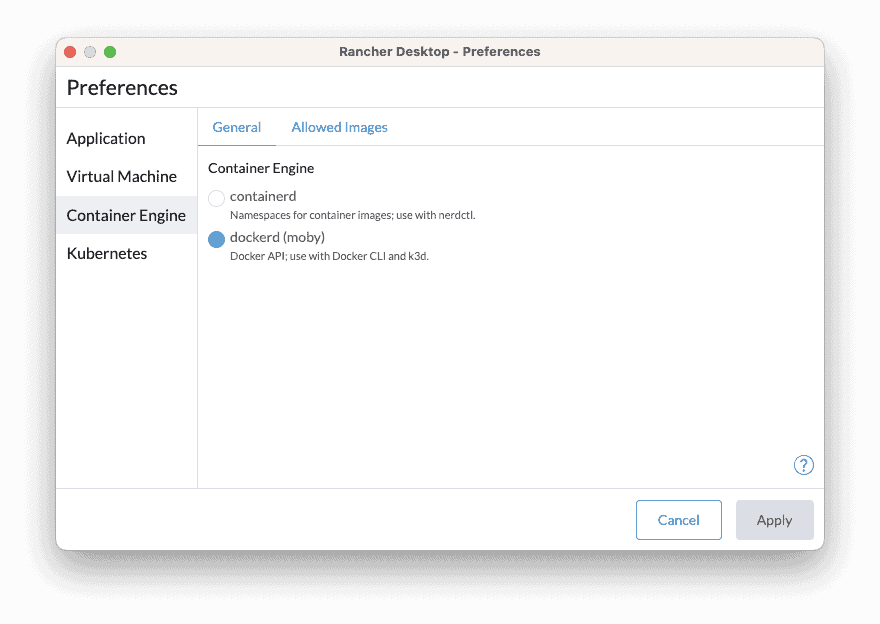
From the Preferences, we first start Rancher Desktop without enabling Kubernetes and use dockerd (aka moby) as the container engine
This configuration is the same we have when using Docker Desktop, a docker client communicating with a docker daemon.
First we build an image of our application::
docker build -t podinfo:1.0 .
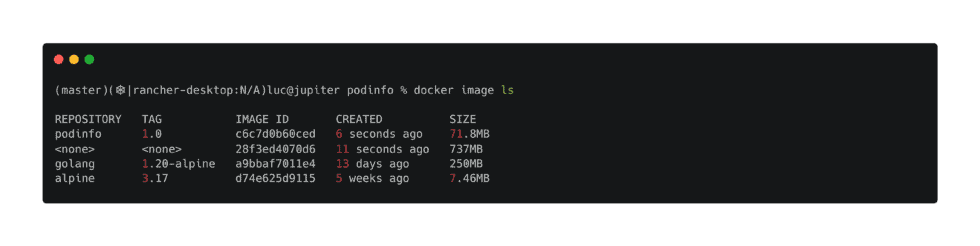
Next we verify this image exists locally:
The image podinfo:1.0 has correctly been created
Next we run a container from this image:
docker container run -p 9898:9898 podinfo:1.0
Then we verify the podInfo frontend is accessible on localhost port 9898.
Docker Compose can also be run in the same way it is with Docker Desktop.
Note: some time ago Rancher Desktop only packaged nerdctl / containerd (this will be covered in the next part), it now also packages docker / dockerd (moby) to build/run/deploy containerized applications.
Using nerdctl with containerd
With Rancher Desktop we can use containerd instead of dockerd as the container engine. This can easily be changed in the Container Engine menu in the Preference window.

With this configuration, it’s not possible to run commands using the docker client as this one can only communicate with the docker daemon which is not running anymore:
docker client cannot communicate with containerd

As the error above suggests, we need to use a containerd client instead. Here comes nertctl (contaiNERD CTL) which is available in $HOME/.rd/bin. nerdctl is a Docker-compatible CLI for containerd. The goal of nerdctl is to facilitate experimenting with cutting-edge features of containerd that are not present in Docker. Such features include, but not limited to, lazy-pulling (stargz) and encryption of images (icecrypt).
From its github repository (https://github.com/containerd/nerdctl), nerdctl is defined as a Docker-compatible CLI for containerd.
- Same UI/UX as docker
- Supports Docker Compose (nerdctl compose up)
- [Optional] Supports rootless mode, without slirp overhead (bypass4netns)
- [Optional] Supports lazy-pulling (Stargz, Nydus, OverlayBD)
- [Optional] Supports encrypted images (ocicrypt)
- [Optional] Supports P2P image distribution (IPFS)
- [Optional] Supports container image signing and verifying (cosign)
Using nerdctl we can create a new image of the podinfo application the same way we would do it using the docker client (see the UX is pretty much the same):
nerdctl build -t podinfo:2.0 .
Next we verify the image is present locally:
podinfo:2.0 image built using nerdctl / containerd
Then we run a container from this image, publishing the container port 9898 on the port 3000 on the host:
nerdctl run --rm -p 3000:9898 podinfo:2.0
The web frontend of the podinfo application is thus available on localhost port 3000
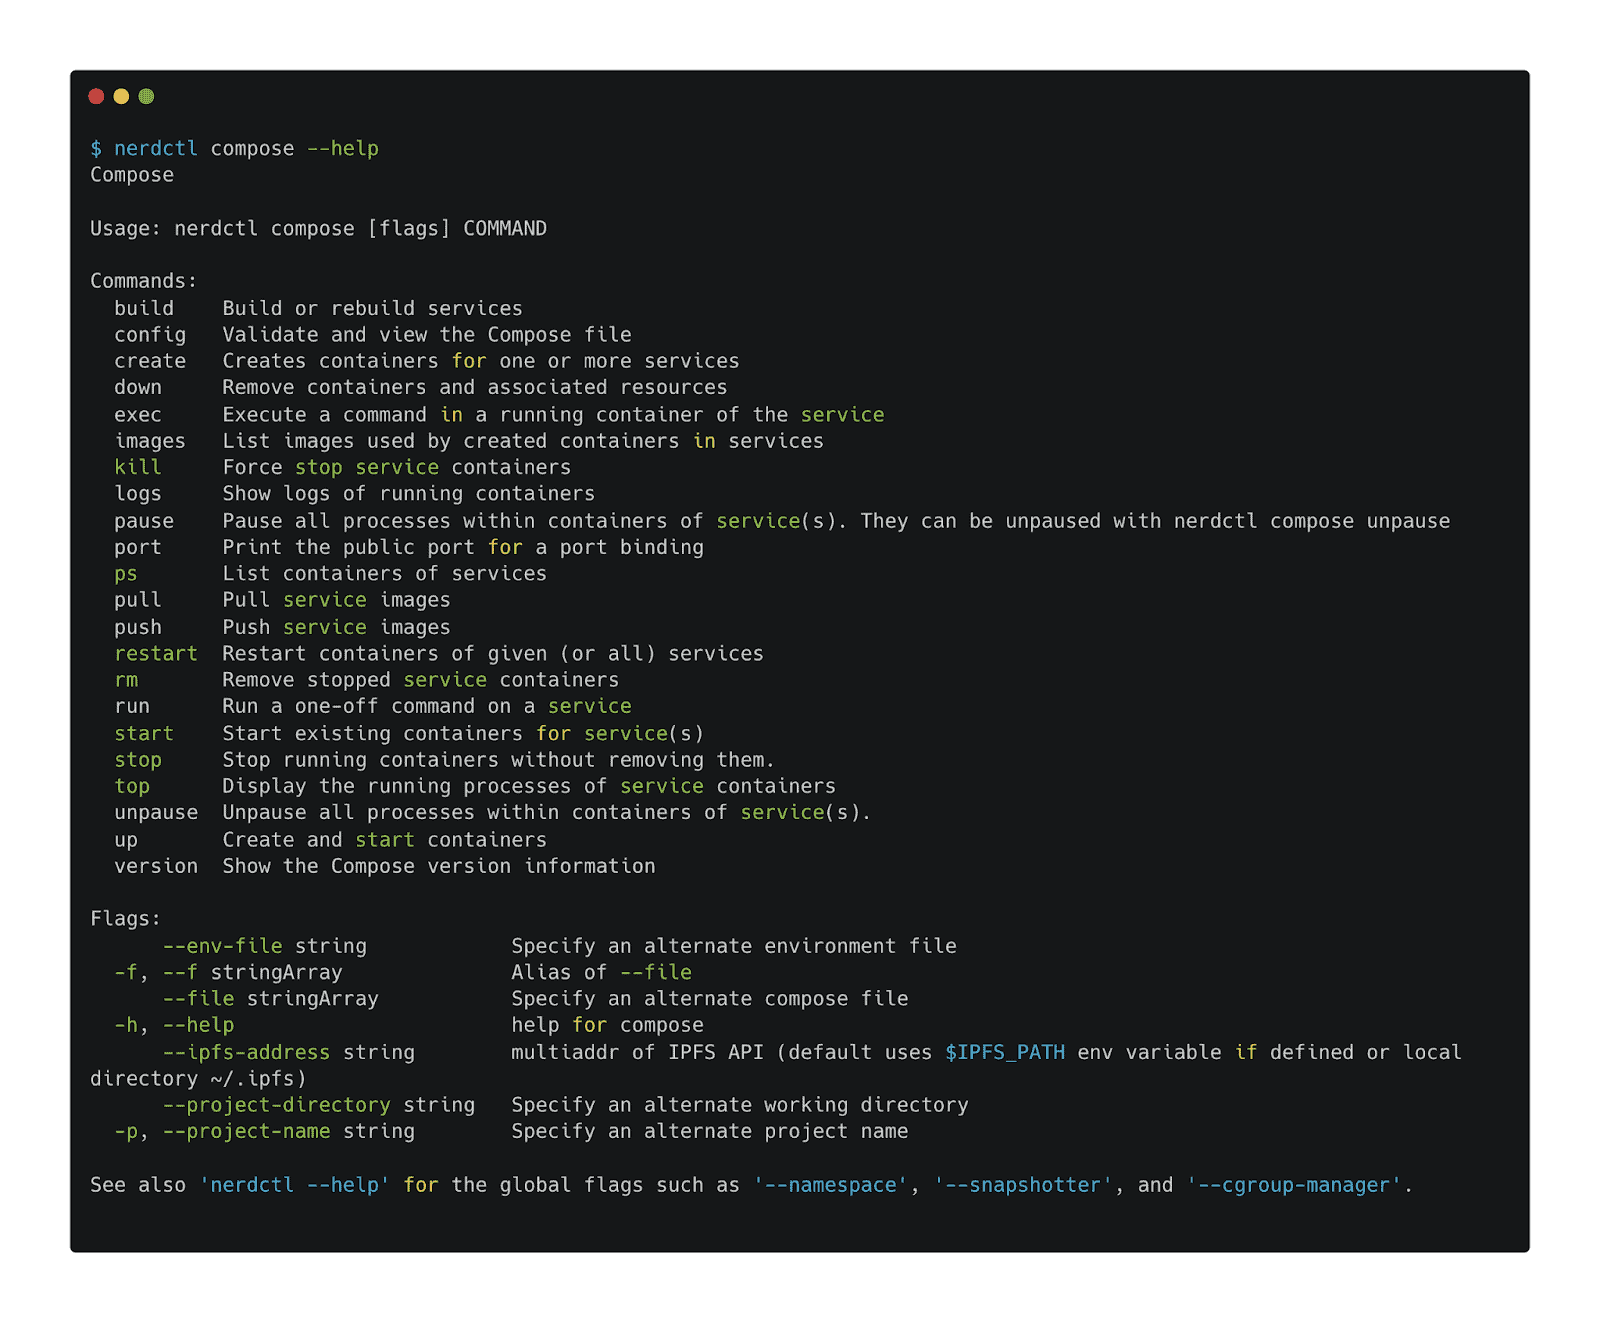
Using nerdctl we can run applications defined in the Docker Compose format as well. The following output shows all the commands we can use to manage such applications.
Let’s consider one more time the (over-simplified) Compose definition we used previously:
services:
  frontend:
    build: .
    ports:
    - 9898:9898
We can run the application with nerdctl:
nerdctl compose up -d
The podinfo image is built and a container runs allowing us to access the podinfo application on localhost port 9898 this time.
We can then delete the application as follows:
nerdctl compose stop
nerdctl compose rm
We’ve just illustrated 2 basic commands used to manage Compose applications with nerdctl, the major part of the Docker Compose commands are also implemented in nerdctl.
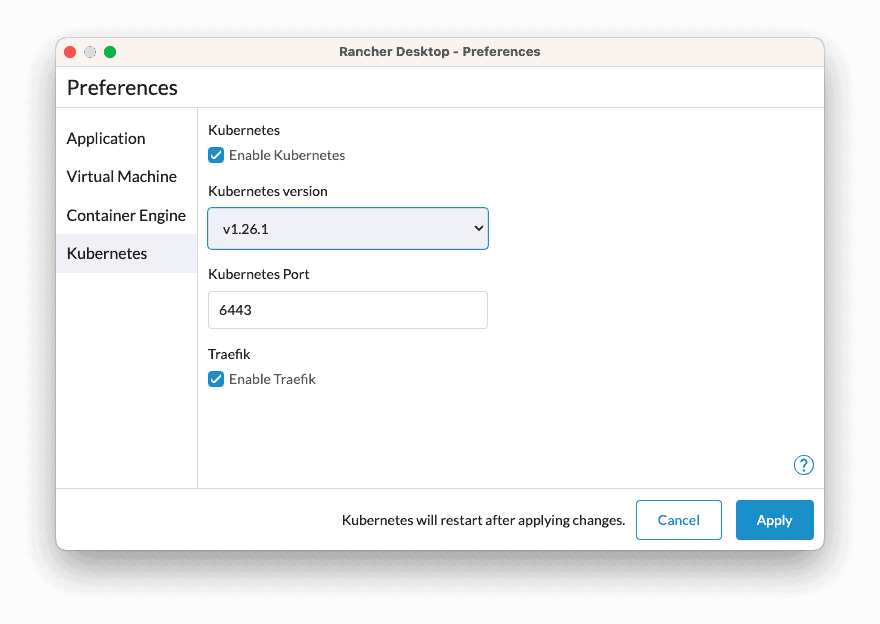
Using Kubernetes in Rancher Desktop
From the Preferences dialog, we can enable Kubernetes and select the version to install

It takes a few tens of seconds for a single node Kubernetes to be up and running. We can then open the Cluster Dashboard, it provides a detailed view of the main resources of the cluster.
As many Kubernetes dashboard, resources are grouped by category:
- Workloads
- Service Discovery
- Storage
- Policy
- other resources
Note: other tools might categorize resources in a slightly different way though
In order to see the images used in the Kubernetes cluster we need to specify k8s.io as the namespace
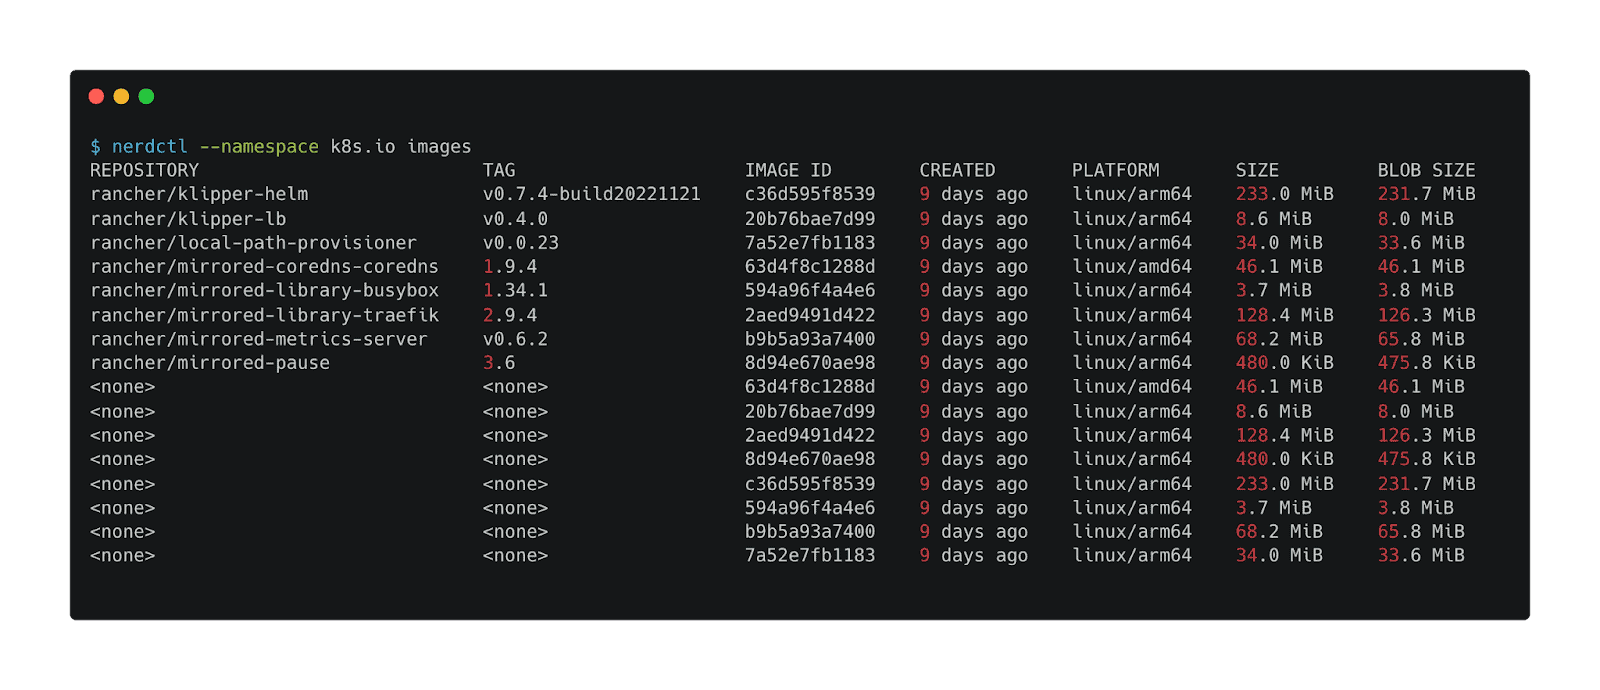
Let’s now use nerdctl to build our simple app in Kubernetes:
nerdctl --namespace k8s.io build --tag podinfo:3.0 .
Next we verify this new image is present:
nerdctl built the image podinfo:3.0 thus making it directly available in the underlying Kubernetes cluster

Without having to publish that image in a registry, we can run a Pod directly, and this is pretty cool.
kubectl run podinfo --image=podinfo:3.0
Then we use a port-forward to access the application on localhost port 3000
kubectl port-forward podinfo 3000:9898
Why should you use Rancher Desktop?
- it allows you to select containerd or dockerd as the container runtime and to switch between them to get to know both of them
- it uses the same container runtime as Kubernetes
- it allows to build images which are immediately available to use in your local workloads without any intermediate registry
- it’s also a great alternative if your company does not meet the criterias (in terms of net income and number of developers) to use Docker Desktop
Why shouldn’t you use Rancher Desktop?
- you only want to use docker (client and daemon) and do not need to use containerd
- you don’t want or need to use a local Kubernetes cluster in the development environment
- you do not use Kubernetes in production
Podman / Podman Desktop
Podman (https://podman.io) is a daemonless container engine for developing, managing, and running OCI containers on your Linux system. Containers can be run as root or in rootless mode. Podman lives under the RedHat umbrella, it was created as an alternative to Docker because in its early years dockerd only worked with root privileges, which is definitely not good for security reasons. Podman has almost the same CLI UX as the Docker client, which makes it easy to migrate from Docker to Podman. This migration often starts with the following alias definition which uses Podman under the hood without noticing it:
alias docker=podman
Podman Desktop (https://podman-desktop.io/) is an open source graphical tool enabling you to seamlessly work with containers and Kubernetes from your local environment. It is available for Windows, MacOS and Linux.
Setup the environment
Once downloaded we get to the Dashboard as illustrated by the screenshot below.
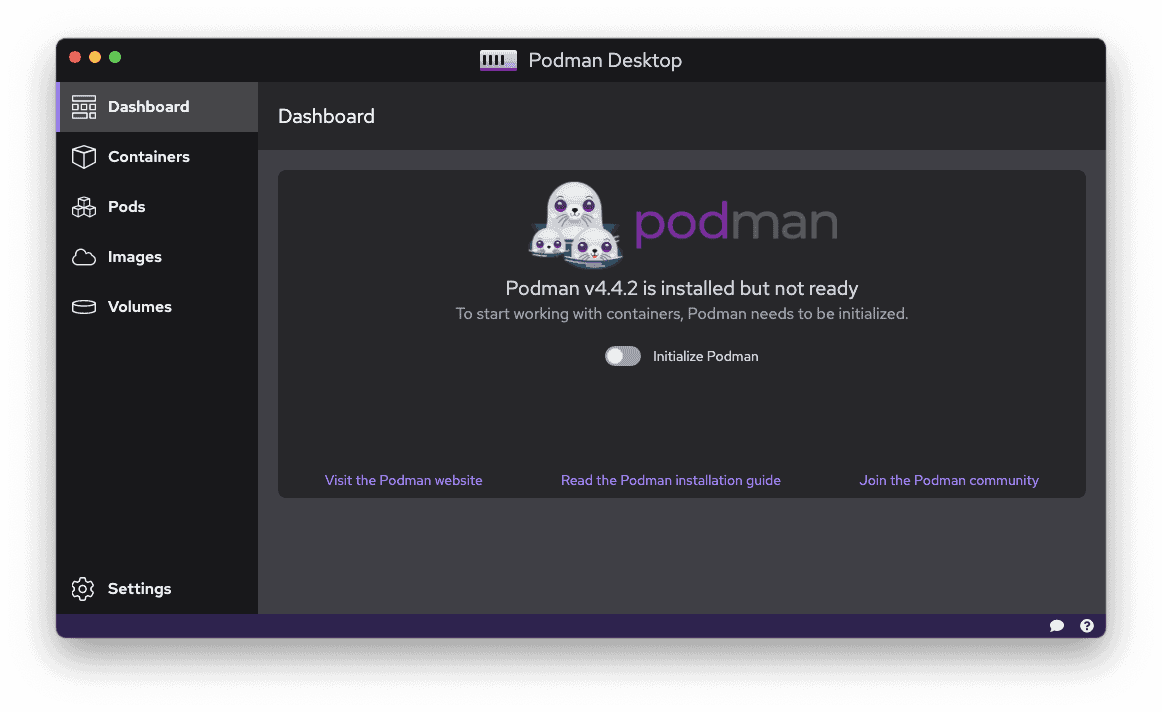
First we initialize Podman. In the background it launches a Linux VM with Podman inside of it.
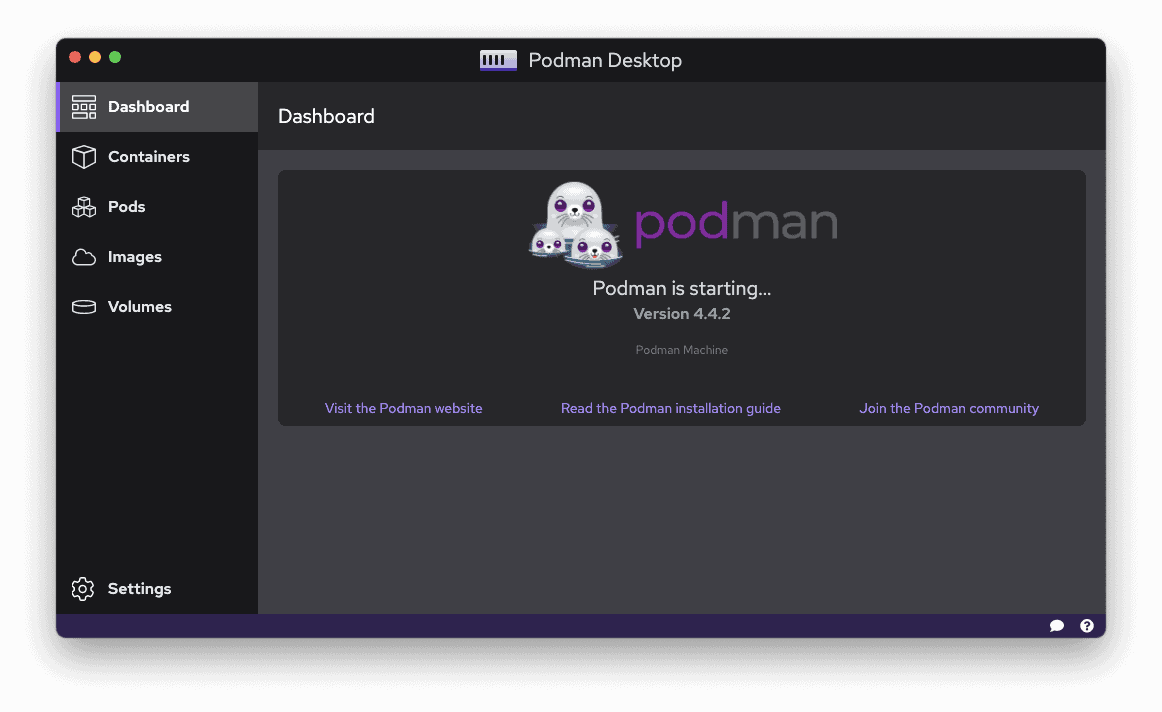
After a few tens of seconds Podman is ready. The initialization process can also be done from the command line:
podman machine init
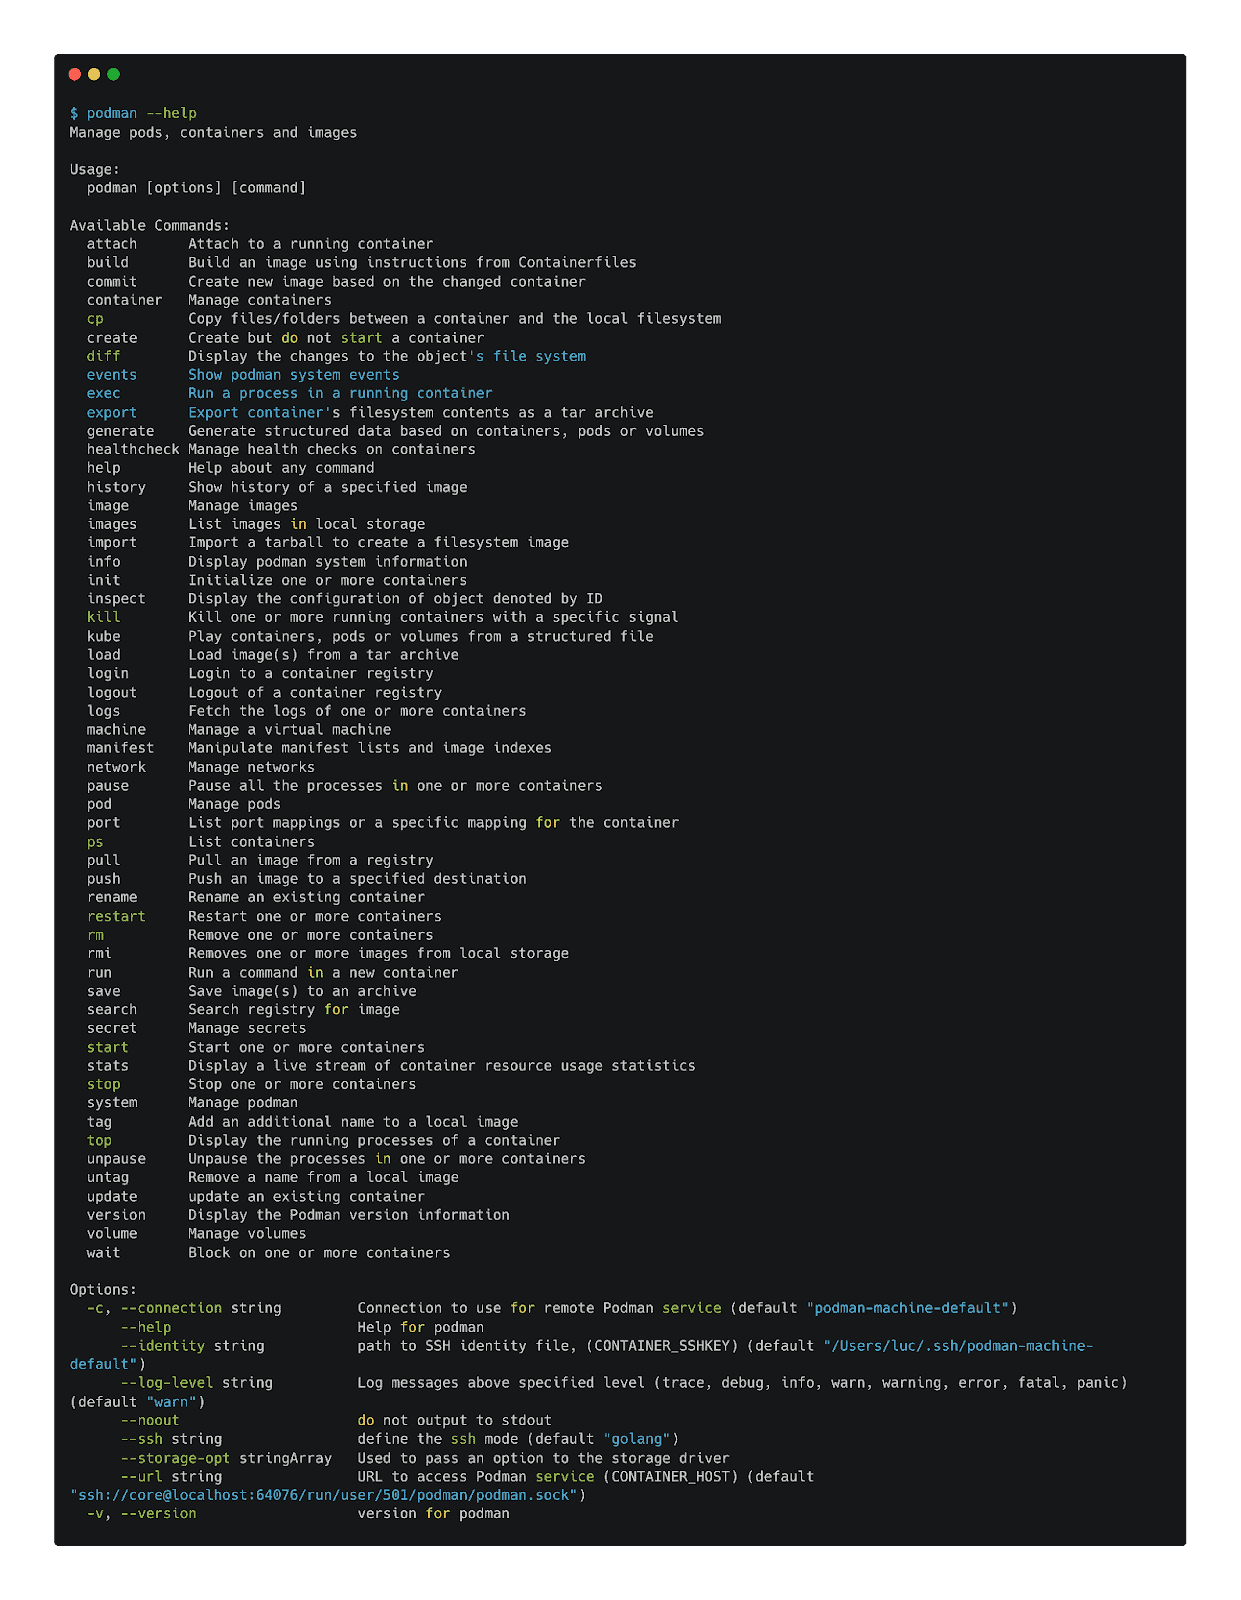
Once Podman is ready, we can list the available commands, many of them are related to the management of the containers’ lifecycle.
Building an image
To build an image for our sample application, we can use the command line. Podman’s UX is similar to the docker client’s one as exactly the same options/flags are used:
podman image build -t podinfo:1.0 .
Note: under the hood Podman uses Buildah (https://buildah.io) to build container images
Next we verify the image has correctly been created:
new podinfo image created with podman
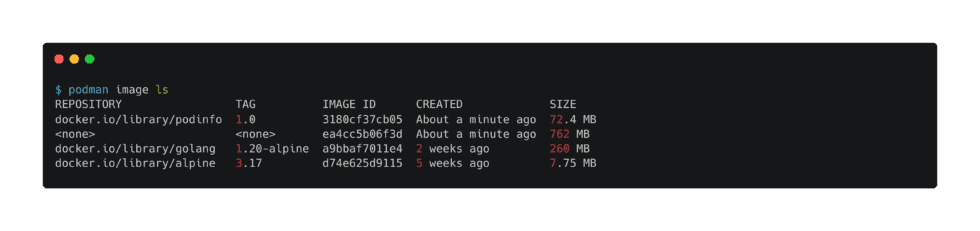
As indicated in the output above, the image is prefixed with docker.io/library by default.
An image can also be built using Podman Desktop. From the UI we need to select the Dockerfile (or a more generic Containerfile) and give a name to the image which will be built:
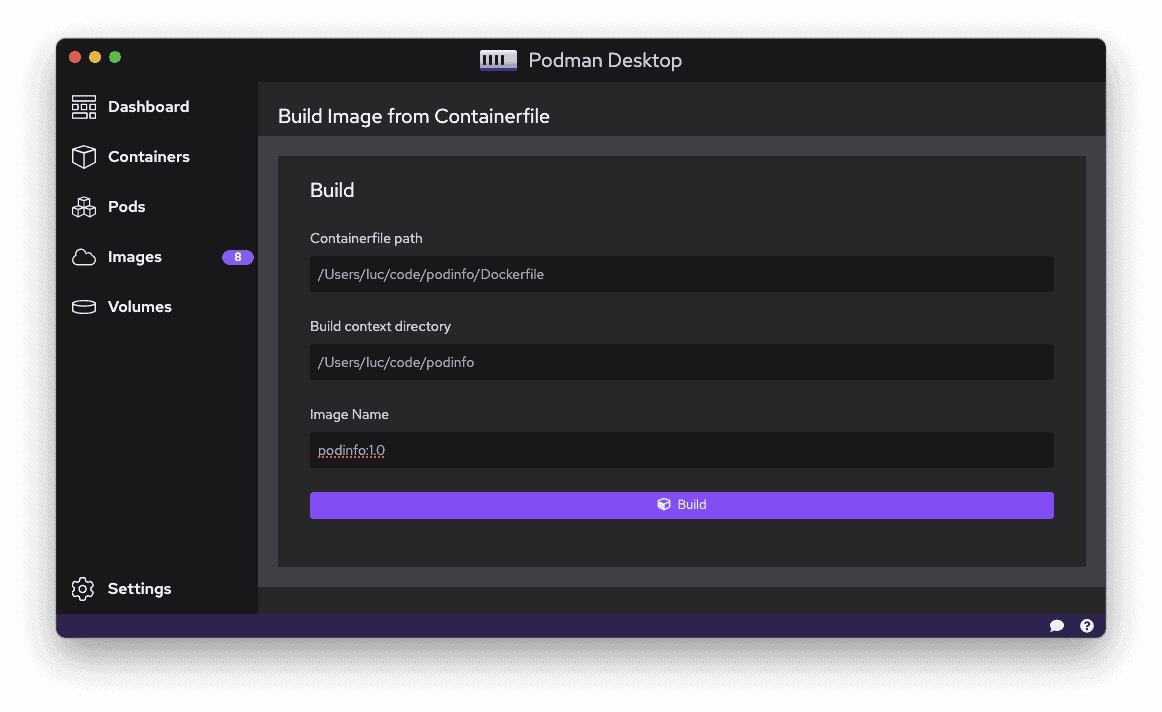
Next we trigger the build.
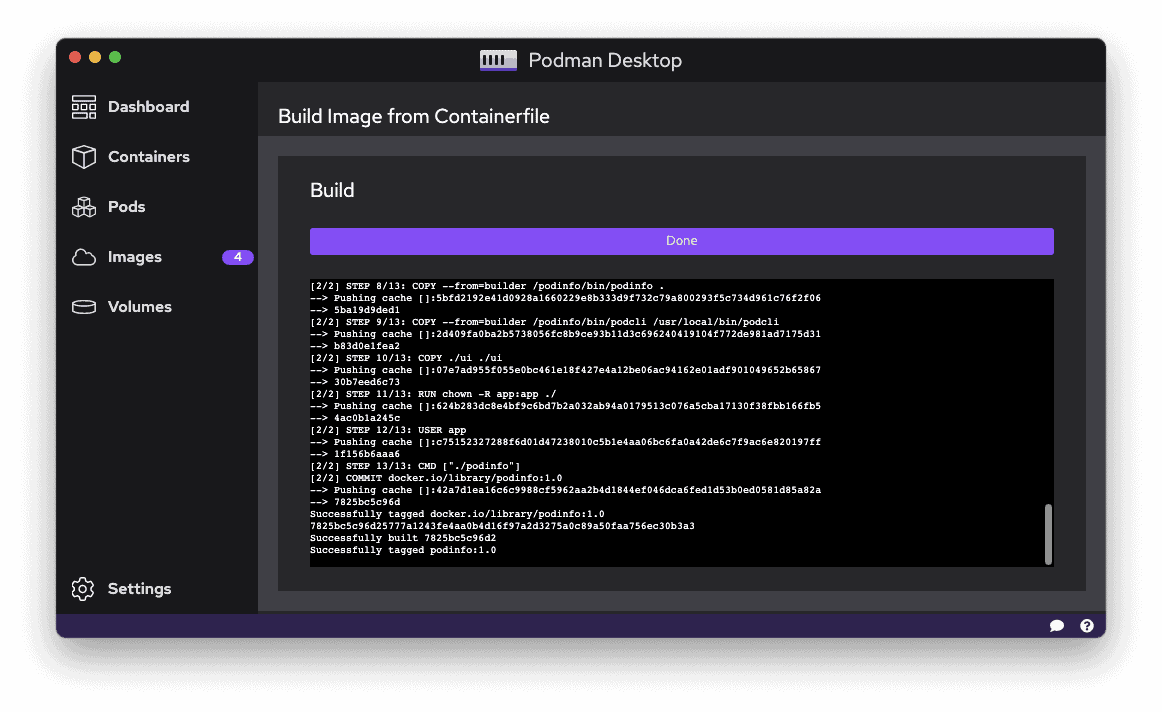
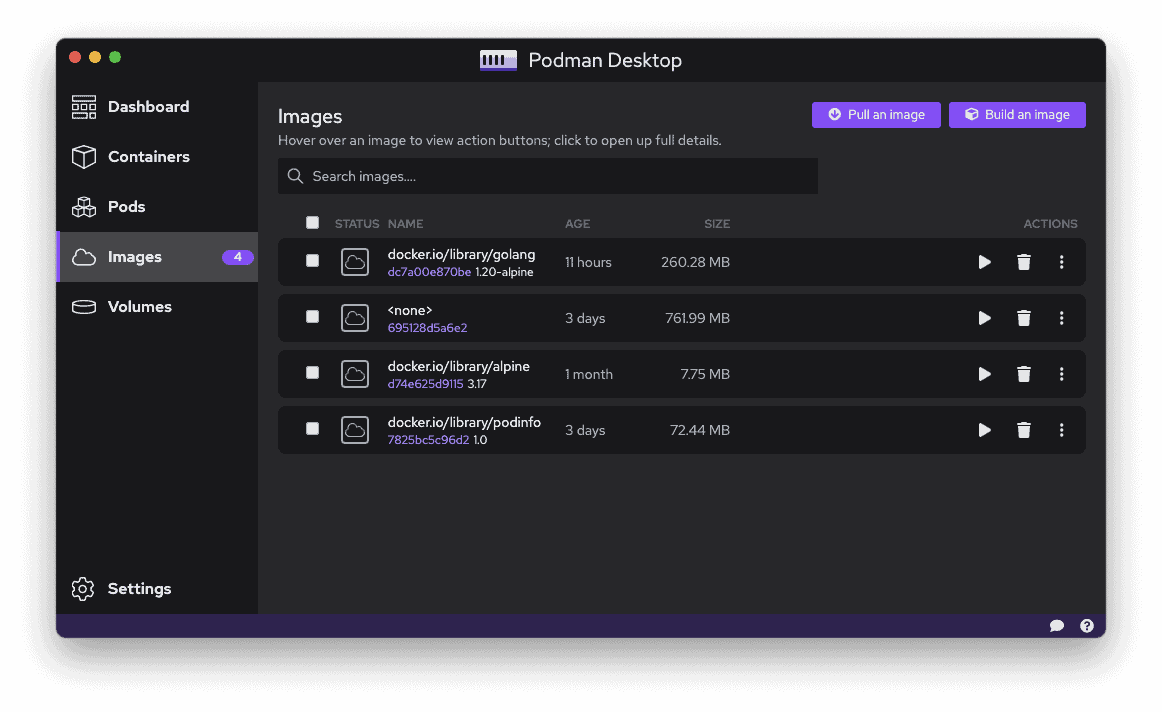
From the image menu we can see the newly created image (docker.io/library/podinfo:1.0) alongside the images retrieved during the build process. Alpine and golang images were indeed needed to build the podinfo image.
Running a container
Once the image is built we can run a container from the command line. Once again we can see the options/flags are exactly the same as the ones we use with the docker client.
podman container run -p 9898:9898 docker.io/library/podinfo:1.0
Next we can list the containers:
podman container ls
Containers can be created using Podman Desktop as well. From the UI we need to select the image to use (docker.io/library/podinfo:1.0 in our example):

Next we need to enter the container’s basic configuration parameters:
- container’s name
- bind-mount definition: file or folder on the host which must be mounted in the container’s filesystem
- ports mapping
- environment variables
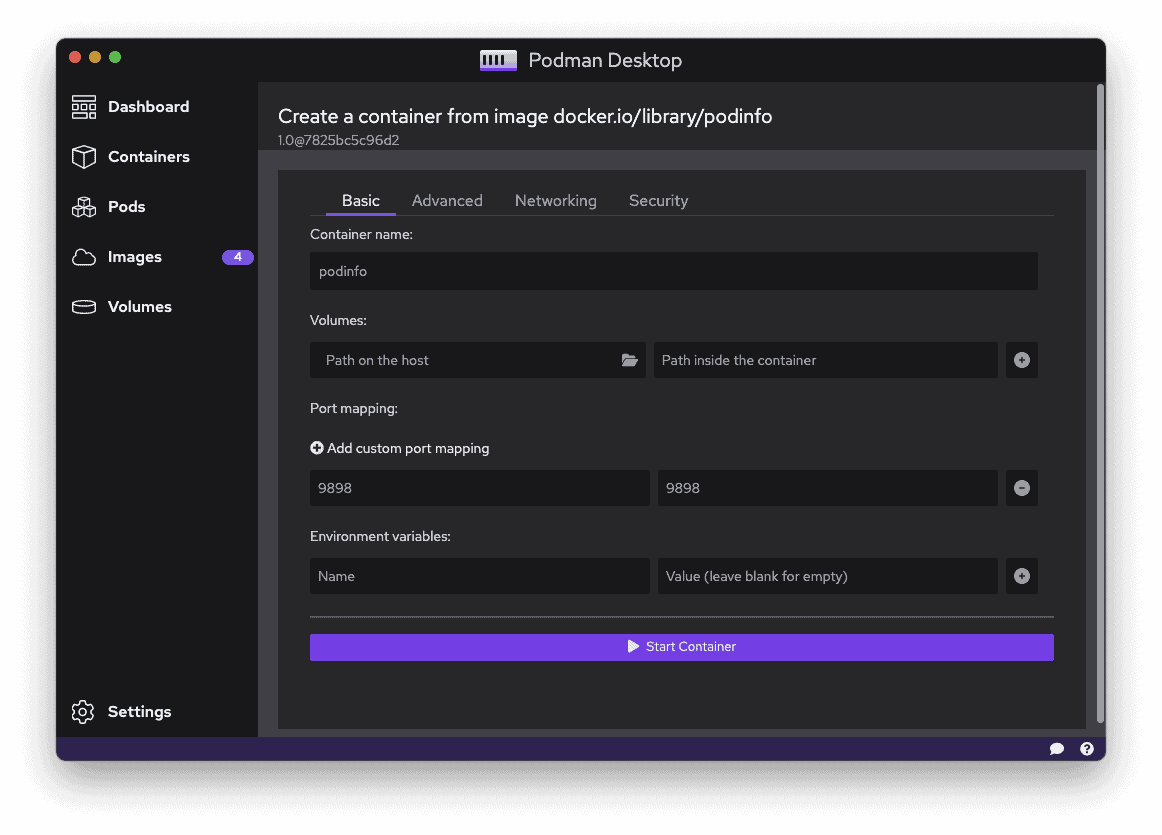
Additional parameters can be defined as well for a more granular configuration (networking, security, …).
Once the container is started it appears in the Containers menu
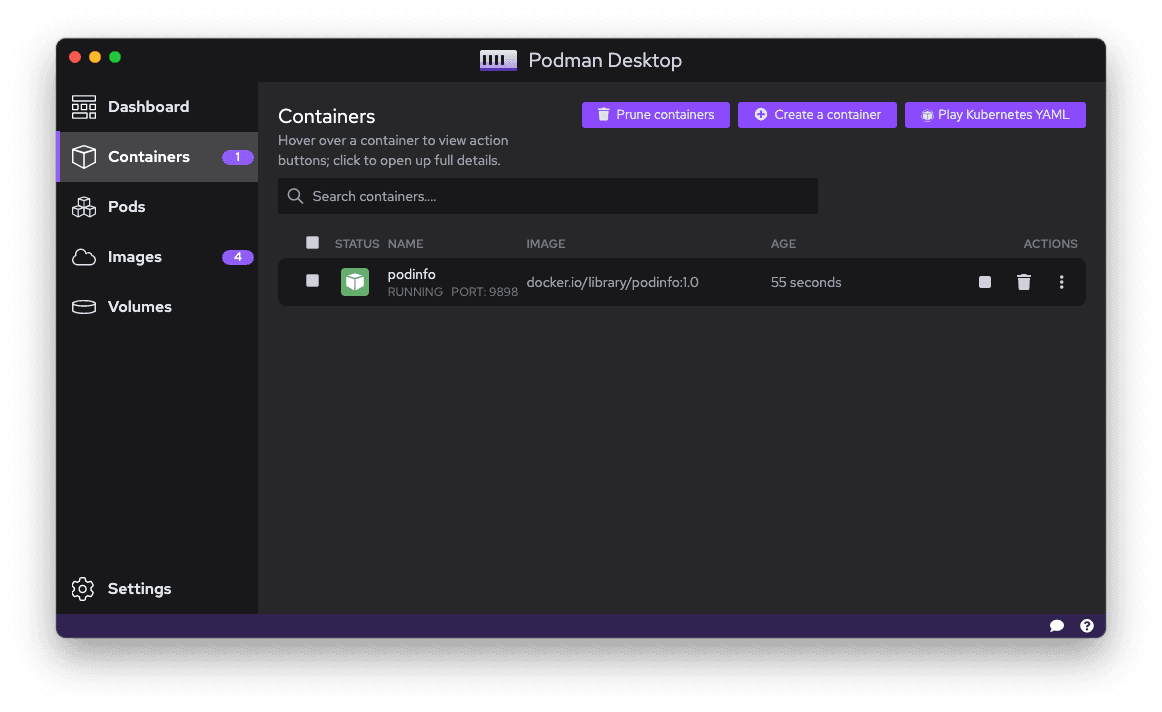
From this interface we can get many information regarding the running container such as:
- the detailed container’s specification as known by Podman
- the container’s logs
- we can also get a terminal with a shell in the container
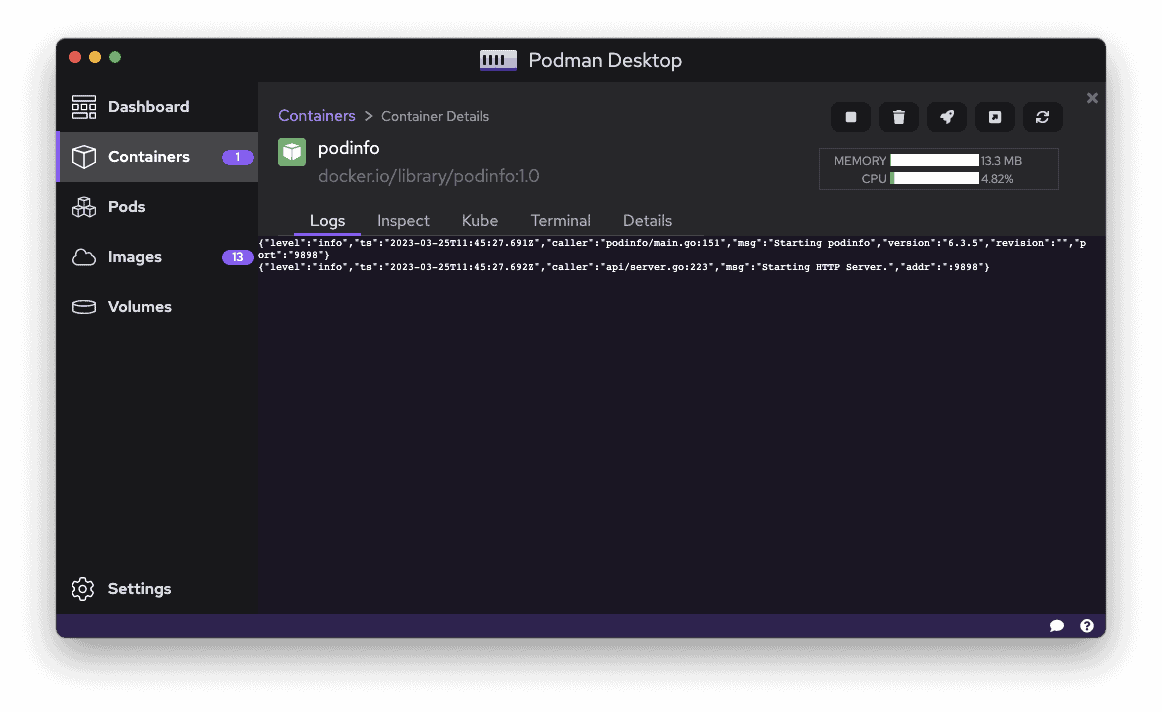
container’s logs directly accessible from Podman Desktop
On top of that we also get a yaml specification we can use to create a Pod in a Kubernetes cluster
# Save the output of this file and use kubectl create -f to import
# it into Kubernetes.
#
# Created with podman-4.4.2

apiVersion: v1
kind: Pod
metadata:
 creationTimestamp: "2023-03-25T11:48:35Z"
 labels:
   app: podinfo-pod
 name: podinfo-pod
spec:
 containers:
 - image: docker.io/library/podinfo:1.0
   name: podinfo
   ports:
   - containerPort: 9898
     hostPort: 9898
   securityContext: {}
   tty: true
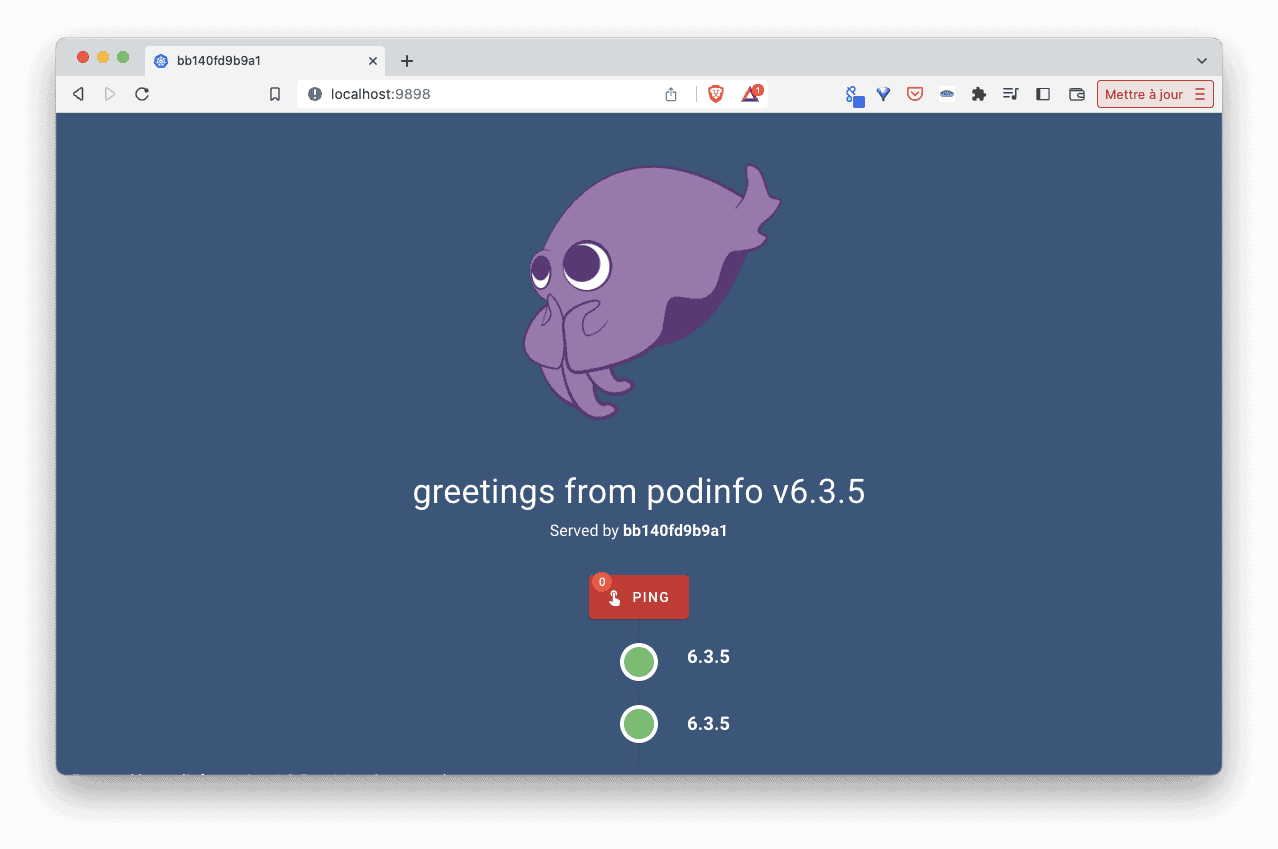
Ran from the CLI or from the UI we can access the podinfo container on localhost port 9898
Deleting a container can be done via the UI or using the CLI
podman container rm -f podinfo
Multi container application
When it comes to multi container applications, Podman relies on Podman Compose, a tool which understands the Compose Spec. Podman Compose can be installed following the official documentation: https://github.com/containers/podman-compose#installation
Running Pod
As the name suggests, Podman seems to be somewhat related to Pod, a concept used in Kubernetes. In Kubernetes, a pod is the smallest unit used to deploy workloads (read containers). A pod is one or more containers that share namespaces and cgroups. If we have 2 containers that need to communicate on specific ports, instead of messing around getting the IP addresses and setting some kind of alias, we can create a pod and put the containers in it. They will communicate through the pods localhost interface. Using Pod in a local development environment can therefore make a lot of sense.
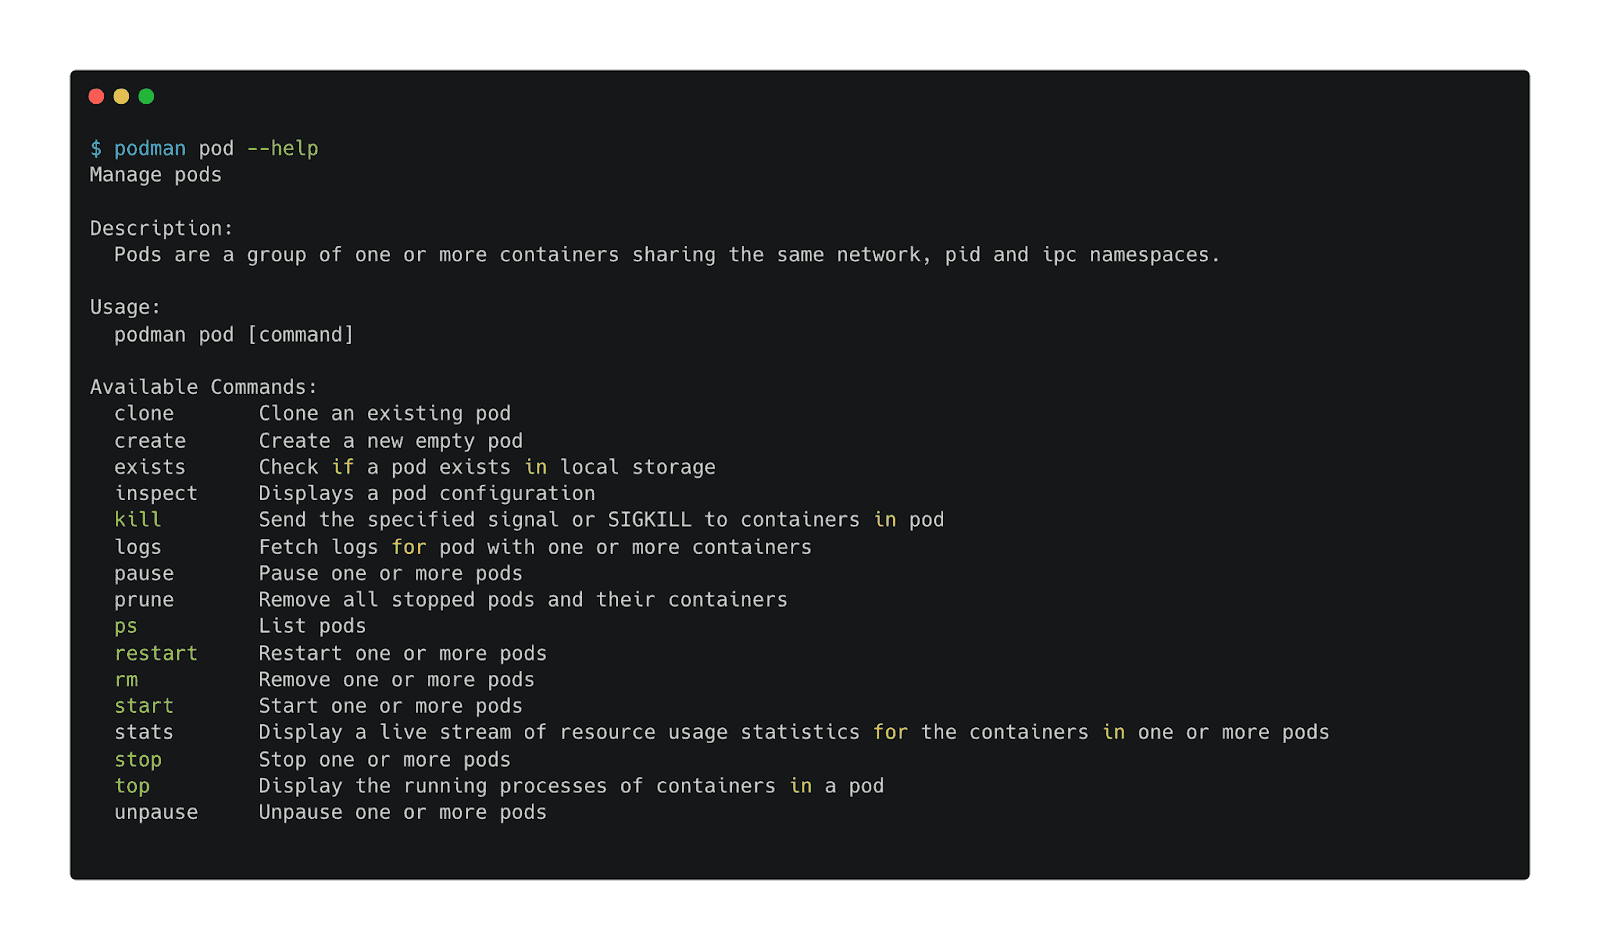
Podman’s pod’s subcommand allows it to manage Pod’s lifecycle. The available commands are listed below:
We can start creating an empty Pod named podinfo, making sure it publish the port 9898 of its network stack on the port 3000 of the host machine:
podman pod create -p 3000:9898 podinfo
Next we can run a podinfo container in that Pod:
podman run -dt --pod podinfo docker.io/library/podinfo:1.0
Listing the running Pods, we can see the podinfo ones contains 2 containers:
Running a container in an existing Pod with Podman

Note: the Pod above runs inside Podman’s VM and doesn’t need access to a Kubernetes cluster because Podman knows how to run pods on its own.
Inspecting the pod (either with the CLI or using the UI) we would see the details of those containers:
- infra container: the container in charge of “holding” the network stack. This container only waits infinitely
- the application container: the one running the podinfo application

The podinfo UI is accessible on localhost port 3000 as this is the port mapped against the host machine.
To go one step further we could add additional containers into the Pod, for instance adding a backend and a cache container to deploy the complete podinfo application (more on that in https://github.com/stefanprodan/podinfo/tree/master/deploy/webapp)
Removing a running Pod can be done from the UI or from the CLI:
podman pod rm -f podinfo
Note: the above command uses the -f flag to force the deletion of the Pod and of the containers (still running) it contains.
Kubernetes
Podman has several commands to interact with Kubernetes in differents ways as shows the help of the podman kube command:
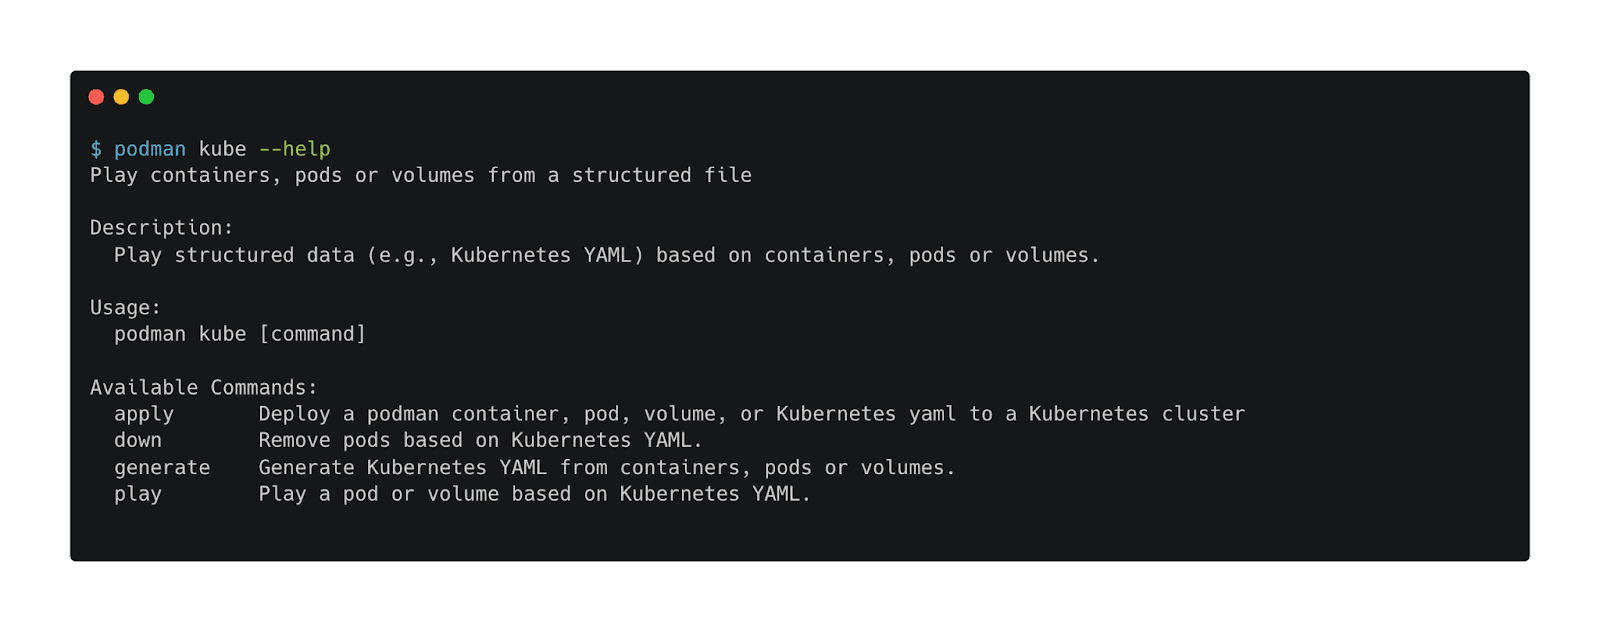
Among those commands:
- podman kube generate generates Kubernetes manifests out of podman Pods so you can easily recreate those Pods and containers on any Kubernetes cluster
- podman kube play which run Podman’s Pods from Kubernetes manifests
Other
Podman Desktop also provides a way to be extended through the usage of extensions developed by the ecosystem for Docker Desktop. There is no guarantee that all the Docker Desktop extensions will work fine with Podman Desktop though.
Why should you use Podman / Podman Desktop?
- you want a daemon-less technology
- you might need to use systemd to manage containers
- you want to use the concept of Pods (similar to the Kubernetes ones) to share resources between several containers
Why shouldn’t you use Podman / Podman Desktop?
- you want to stick with more standard tools for the moment
- you are not familiar with the concept of Pods
- you do not need to interact with Kubernetes yet
Our pick
Between those 3 alternatives Rancher Desktop is our favorite for the following reasons:
- it allows you to select containerd or dockerd as the container runtime and to switch between them to get to know both of them
- it uses the same container runtime as Kubernetes (containerd)
- it allows to build images which are immediately available to use in your local workloads without any intermediate registry
- it’s also a great alternative if your company does not meet the criterias (in terms of net income and number of developers) to use Docker Desktop
Unlock your DevOps potential with this sample app by trying out Clio, our AI CLI assistant! Let Clio guide you through the complex CLI processes, helping you work faster and more efficiently.
Clio works by running local commands and can help you efficiently manage your AWS, Azure, GCP cloud resources, deploy apps and manage Kubernetes clusters, check the status of your Docker containers, interact with your GitHub repos, and much more.
Check out the full run-down on Clio here or try Clio for yourself today—where technology meets simplicity.
Luc Juggery is a software engineer with 18+ years of experience and co-founder of 2 startups located in Sophia-Antipolis, southern France. You can chat with him on Twitter, read more of his work on Medium, find his tutorials on YouTube, or take one of his Docker or Kubernetes training courses on Udemy.
Header Photo by Teng Yuhong on Unsplash