It’s been briefly over a month or two, and I’ve been using GPTScript to build agents to simplify my daily tasks. From interacting with my cloud accounts to local minikube cluster and GitHub, I’ve built assistants that have simplified many things for me.
When I was invited to speak at the Google Cloud Community Days in Hyderabad a few weeks ago, I decided to show off one of the agents I had built for GCP using GPTScript.
In this blog post, I’ll show you the GCP Assistant I built using GPTScript and introduce you to Clio.
Building a GCP Assistant Using GPTScript
GTPScript is a scripting language that automates your interactions with an LLM using natural language. It is easy to understand and implement. One of the highlights of GPTScript is its ability to mix natural language prompts with traditional scripts, making it extremely flexible and versatile.
Use Case
GPTScript makes it easy to build AI Assistants to interact with various systems and perform various tasks. In our case, we’ll build an assistant for the Google Cloud Platform to provision a Kubernetes cluster, deploy an nginx application on it, configure metrics collection, and deploy Grafana to visualize the metrics.
Note: Ensure you’re using the latest version of GPTScript
Pre-requisites
Writing GPTScript
The first step is to create the GPTScript for the GCP assistant. Since GPTScript is written primarily in natural language, writing the script to perform code review is easy. Below is the gcp.gpt file.
Name: GCP Assistant
Description: Agent to help you interact with Google Cloud
Context: learn-gcp, learn-kubectl
Tools: sys.exec, sys.http.html2text?, sys.find, sys.read, sys.write
Chat:true
You are an assistant for Google Cloud Platform (GCP).
Rules
1. Use gcloud CLI to interact with GCP.
2. Assume the user is using Google cloud.

---
Name: learn-gcp
Description: A tool to help you learn gcp cli
#!/bin/bash
echo "Current gcloud config:"
gcloud config list || true
---
Name: learn-kubectl
Description: A tool to help you learn k8s and related commands
#!/bin/bash

CMDS="kubectl helm"
echo 'The additional CLI commands are available locally, use the `exec` tool to invoke them:'
for i in $CMDS; do
	if [ -e "$(command -v $i)" ]; then
    	echo '  ' $i
	fi
done
Let us understand what this file does:
- We create a GCP Assistant and define the tools and contexts it has access to: learn-gcp and learn-k8s in this case.
- We enable chat mode and describe the guidelines for the assistant to follow.
- For the learn-gcp context, we provide access to the gcloud CLI
- For the learn-k8s context, we provide access to kubectl, helm CLI.
You can find this GPTScript in our examples folder.
Executing the GPTScript
To execute this script, you must first configure the “OPENAI_API_KEY” environment variable.
Execute the script using the following command:
gptscript gcp-assistant.gpt
This will initialize the assistant and start in chat mode. If you’re not already logged in to your Google Cloud console, you can ask it to do so.
Note: Since this is an AI assistant, the responses that you receive will differ from what is shown here, even if you provide the same prompts. Hence you might have to do some extra steps/prompts to get this working.
Simply type “login to my google cloud account”, and it will suggest the command required to perform the login action and ask you for confirmation to execute the commands.
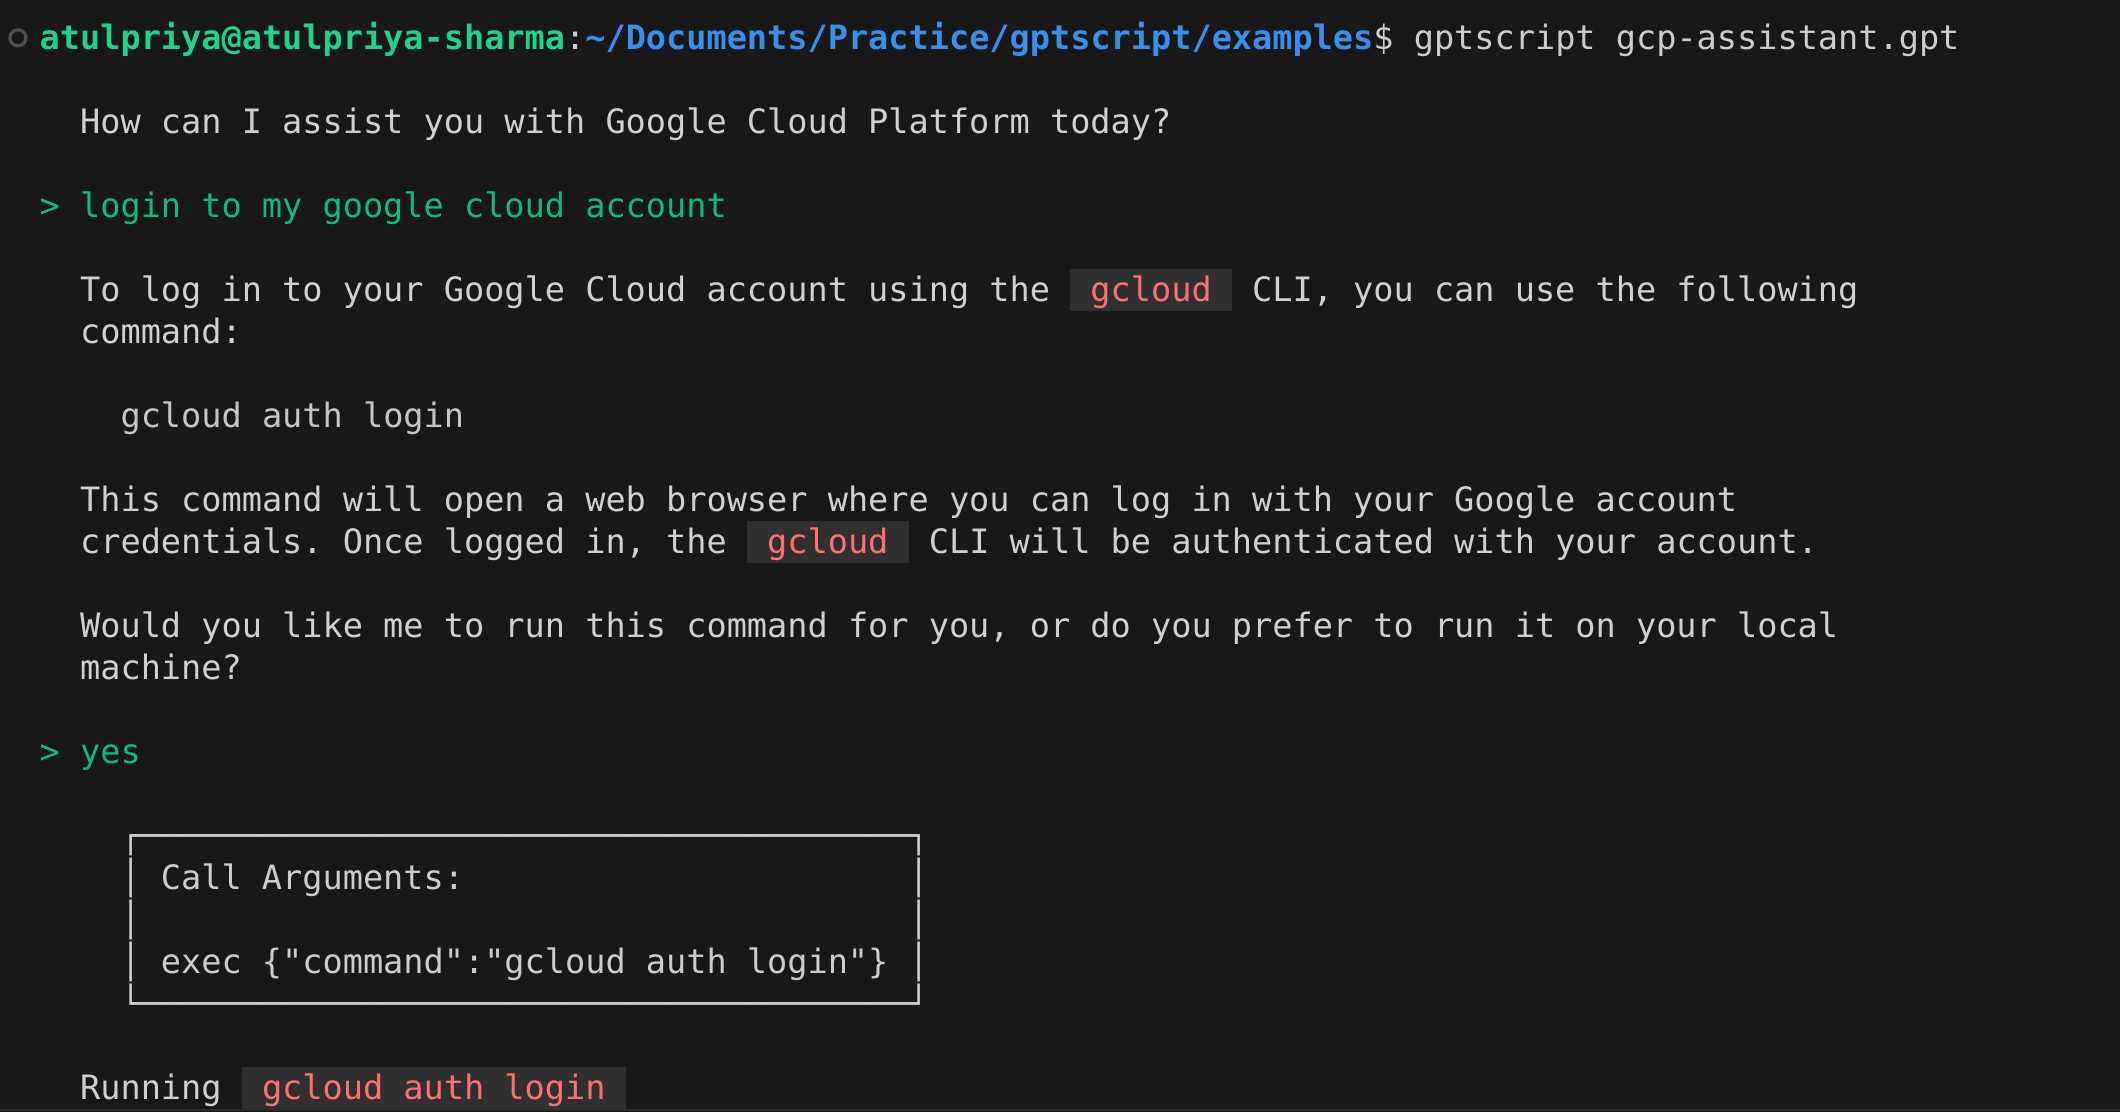
Once the login is complete it will display the email id used to login and the default project.
Creating Kubernetes Cluster
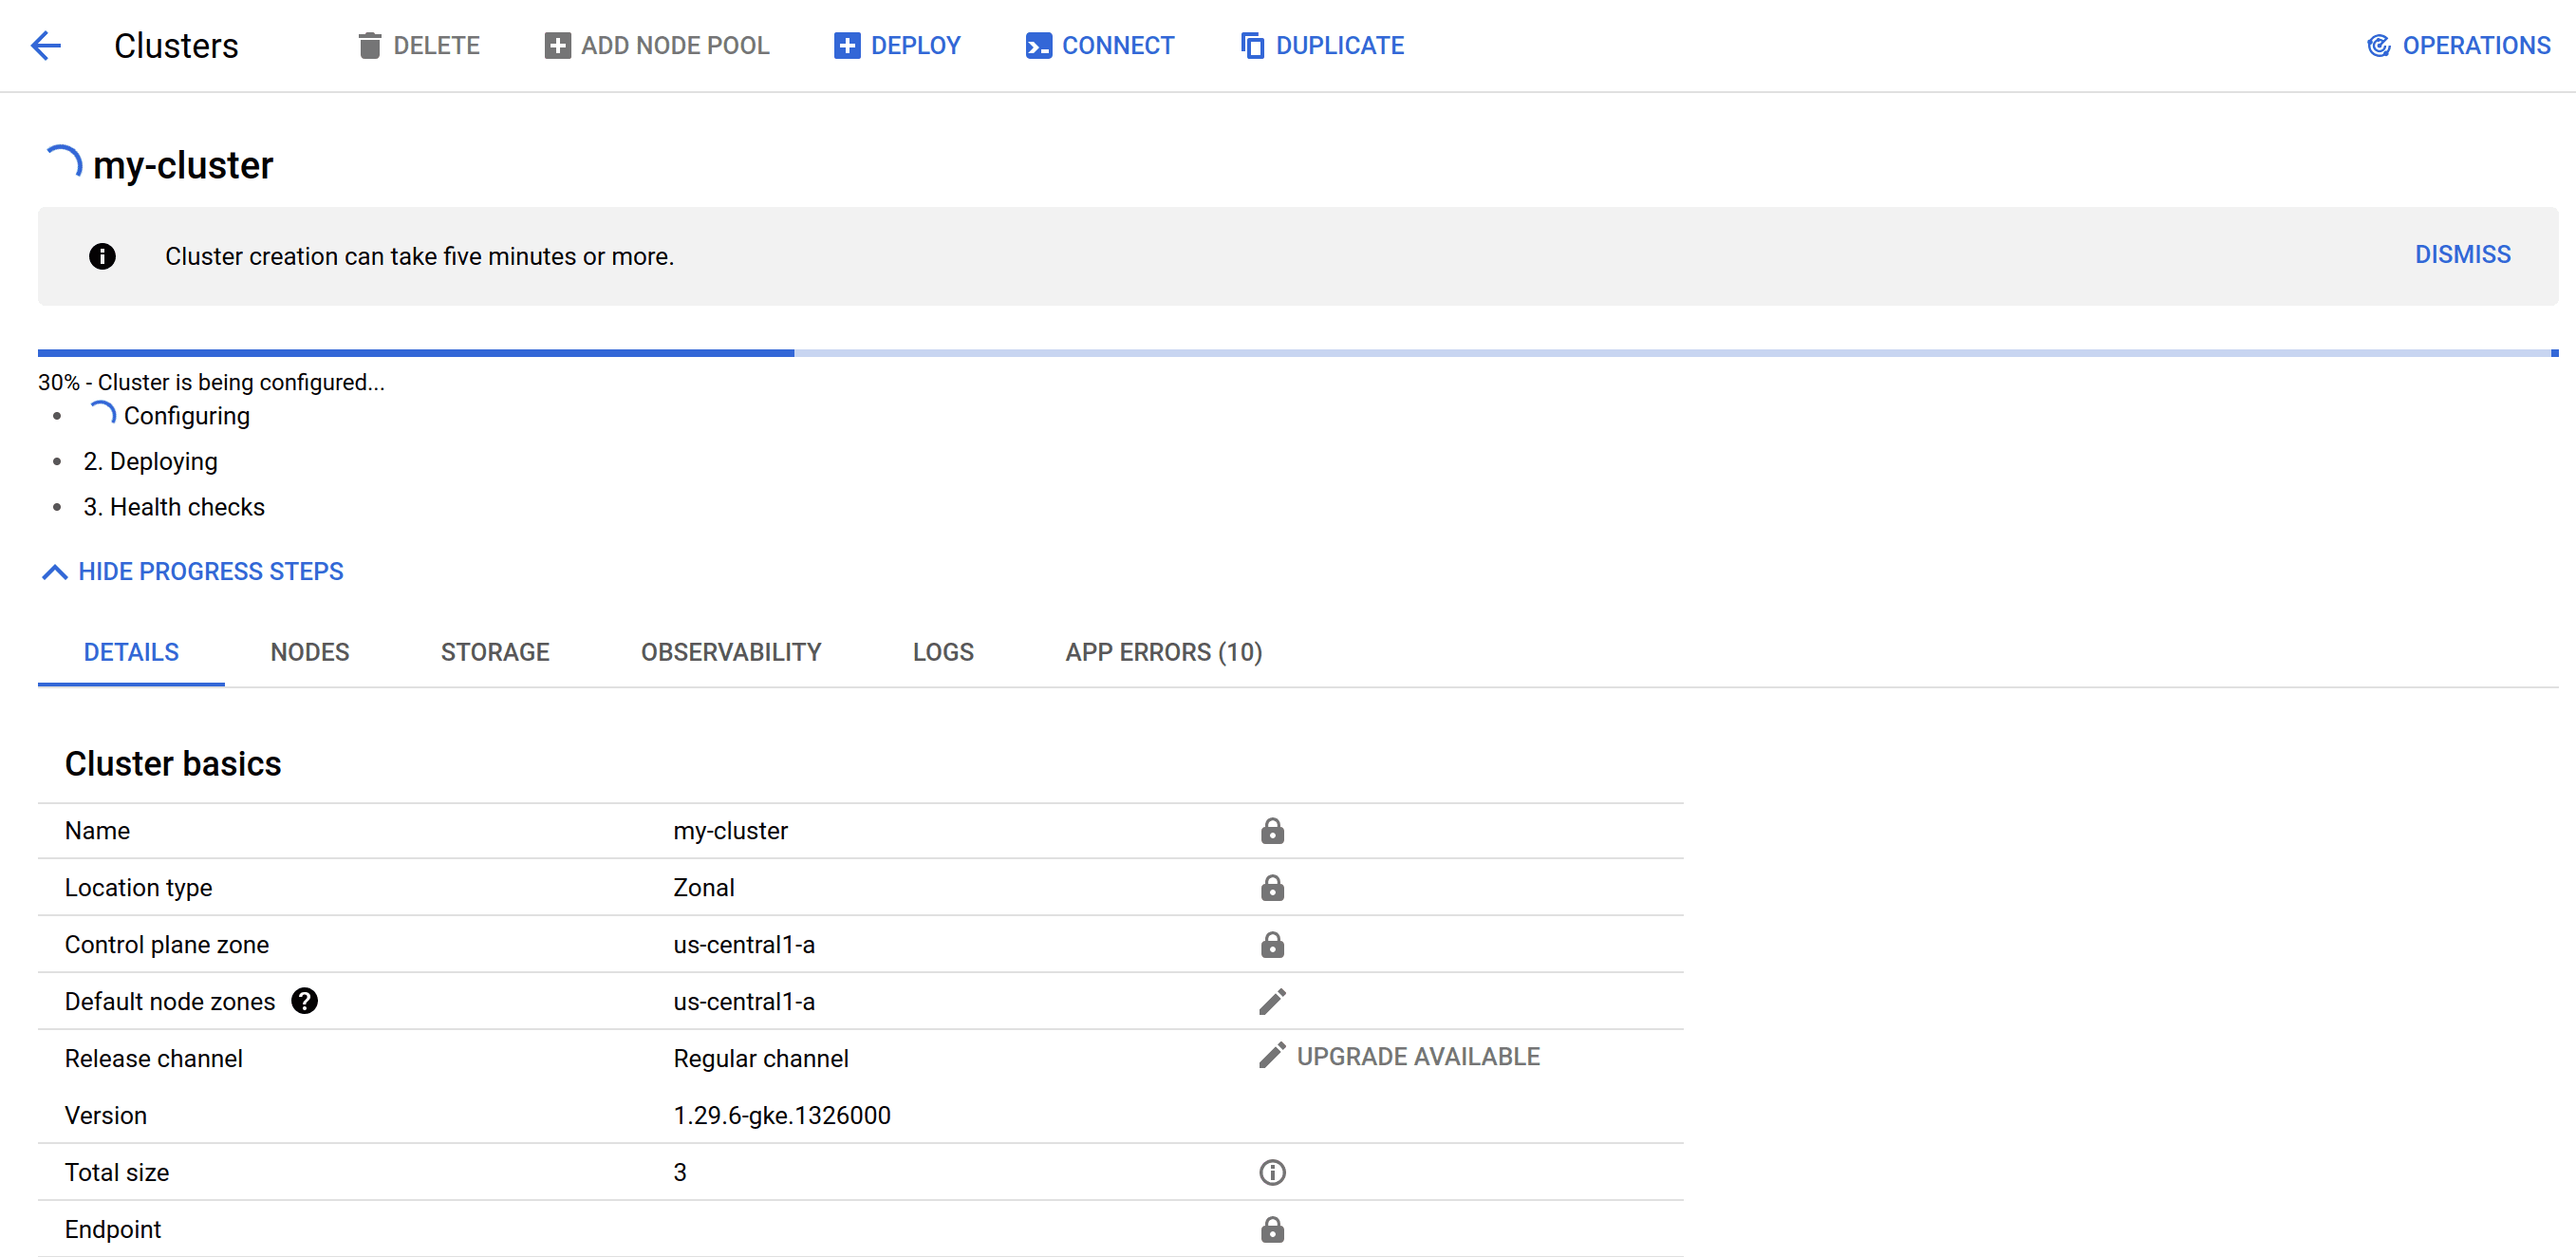
To create a Kubernetes cluster, type in “deploy a kubernetes cluster with 3 nodes of standard compute, call the cluster my-cluster”.
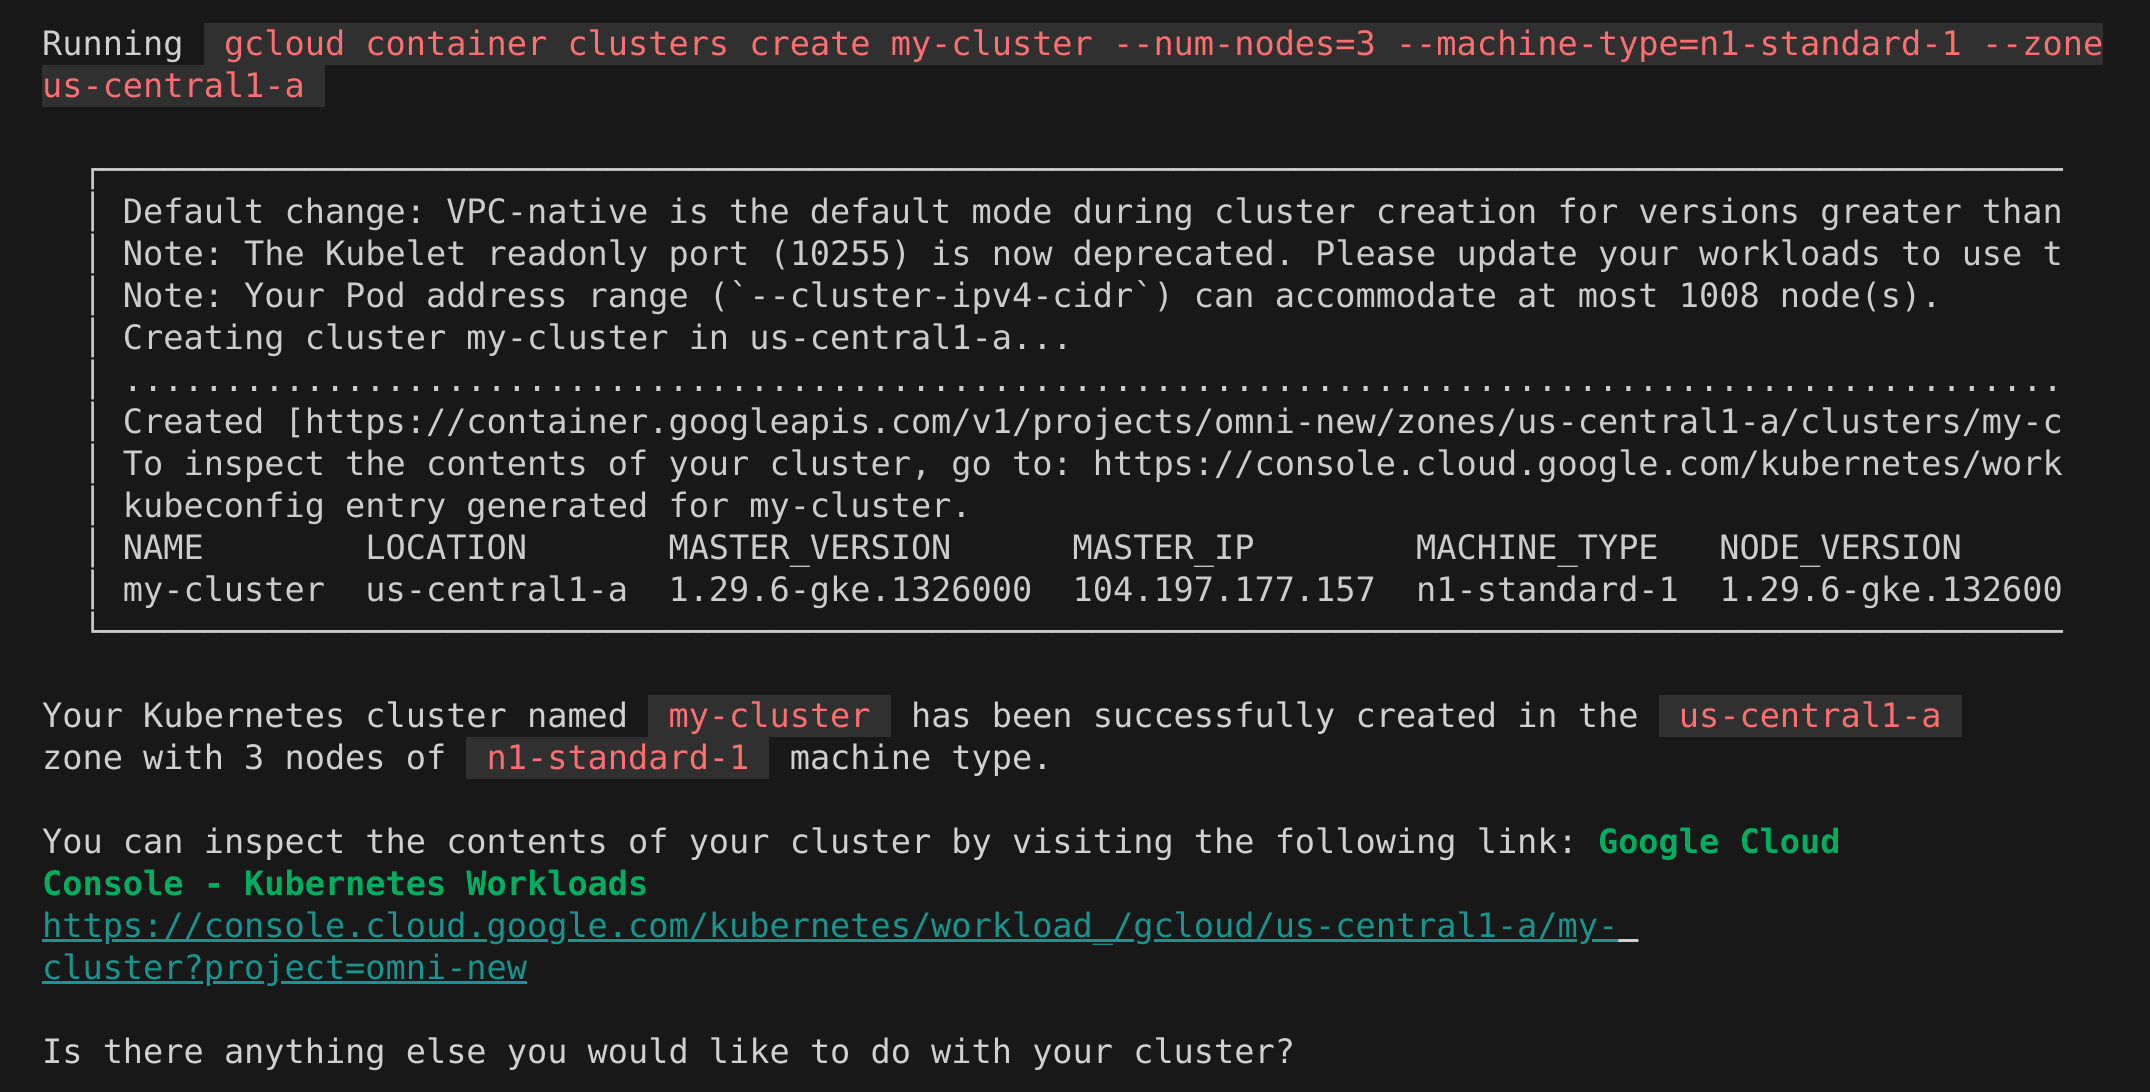
Since GPTScript has access to gcloud CLI, it understands that it needs to execute the “gcloud containers clusters create my-cluster” command. Sometimes it may forget to supply a region and will ask you what region you want the cluster to be deployed in.

Once GPTScript executes the command, you can navigate to your Google Cloud console to confirm. As you can see, a new my-cluster was created, and the configuration is in progress.
Once the deployment is successfully completed, our GCP Assistant will confirm the same and ask if anything else is required.
Deploy Nginx Application
Now that our cluster is in place, let us deploy a simple nginx application and configure metrics on it using the prompt “Deploy an Nginx application on a Kubernetes cluster and configure a /metrics endpoint that is publicly accessible. The /metrics endpoint should expose Nginx metrics in Prometheus format. Please ensure that the necessary exporters and configurations are in place to make the metrics available for scraping by Prometheus.”
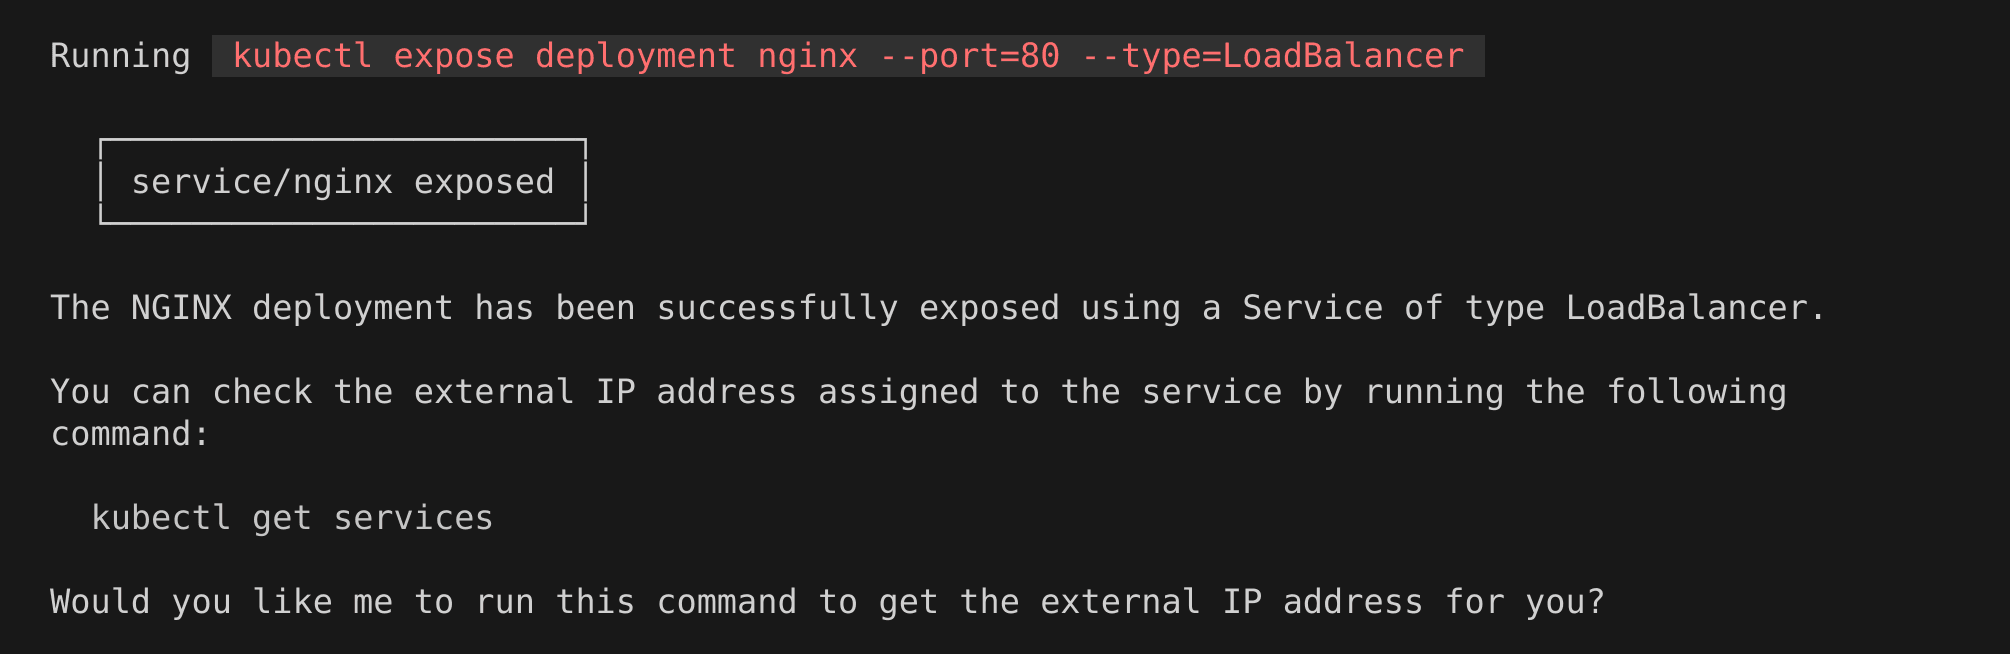
Our assistant will first show the steps that it will perform to deploy the nginx application and ask for confirmation. Once you approve it, it will perform all the steps.
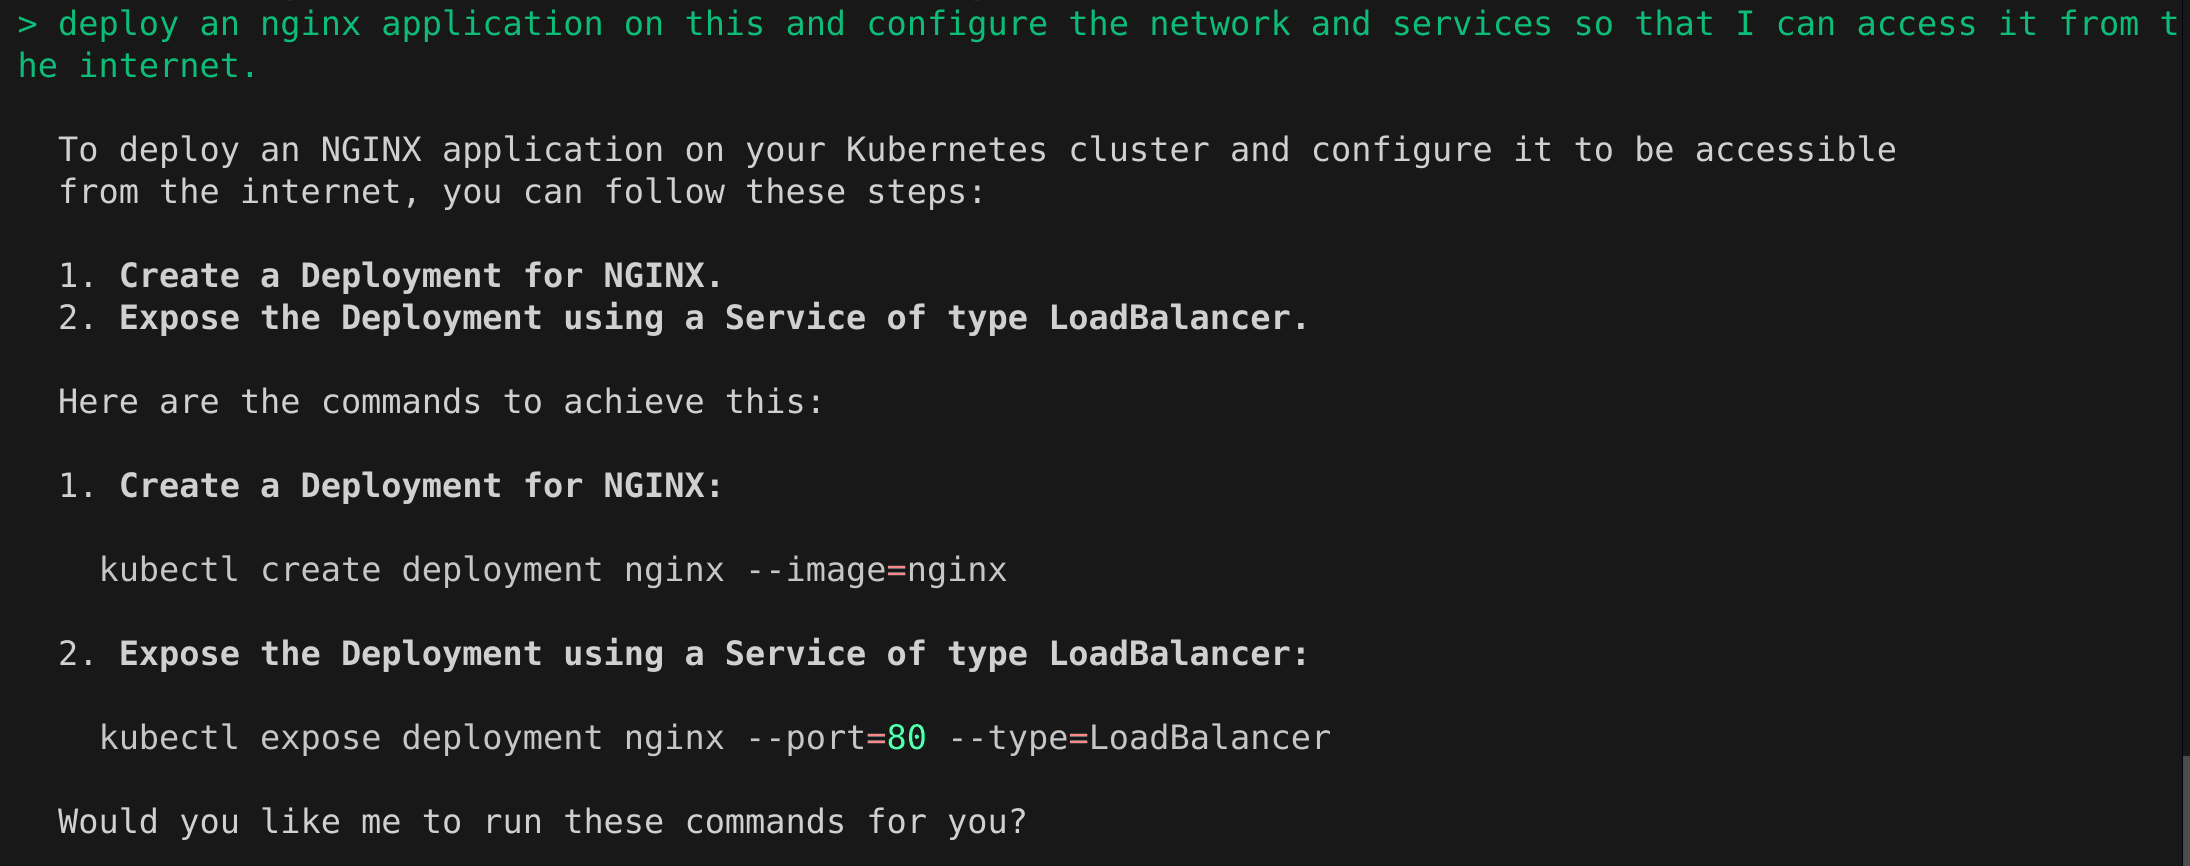
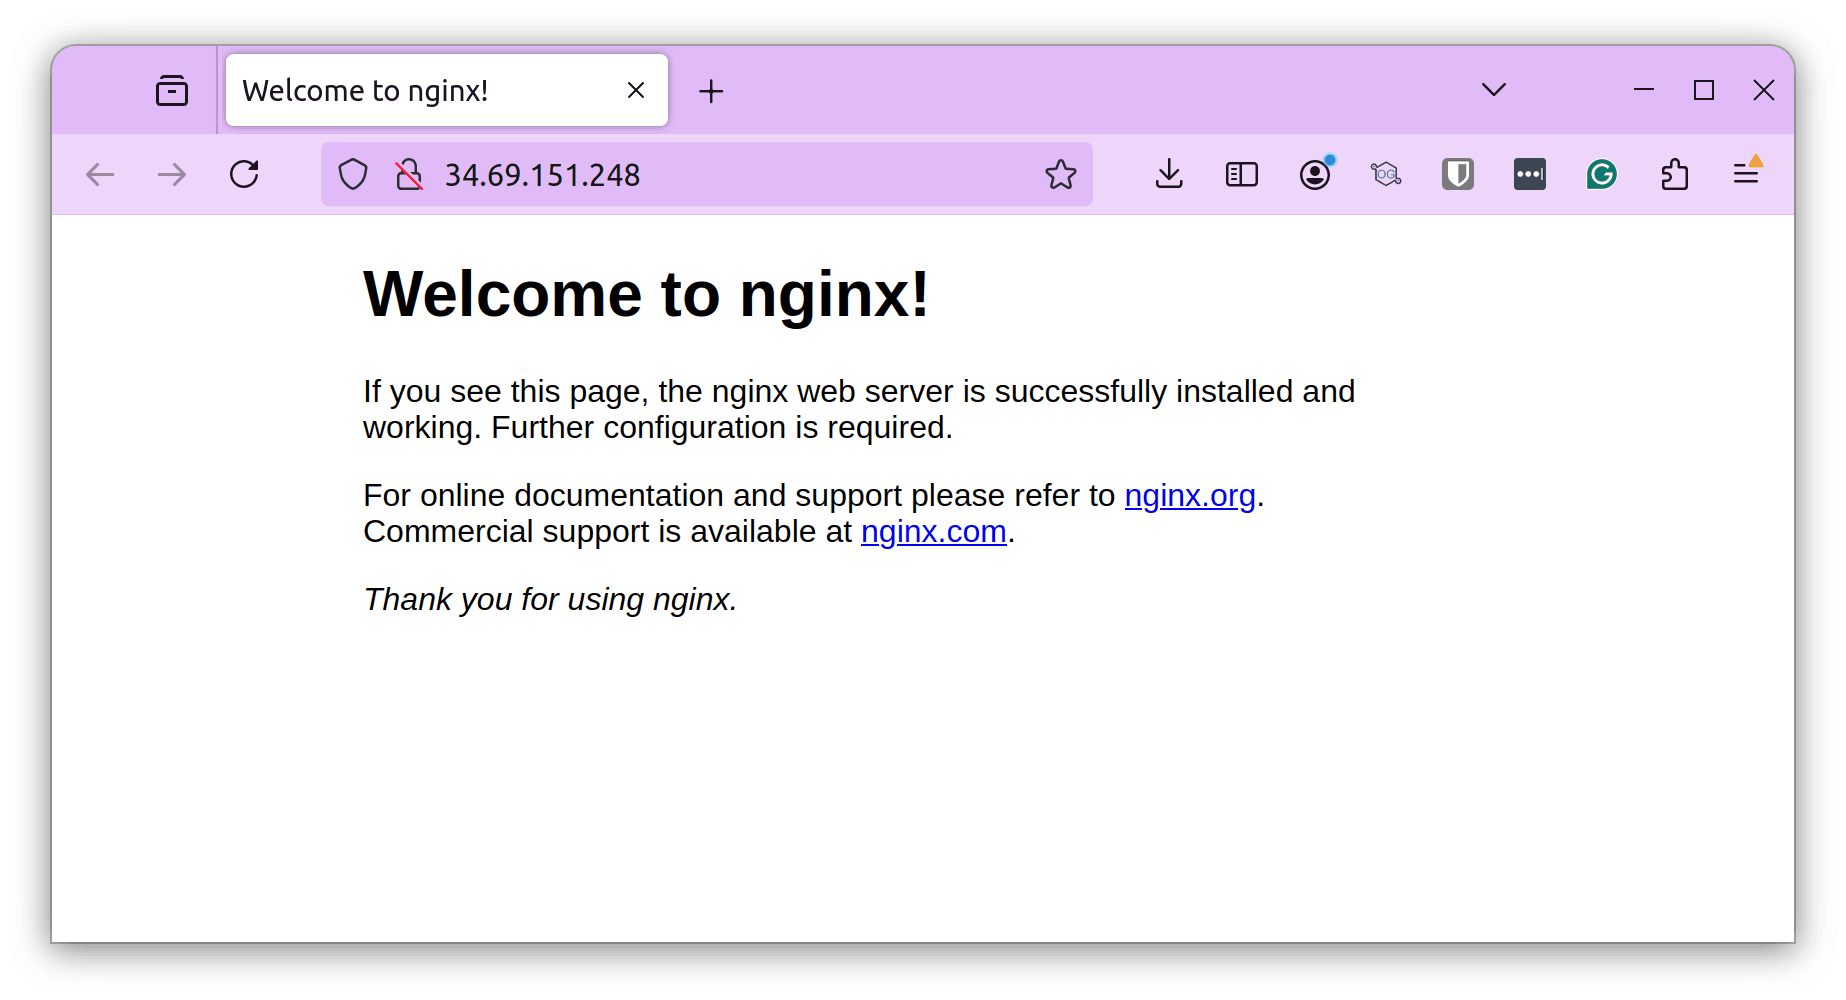
After the application is deployed, it knows that it needs to configure the loadbalancer so that we can access the application from the internet. It will prompt you whether you want the external IP address of the system or not. Say yes and watch it do the needful and give you the IP address.
Let us access the application at the IP address mentioned.
Configure Metrics
Since we asked it to configure /metrics in our previous prompt, it configures nginx-prometheus-exporter and presents the metrics at the mentioned endpoint.

Once this is configured, it gives us the endpoint where we can see the metrics

We have the nginx and Kubernetes metrics available at the /metrics endpoint.
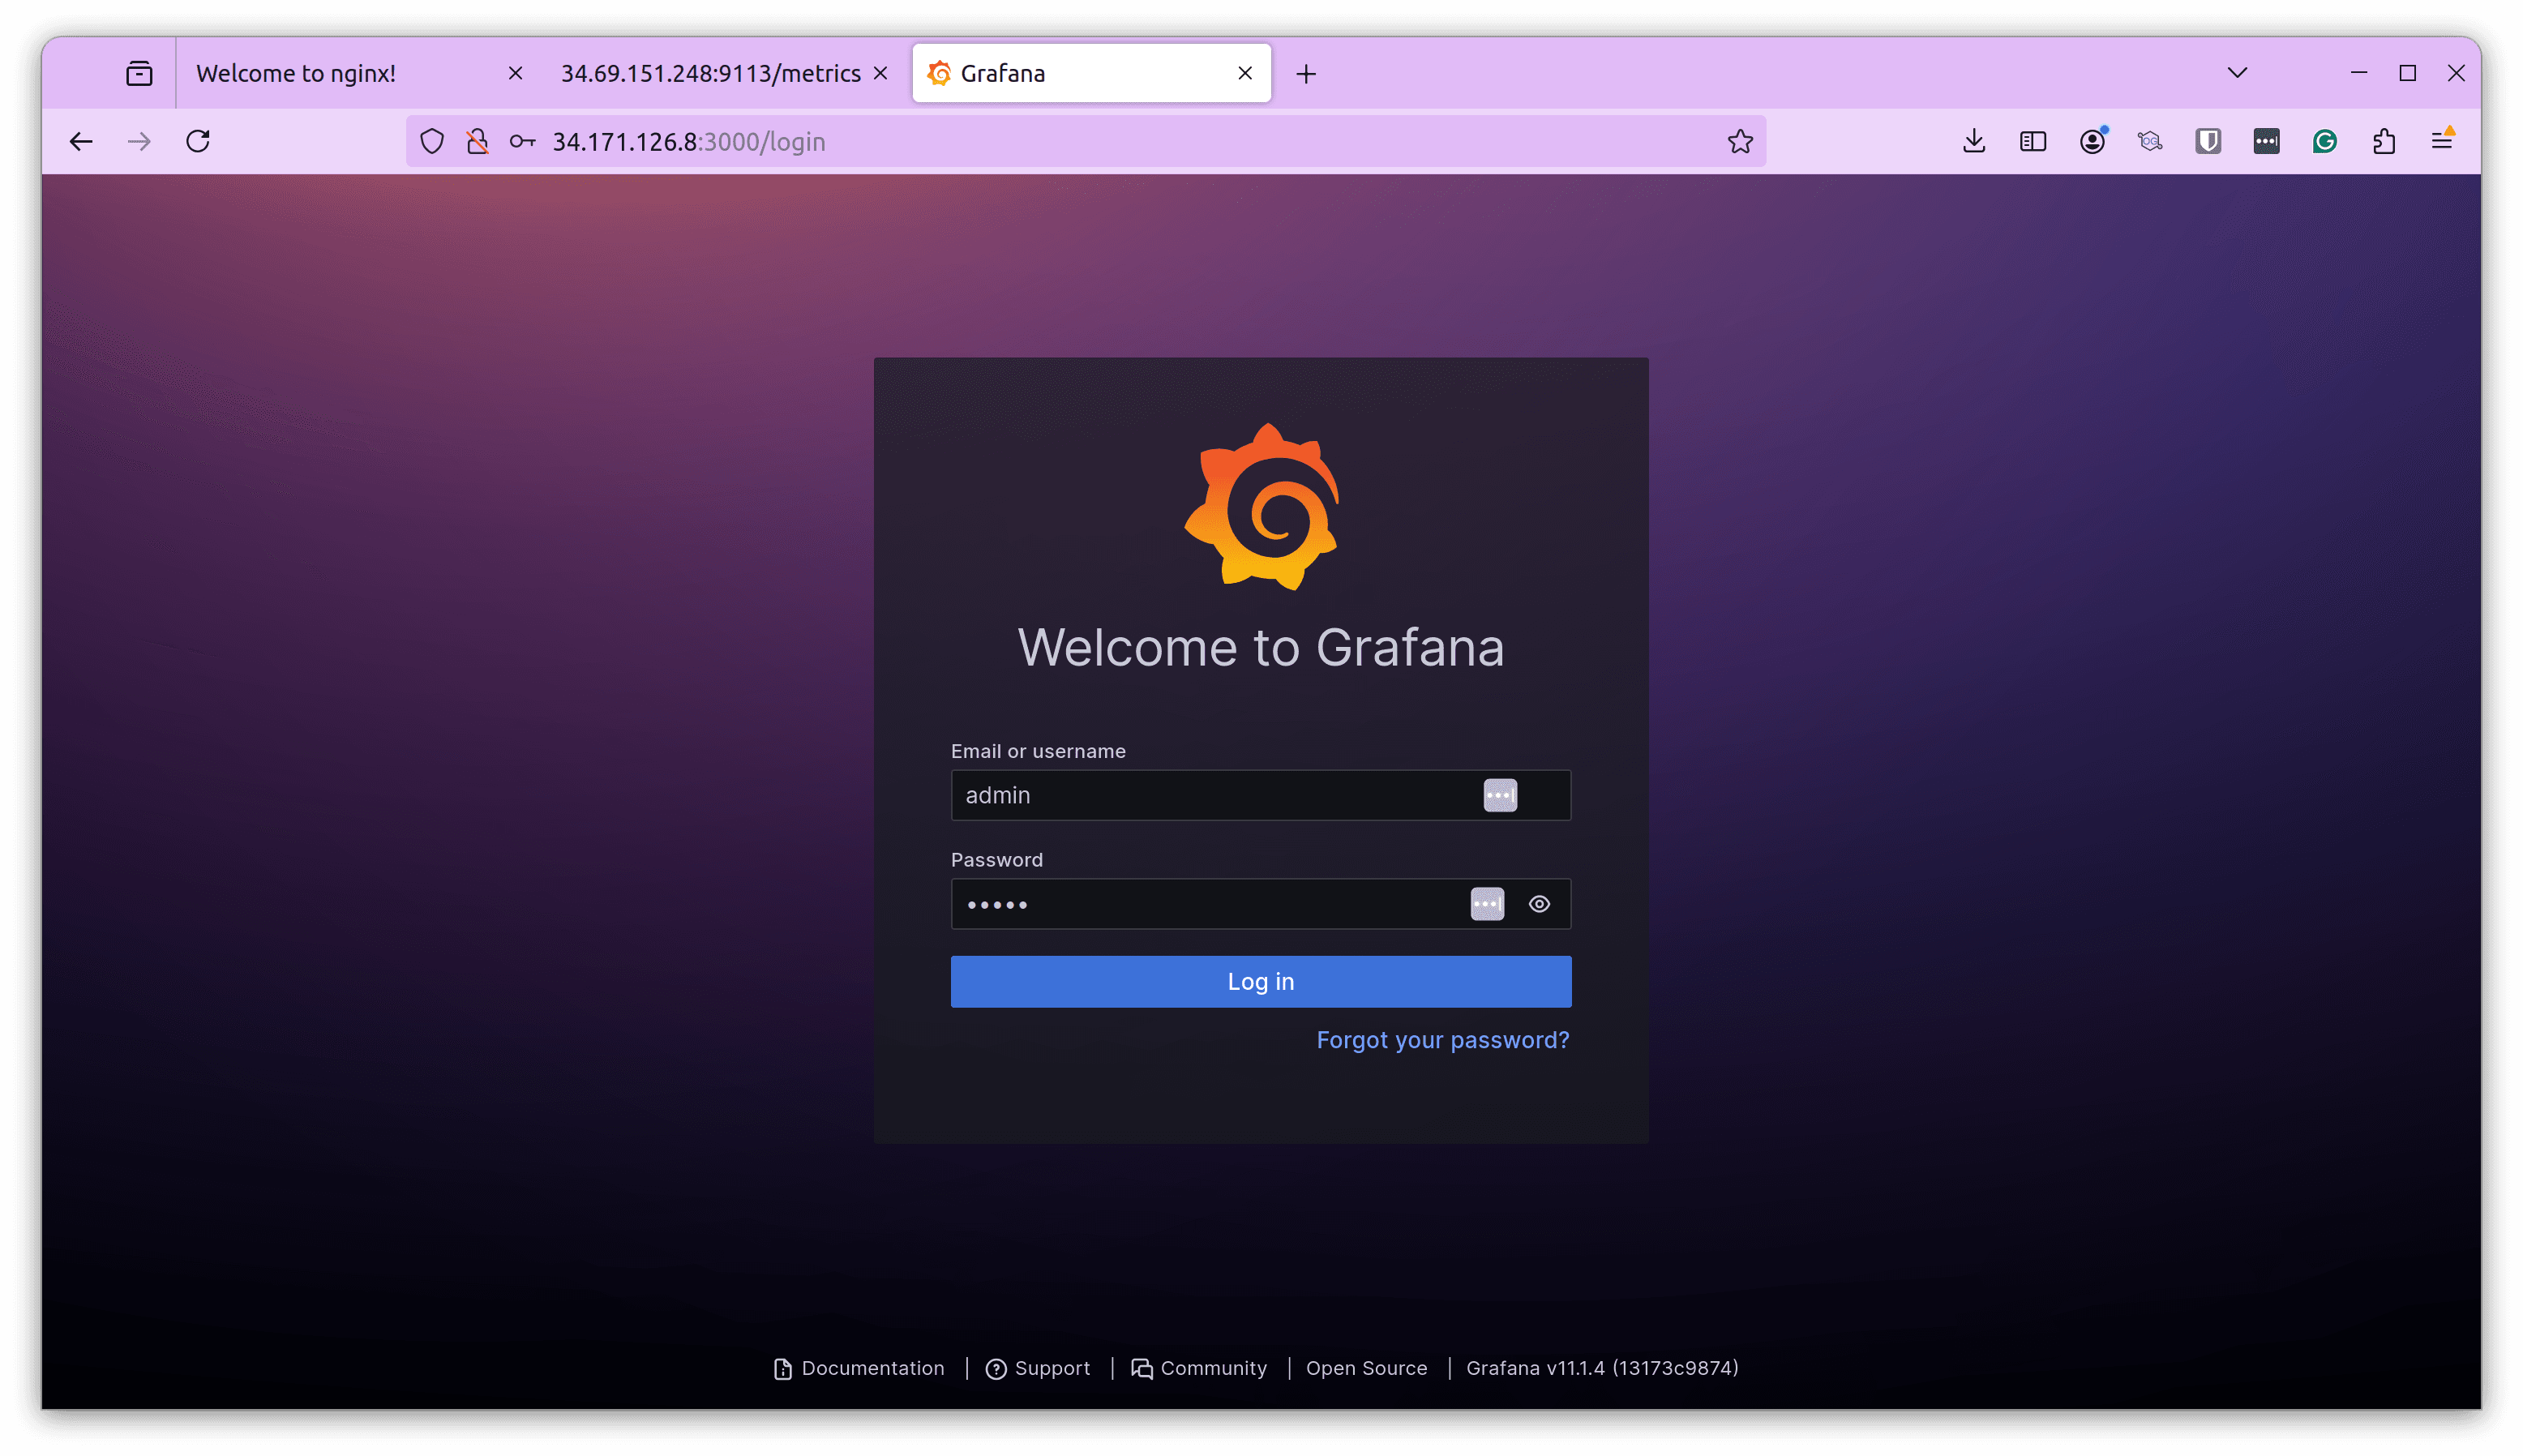
Access Grafana
In our previous prompt, our assistant had installed and configured Grafana for us to visualize the metrics.
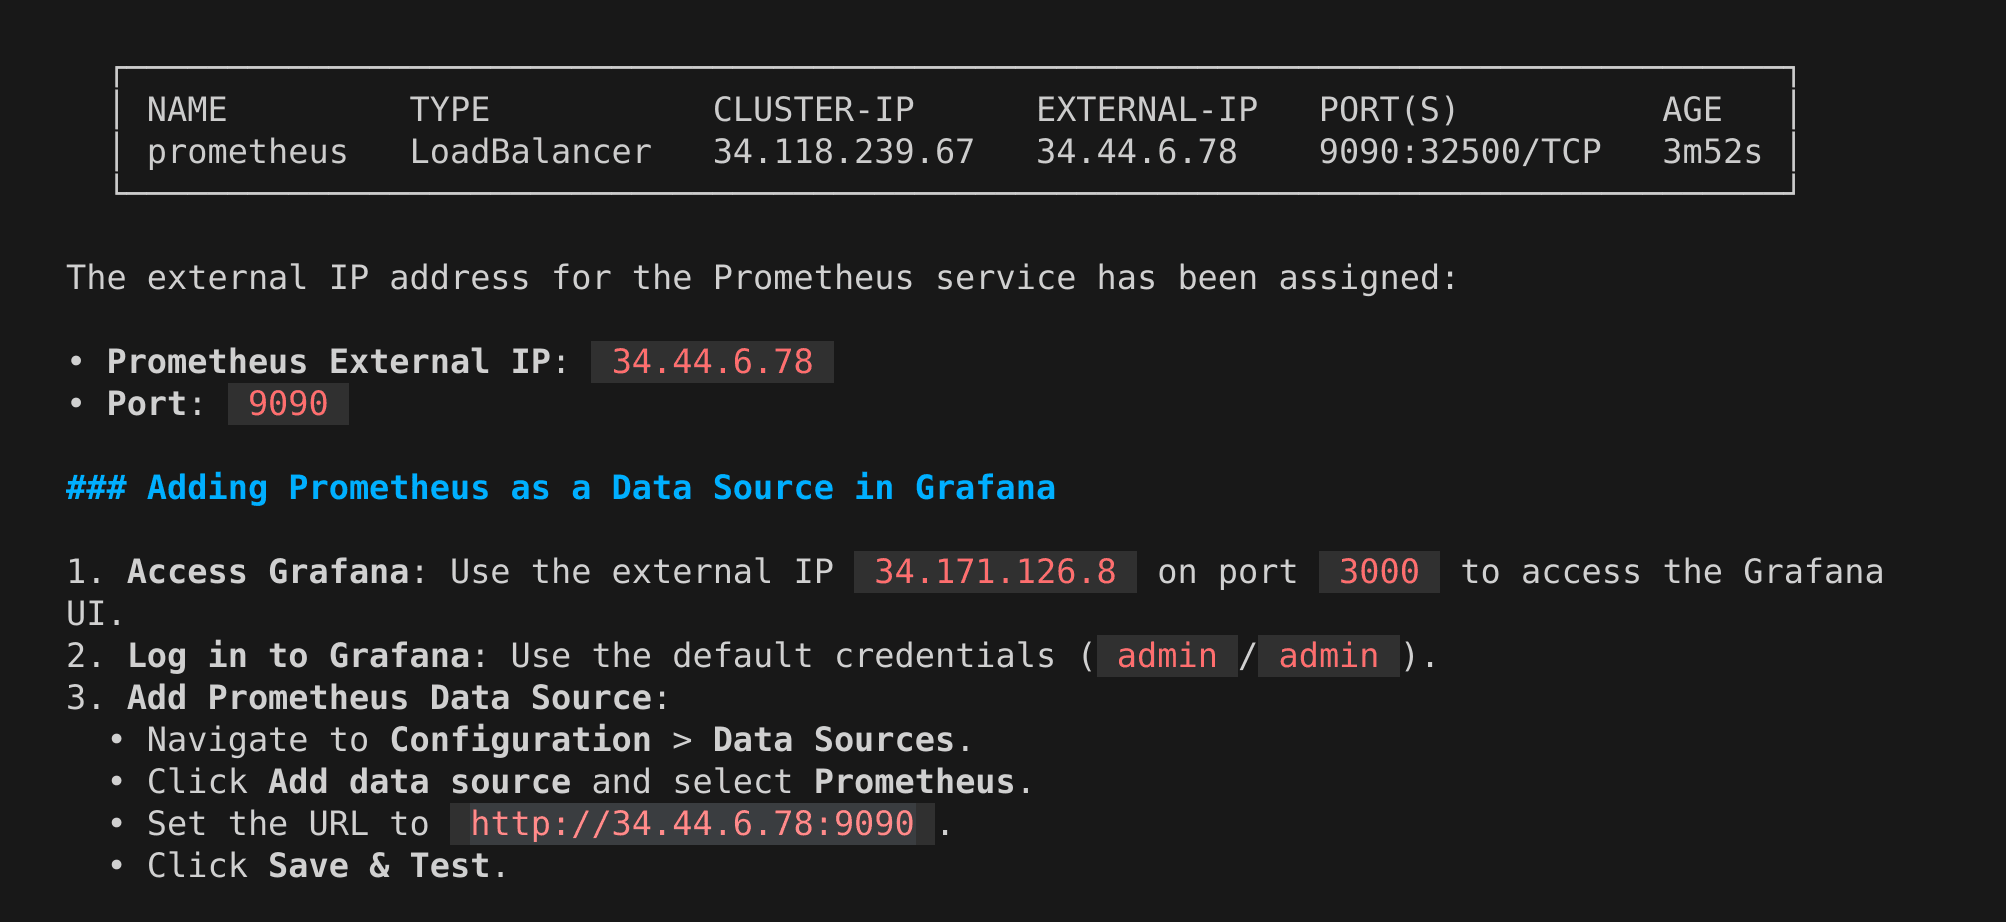
We can access the Grafana dashboard at the URL using the credentials provided.
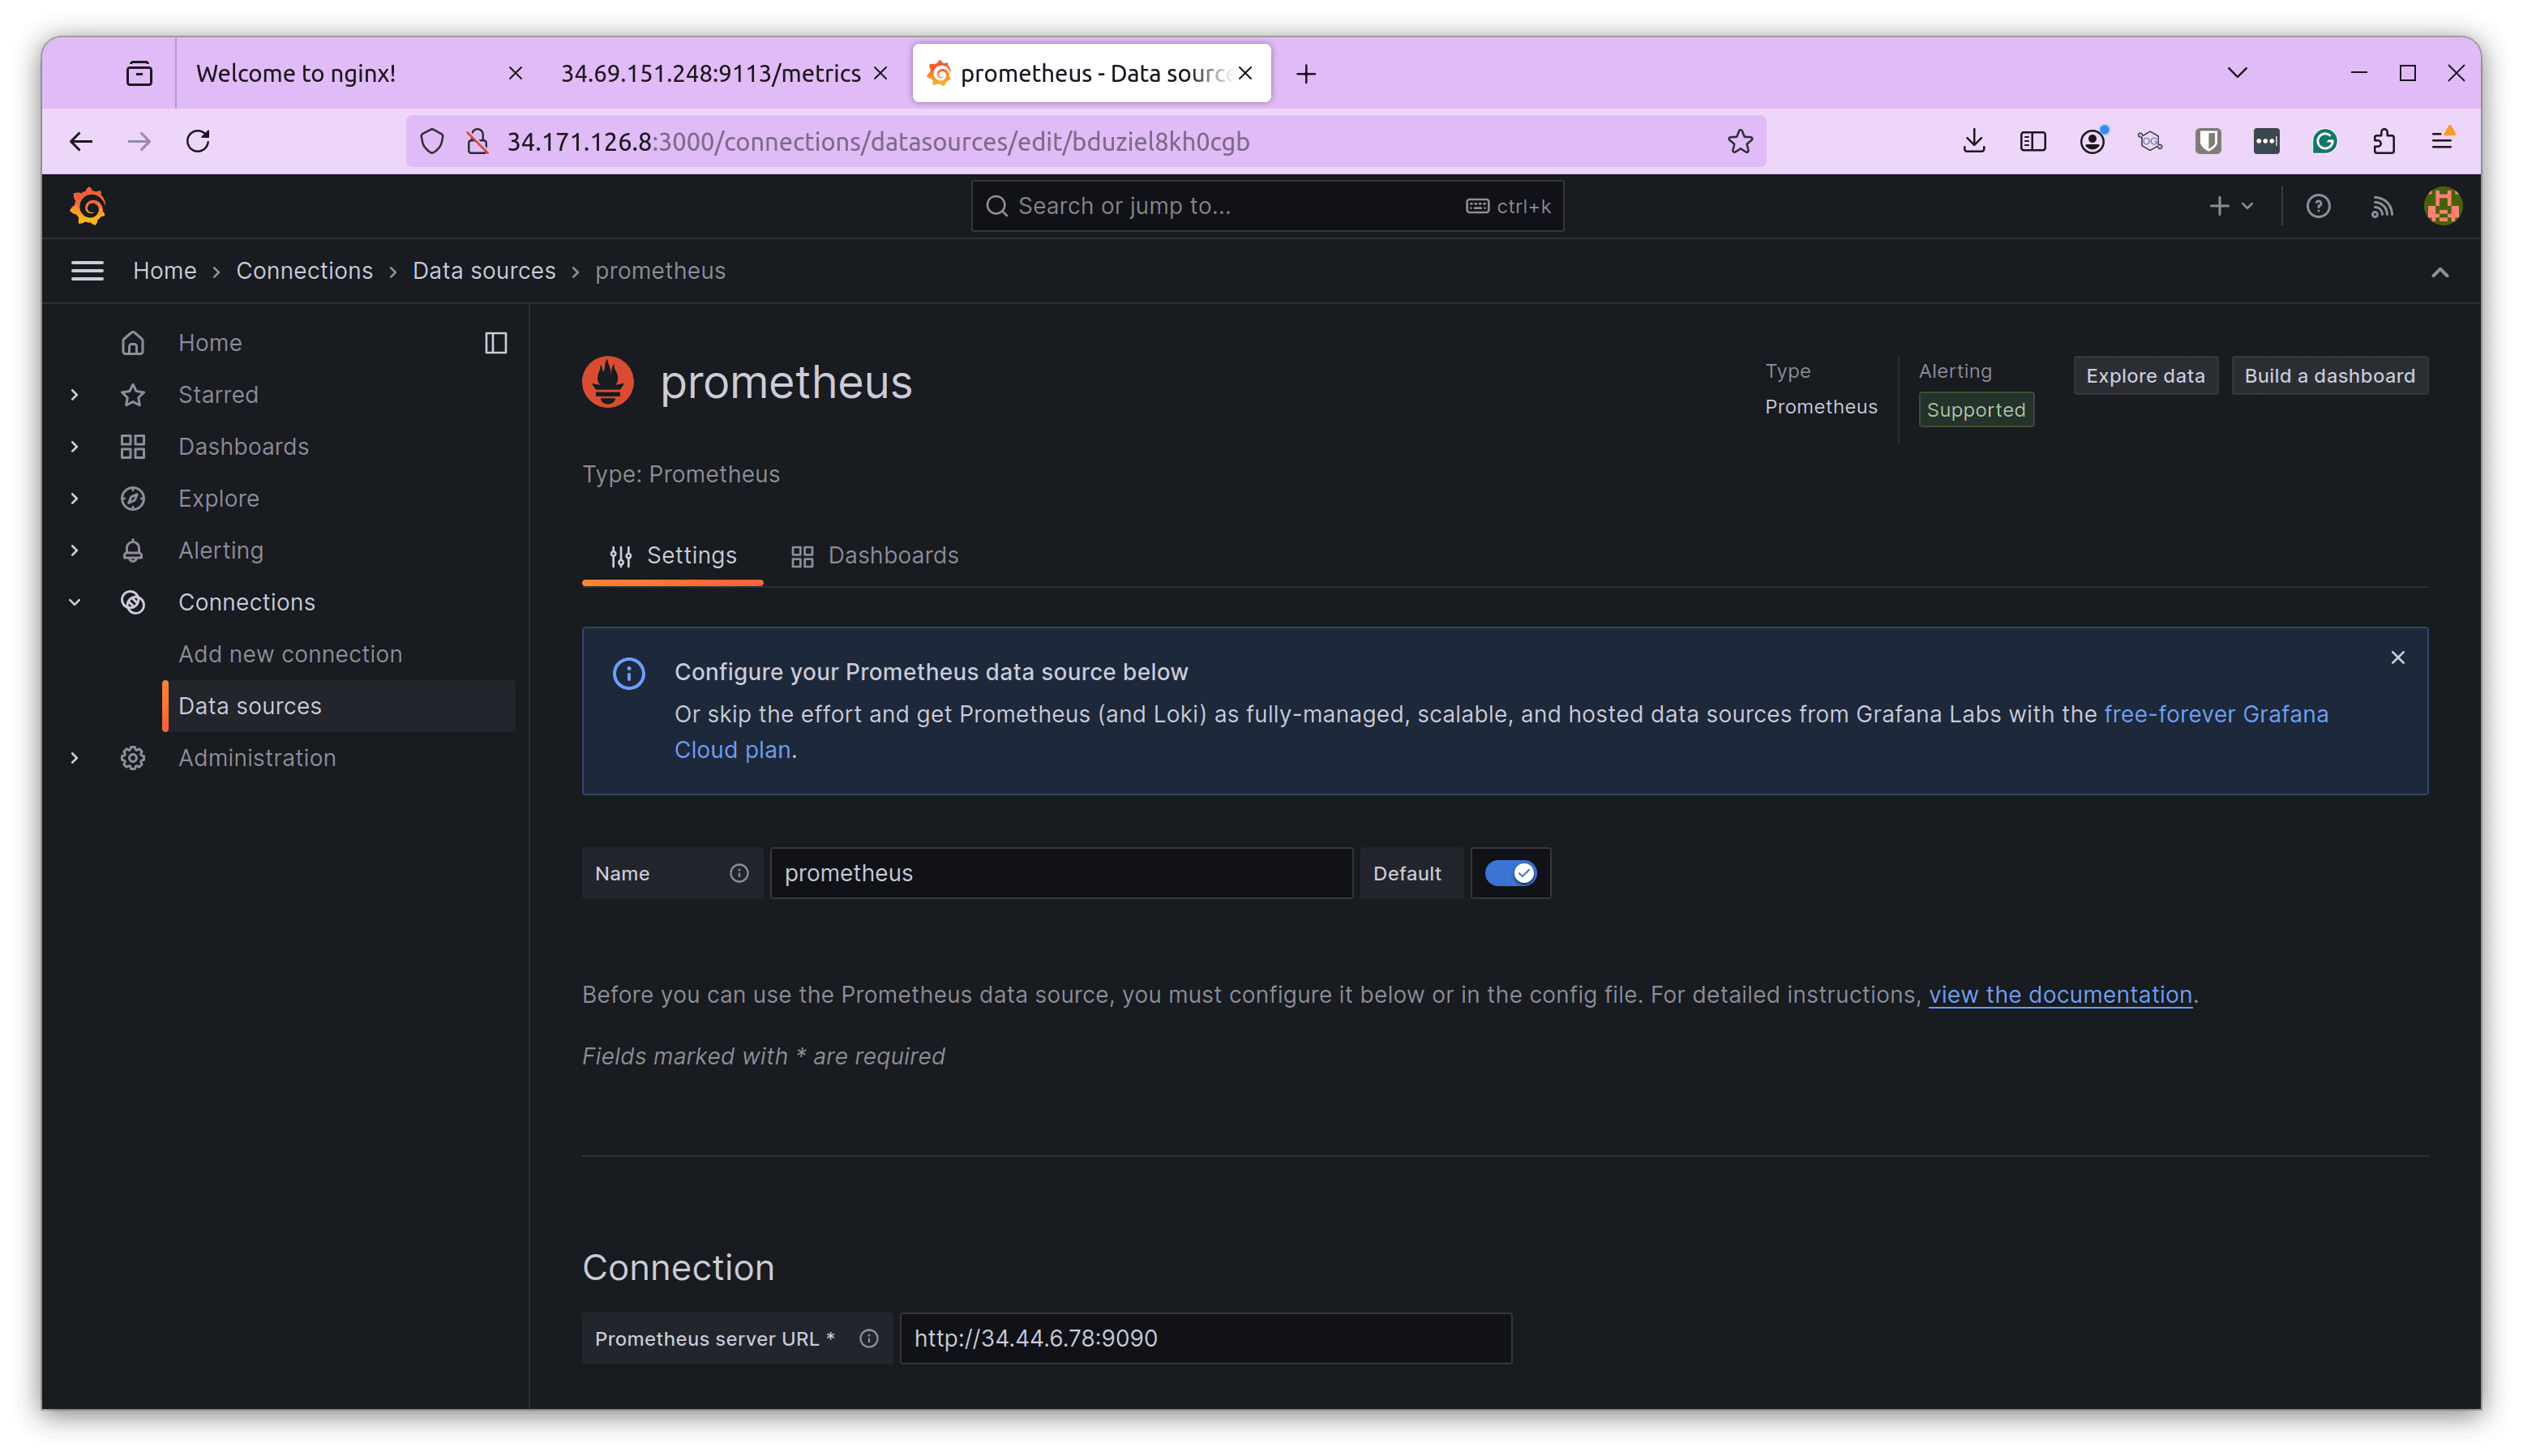
Once logged in, we can configure the data source as Prometheus and provide the Prometheus URL that our assistant provided.
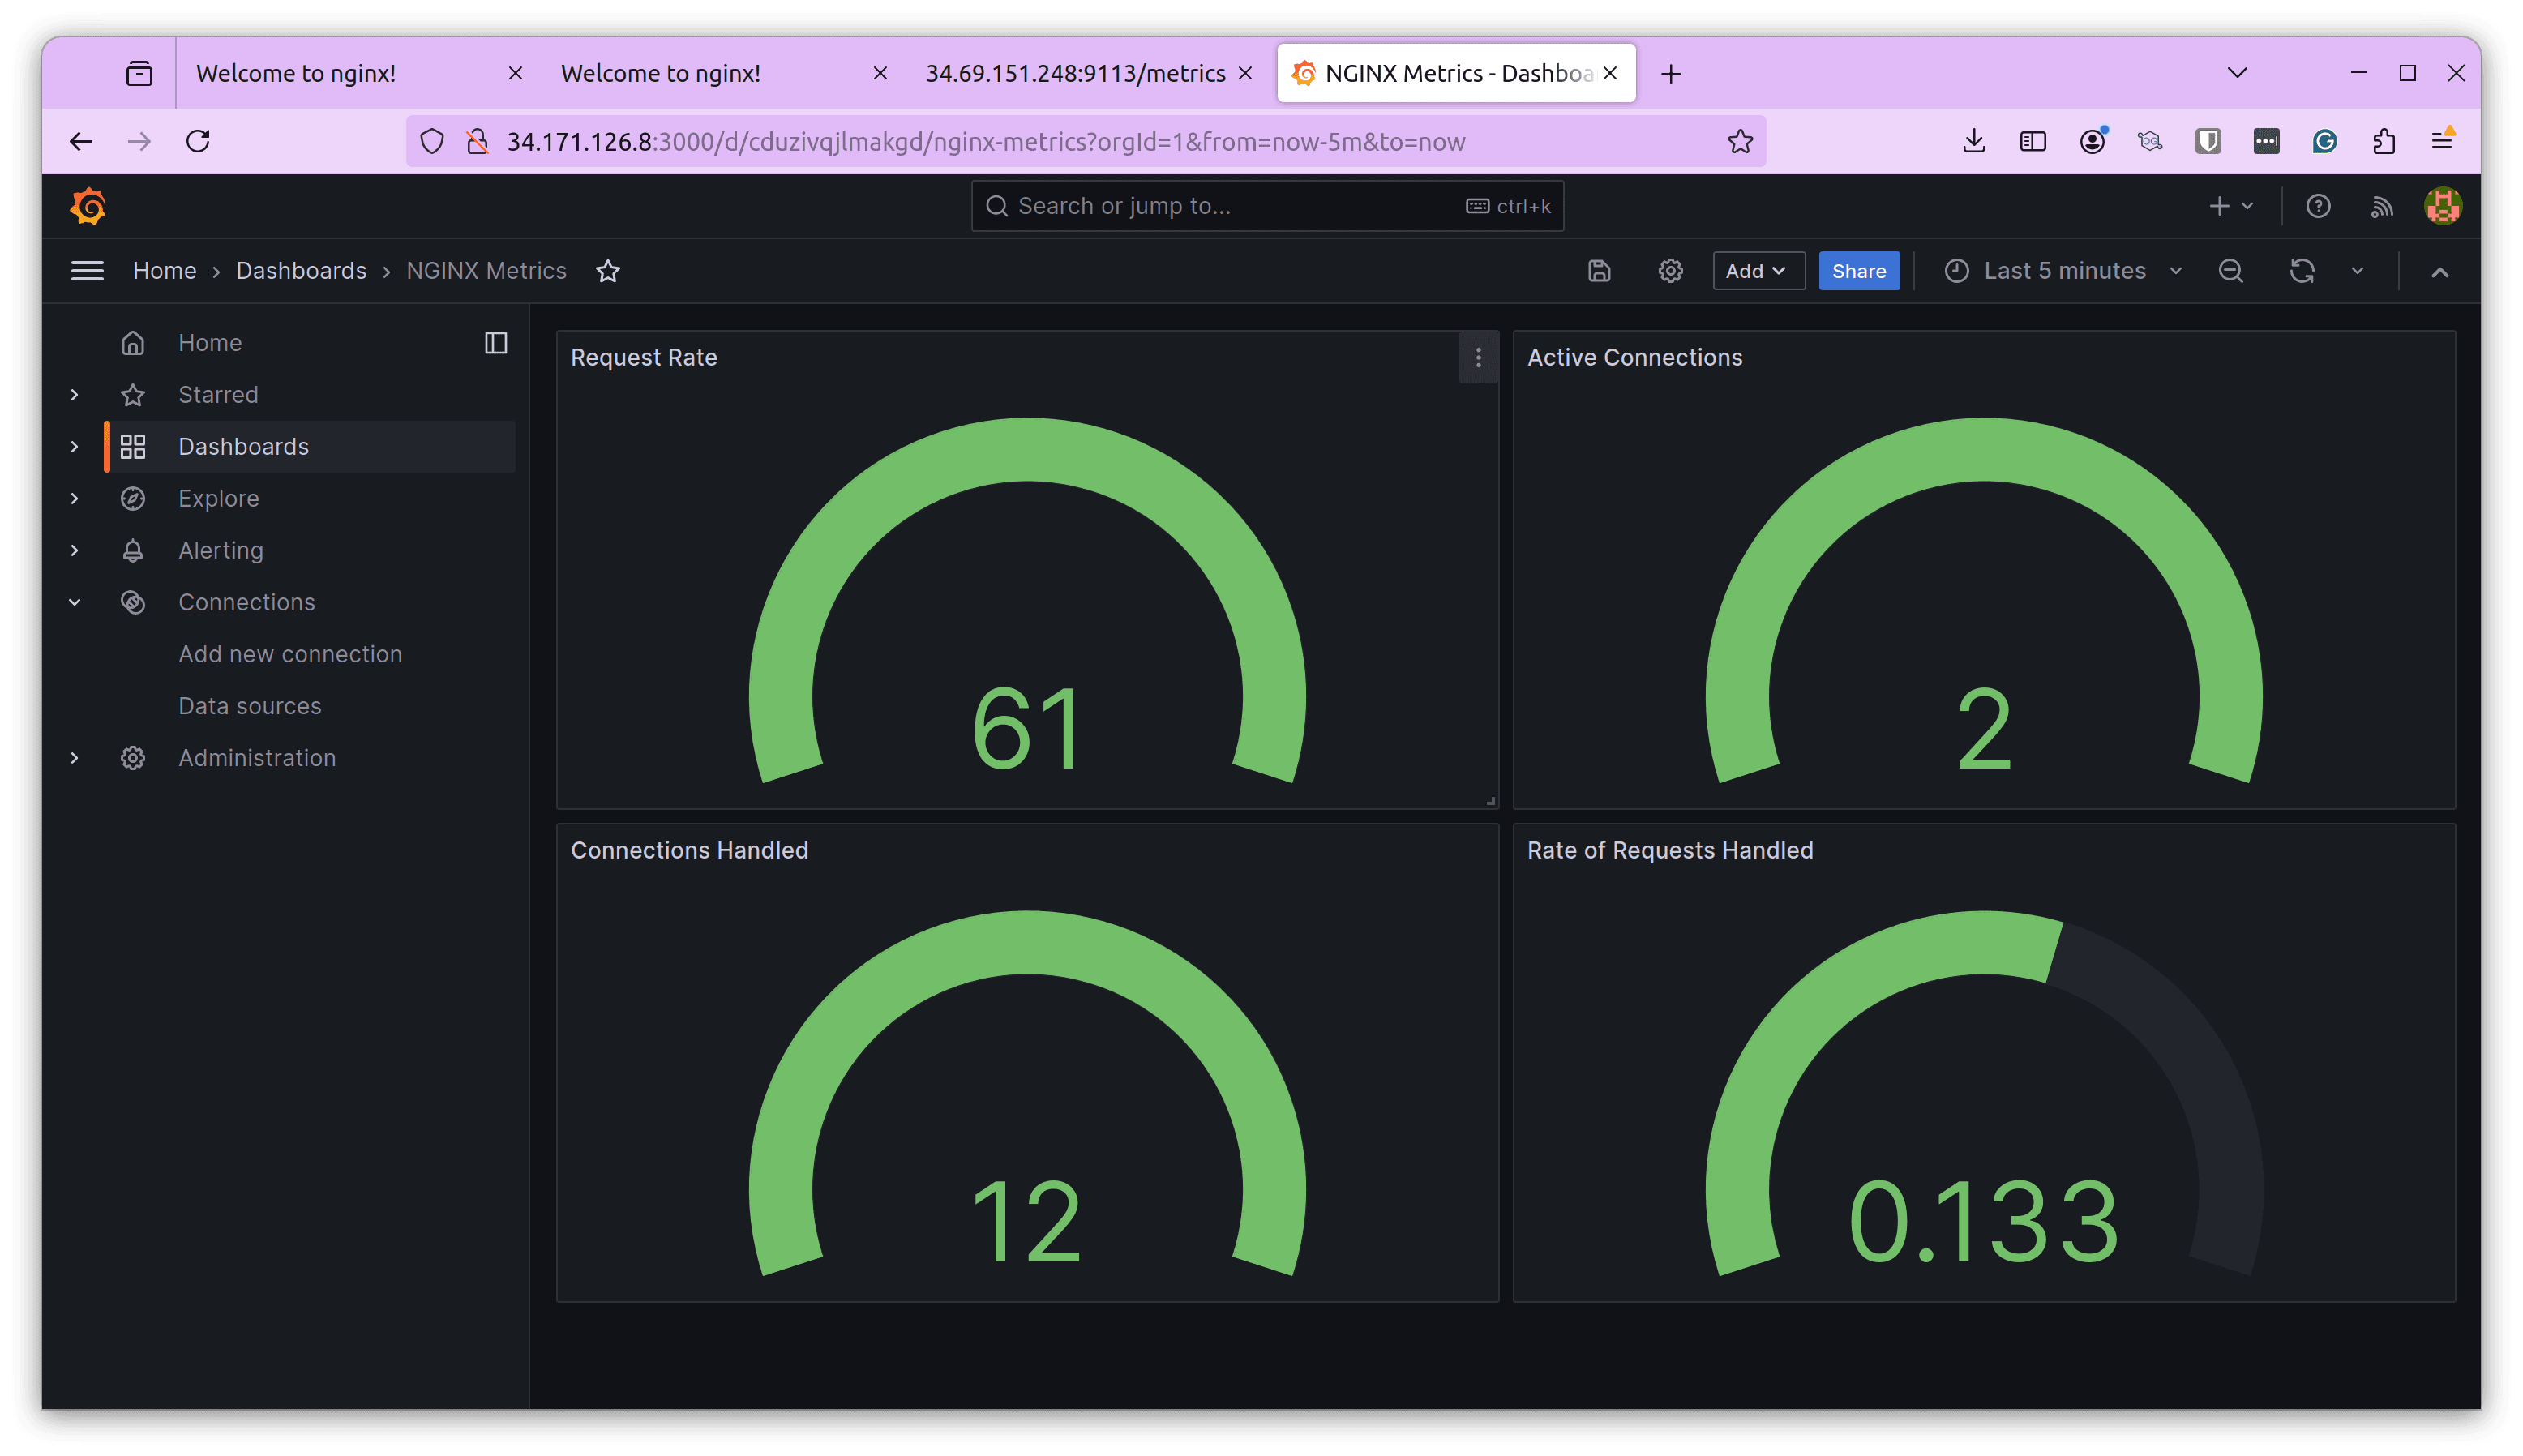
Create A Dashboard
Now that we have successfully configured Grafana with our Prometheus endpoint, we need to create a dashboard and add visualization. You can do that manually or ask our GCP assistant to do it!
Let us ask our assistant:
“Generate a dashboard.json code for a Grafana dashboard that visualizes the Nginx metrics scraped from the /metrics endpoint. The dashboard should include panels for key metrics like request rate, error rate, active connections, and any other relevant Nginx metrics that are available.”
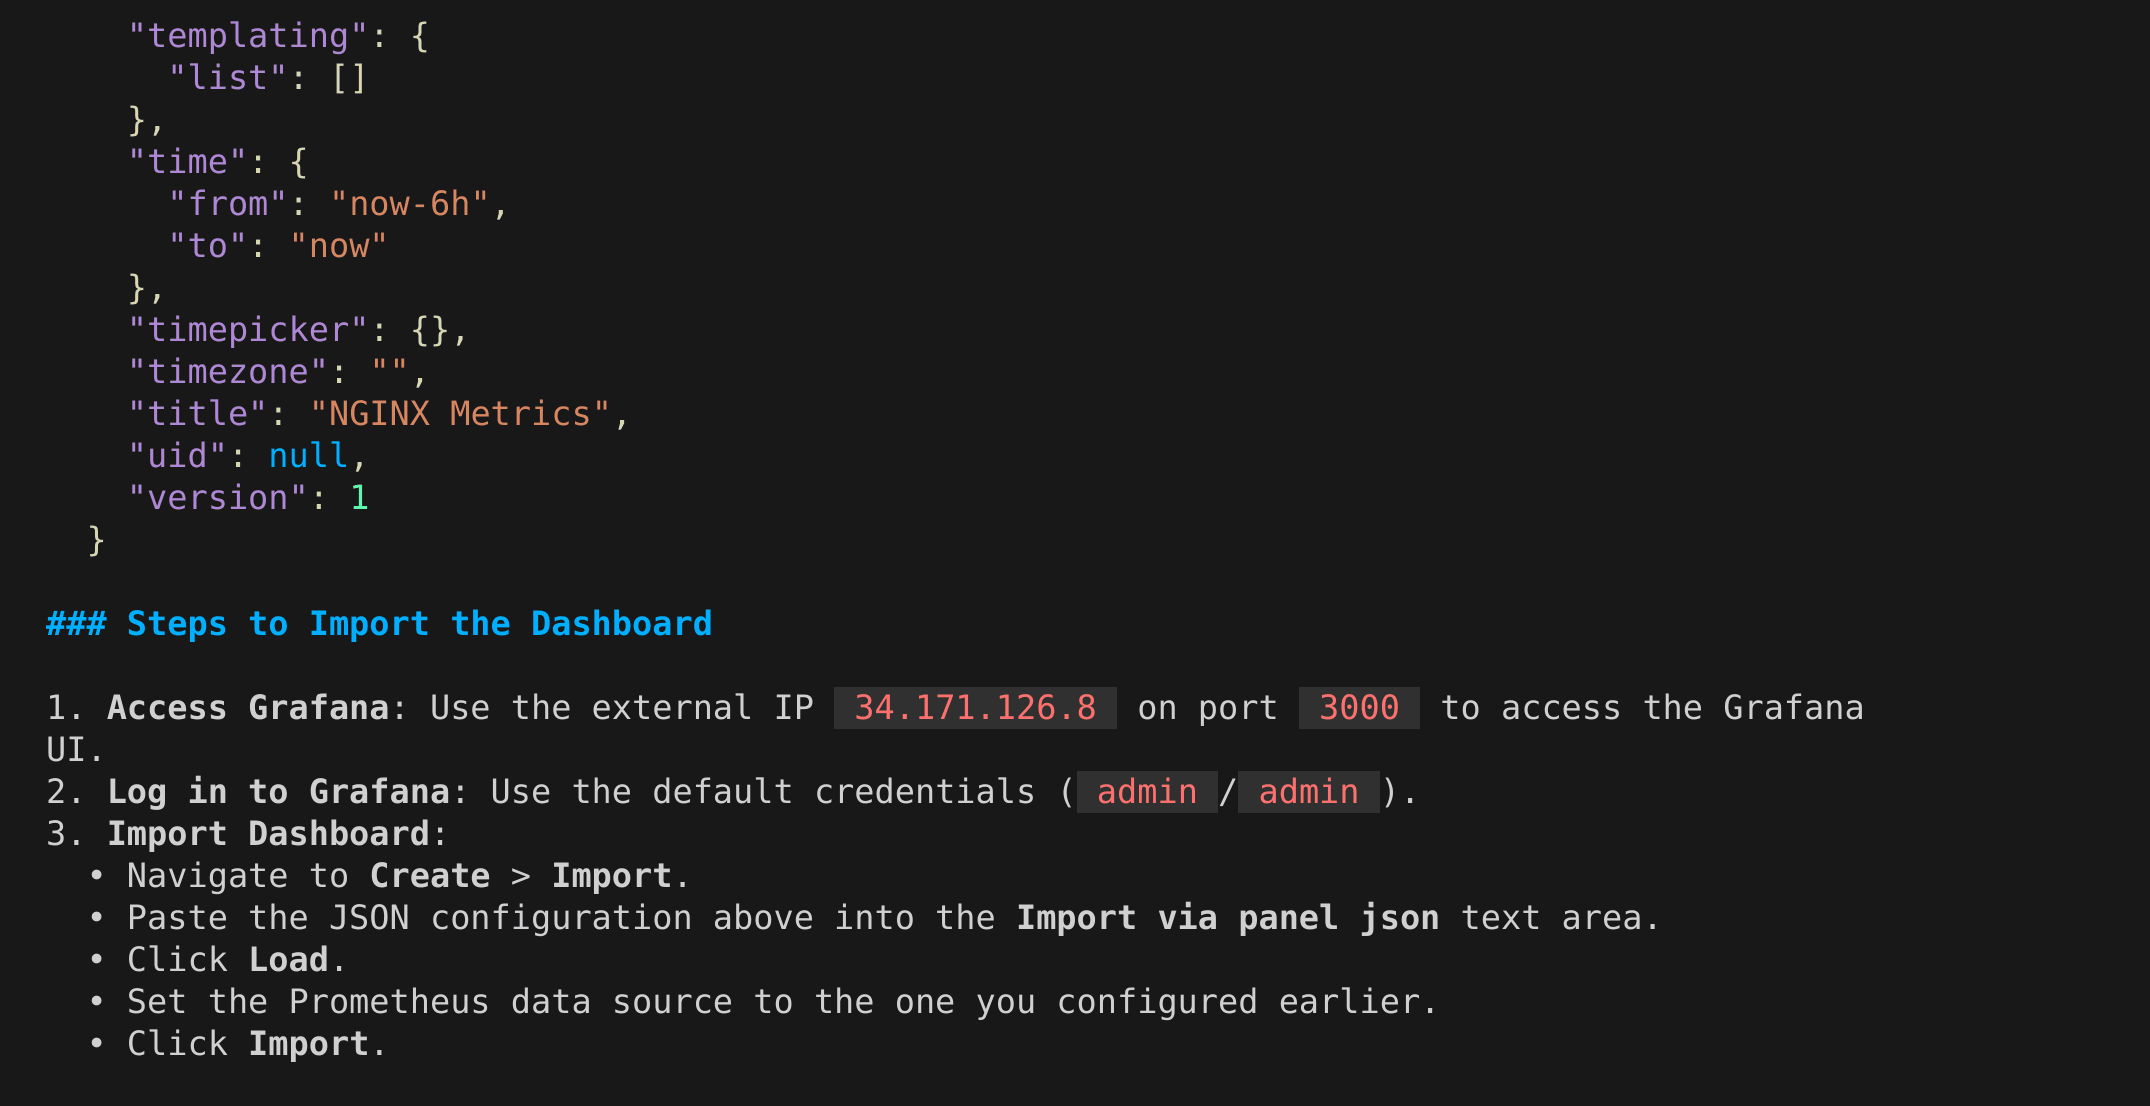
This will generate a dashboard.json file, the content of which we can paste into the Grafana dashboard import page to generate the dashboard with visualizations.
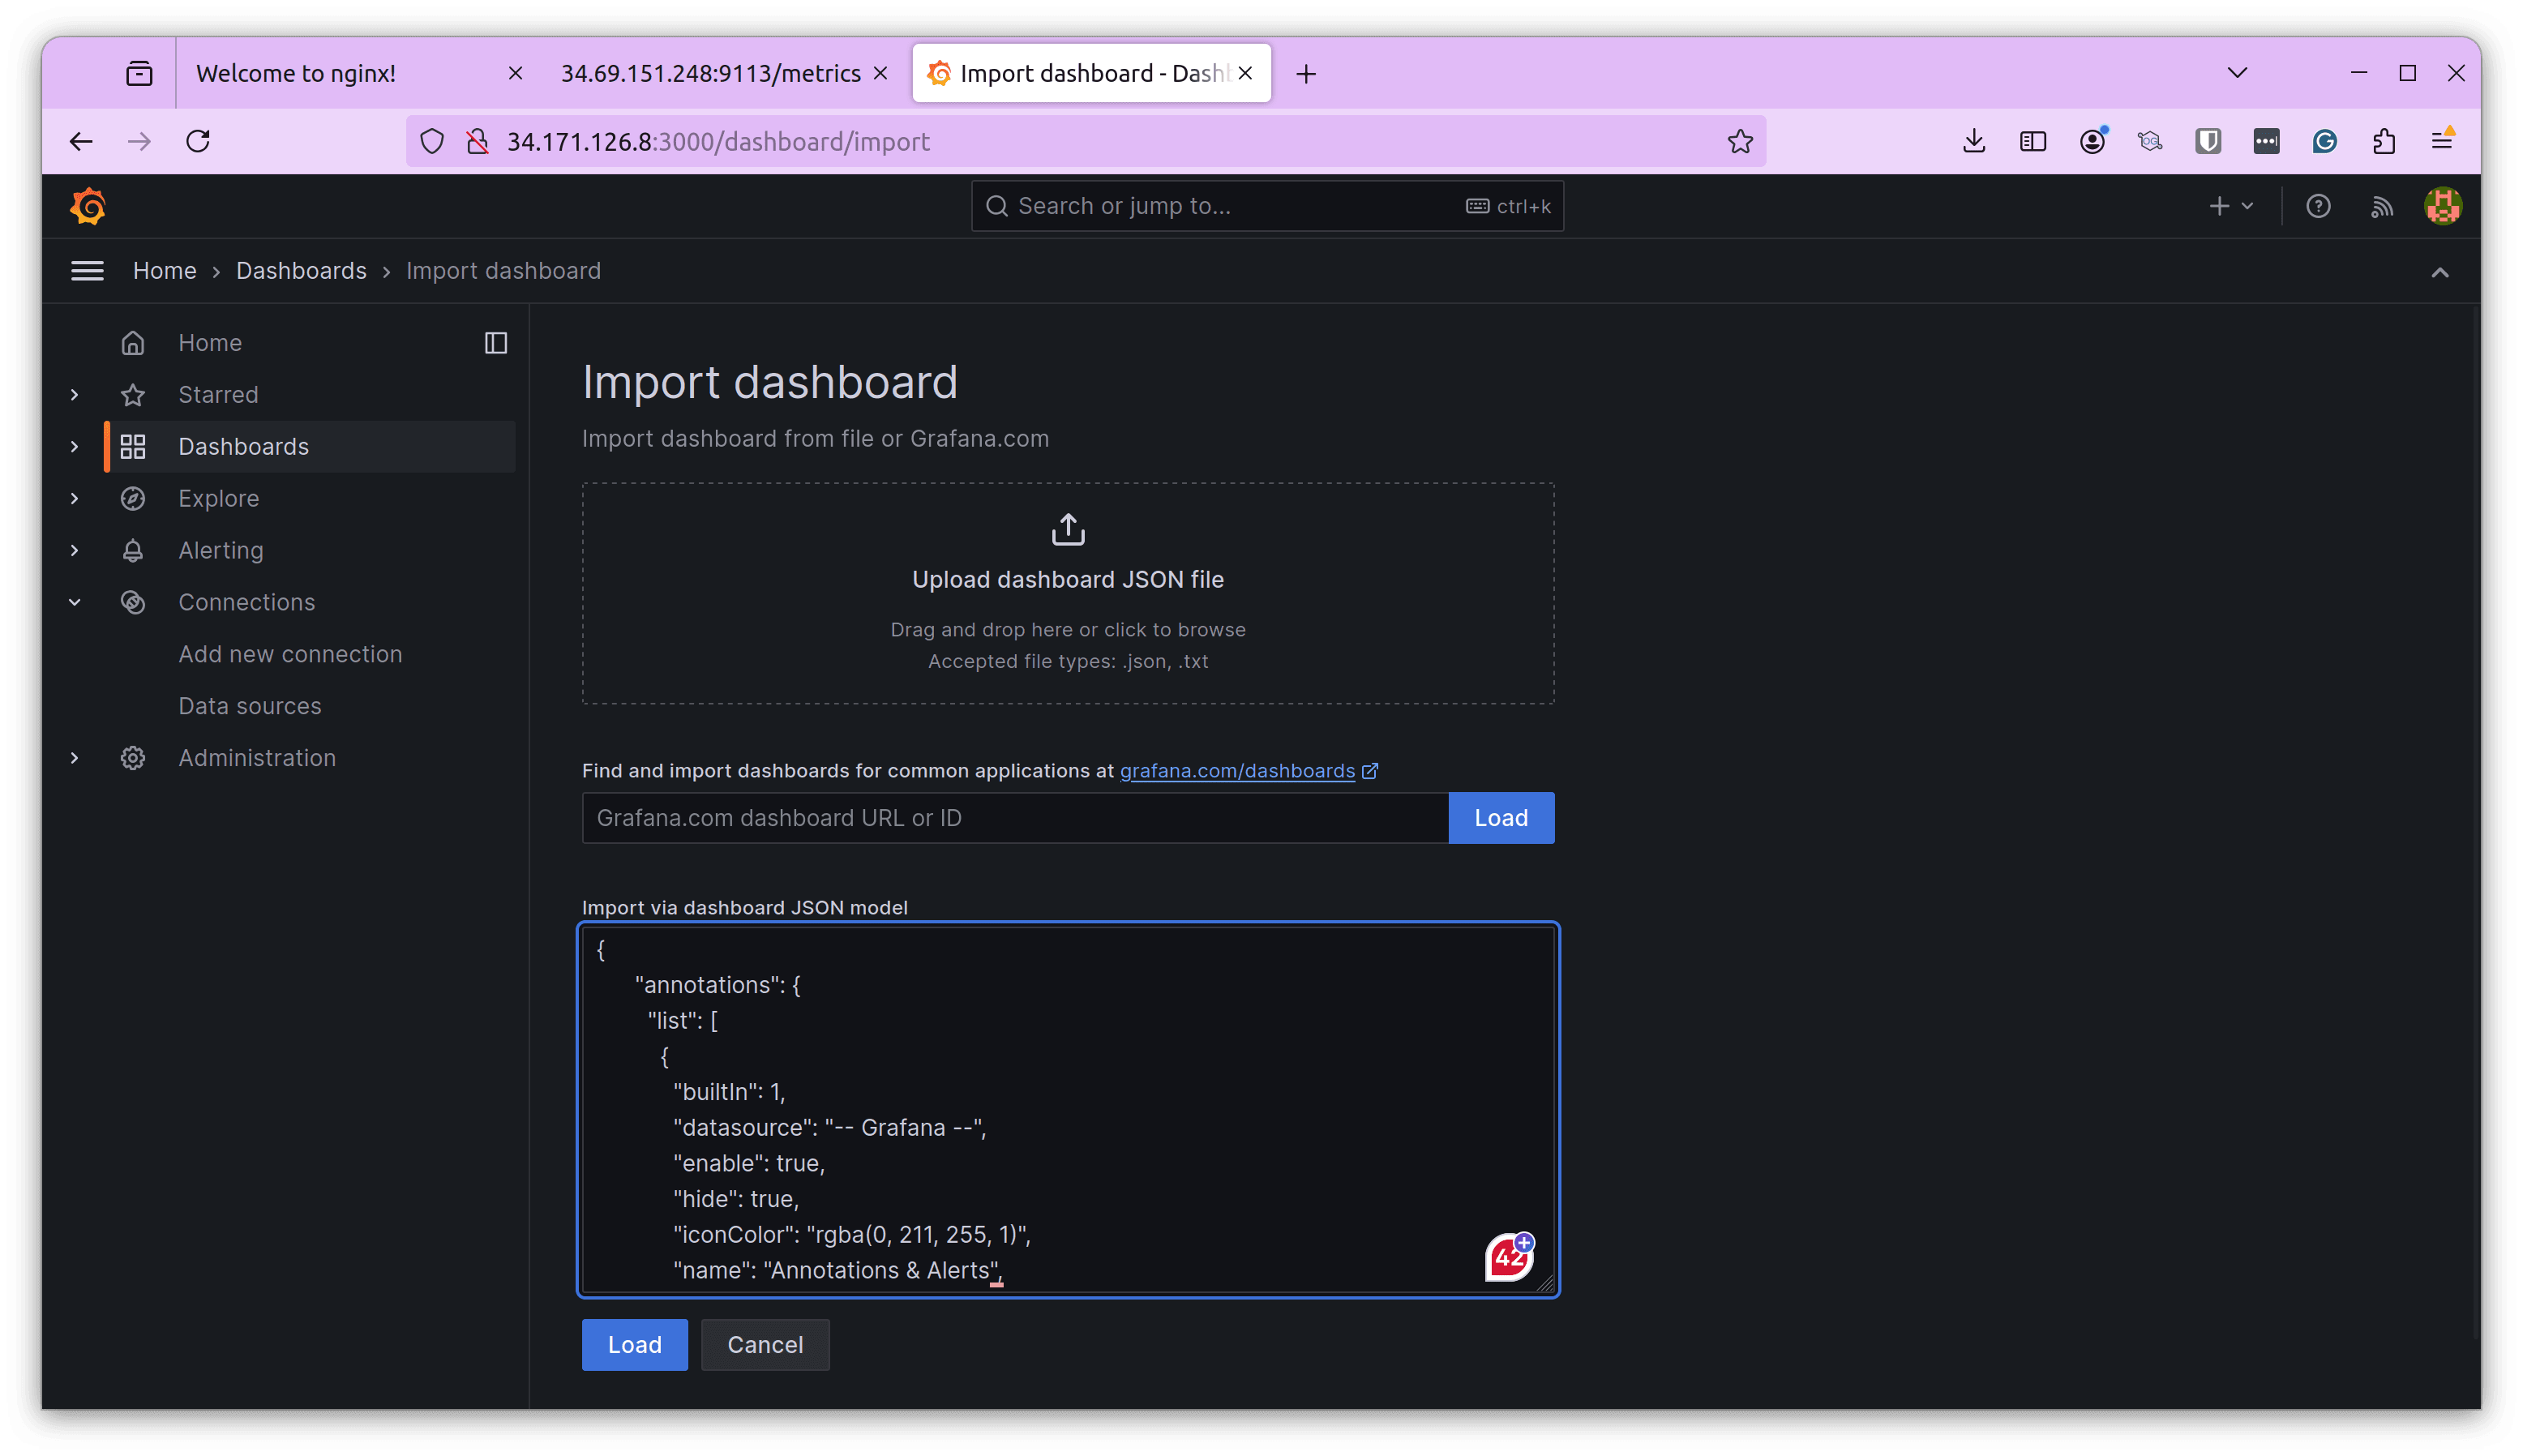
Depending on the JSON code and the metrics configured, you might not see any values at first. Change the filter to last 5 minutes and hit refresh. You should now be able to see the visualizations. You can edit the individual visualizations and change the metric and type.
That’s about the complete GCP Assistant demo using GPTScript. We did everything from provisioning a Kubernetes cluster to deploying an application, configuring metrics, and creating a Grafana dashboard. You can play with the gpt file and configure it to perform your required tasks.
It was fun “talking” to an agent and getting things done. It was similar to talking to an intern and asking them to set this up. The difference is that I interacted with an LLM, and the process was 10x faster.
Having said that, creating a GPTScript in the first place requires planning and attention to detail. What assistant do you want to build? What are its capabilities? What are the tools it should support? These are some questions that you need to ask yourself before writing one. And for basic tasks, this can be too much of an effort.
That’s where Clio comes in.
Clio – The AI-Copilot You Need
Clio is an AI-powered copilot designed to assist with DevOps tasks using command-line interface (CLI) agents. It harnesses OpenAI’s capabilities to deliver intelligent, context-aware support directly from your terminal, simplifying the management of complex workflows and multi-cloud environments.
Whatever we wrote in our GPTScript file comes baked in with Clio.
Key Features
- Preconfigured Agents: Clio includes built-in agents for Azure, GCP, AWS, GitHub, and Kubernetes, making it well-suited for most common platforms and use cases.
- Customizable: You can create and integrate your agents using GPTScript, allowing you to tailor Clio to your needs.
- Extendable: Clio’s features can be easily expanded and customized with minimal coding, making it accessible even to those with limited coding experience.
Installing Clio is as simple as running
brew install gptscript-ai/tap/clio
and you can instantly get started by using your own OpenAI API Key or your GitHub account if you don’t have an API key.
Simply run “clio” and it will prompt you with a guide on how to use it.
You can use the built-in GCP agent to perform everything we did in this blog post and the other agents to simplify other tasks in your DevOps workflow. After using it for over a week, I’ve shared my review of Clio. Read it to understand the nuances.
Overall, Clio is a good sidekick if you’re into DevOps and perform many tasks using various cloud providers, Kubernetes and GitHub. While I’ve shared my opinions here, go ahead and give Clio a try and see how it fares.
For the latest updates on Clio, follow @Clio_ai on X.