
In this part of the tutorial, we are going to build a front end for the generator. We are also going to introduce a little python script to make it possible to add much better text to the thumbnails.
In the previous part, you learned how to set up everything, define tools, run the script, etc.
Prerequisites
-Finished part one of this tutorial.
-Python3.
-A “ttf” font. You can download one for free from Google Fonts.
Modifying the script
First, I want to do some modifications to the script.
tools: thumb-generator, sys.write, sys.download # 1 - Changed
description: Generates a YouTube title and thumbnail based on a script.
args: theme: An overall characteristic description of the theme for the thumbnail. # 2 - Added
args: script: The script to generate title and thumbnail for.

Do the following steps in acsending order:

1. Come up with an appropriate title for the video based on the script. Store the title in a file called `title.txt`. # 3 - Changed
2. Call thumb-generator to illustrate it.
3. Download the illustration to a file at `thumb.png`. # 4 - Changed

---
name: thumb-generator
tools: github.com/gptscript-ai/image-generation
description: Generates a YouTube thumbnail.
args: theme: An overall characteristic description of the theme for the thumbnail. # 5 - Added
args: script: The script to generate thumbnail from.

Do the following steps in acsending order:

# All of the 4 steps has been changed

1. Based on the theme and the script, come up with a background color to represent the script which can be used as the background color for the thumbnail.
2. Do not include any text in the thumbnail.
3. Think of a good prompt to generate an image to represent script and the theme. Only return the URL of the illustration. The thumbnail should be 1792x1024.
4. Use the background color to make sure the edges of the thumbnails fades out.
As, you can see, there has been a few changes since last time. Let’s break it down a little bit:
- We remove the ‘mkdir’ script. We are not longer creating a folder, so we can just remove it from the tools list (And you can remove the whole tool from the script).
- We added a new “theme” argument. This theme is something we can pick in the frontend we are building. This can for example be “happy”, or “dark”.
- Instead of creating a folder with the name of the video, we now just store the title in a file called “title.txt”. This will be used later for showing the title in the frontend.
- Instead of storing the thumbnail in a sub folder with the title name, we just store it in a file called ‘thumb.png’. This makes it very easy to access from the frontend.
- Added the “theme” argument here as well.
- We have changed almost all of the four steps here. Mainly just to tell the script to use both the theme and the script. Plus, we instruct it not to include any text in the image since this is something we want to do later.
Feel free to run the script a see check out the result. To run this now with both arguments, the command can look something like this:
gptscript generator.gpt --theme happy --script Hey, learn how to build a website for a restaurant by using only HTML and CSS.
Setting up a frontend
The frontend will be a Flask app (Flask is a framework based on Python for building web apps).
In the same folder as your script file, create a new file called “requirements.txt”. It should look like this:
Flask==2.0.1
pillow==10.3.0
Werkzeug==2.2.2
- Flask = The framework for building web apps.
- pillow = A library for working with images.
- Wekzeug = A library for handling urls and endpoints in Flask.
This requirments.txt file makes it really easy to install the same version as I used when I created this tutorial. To install these three libraries, you can run this command:
pip install -r requirements.txt
If you don’t have pip installed or you want to keep all of this inside a virtual environment, you can create a virtual environment first by running these two commands:
python3 -m venv env
source evn/bin/activate
When this is finished, the frontend is ready to be built.
Setting up the templates
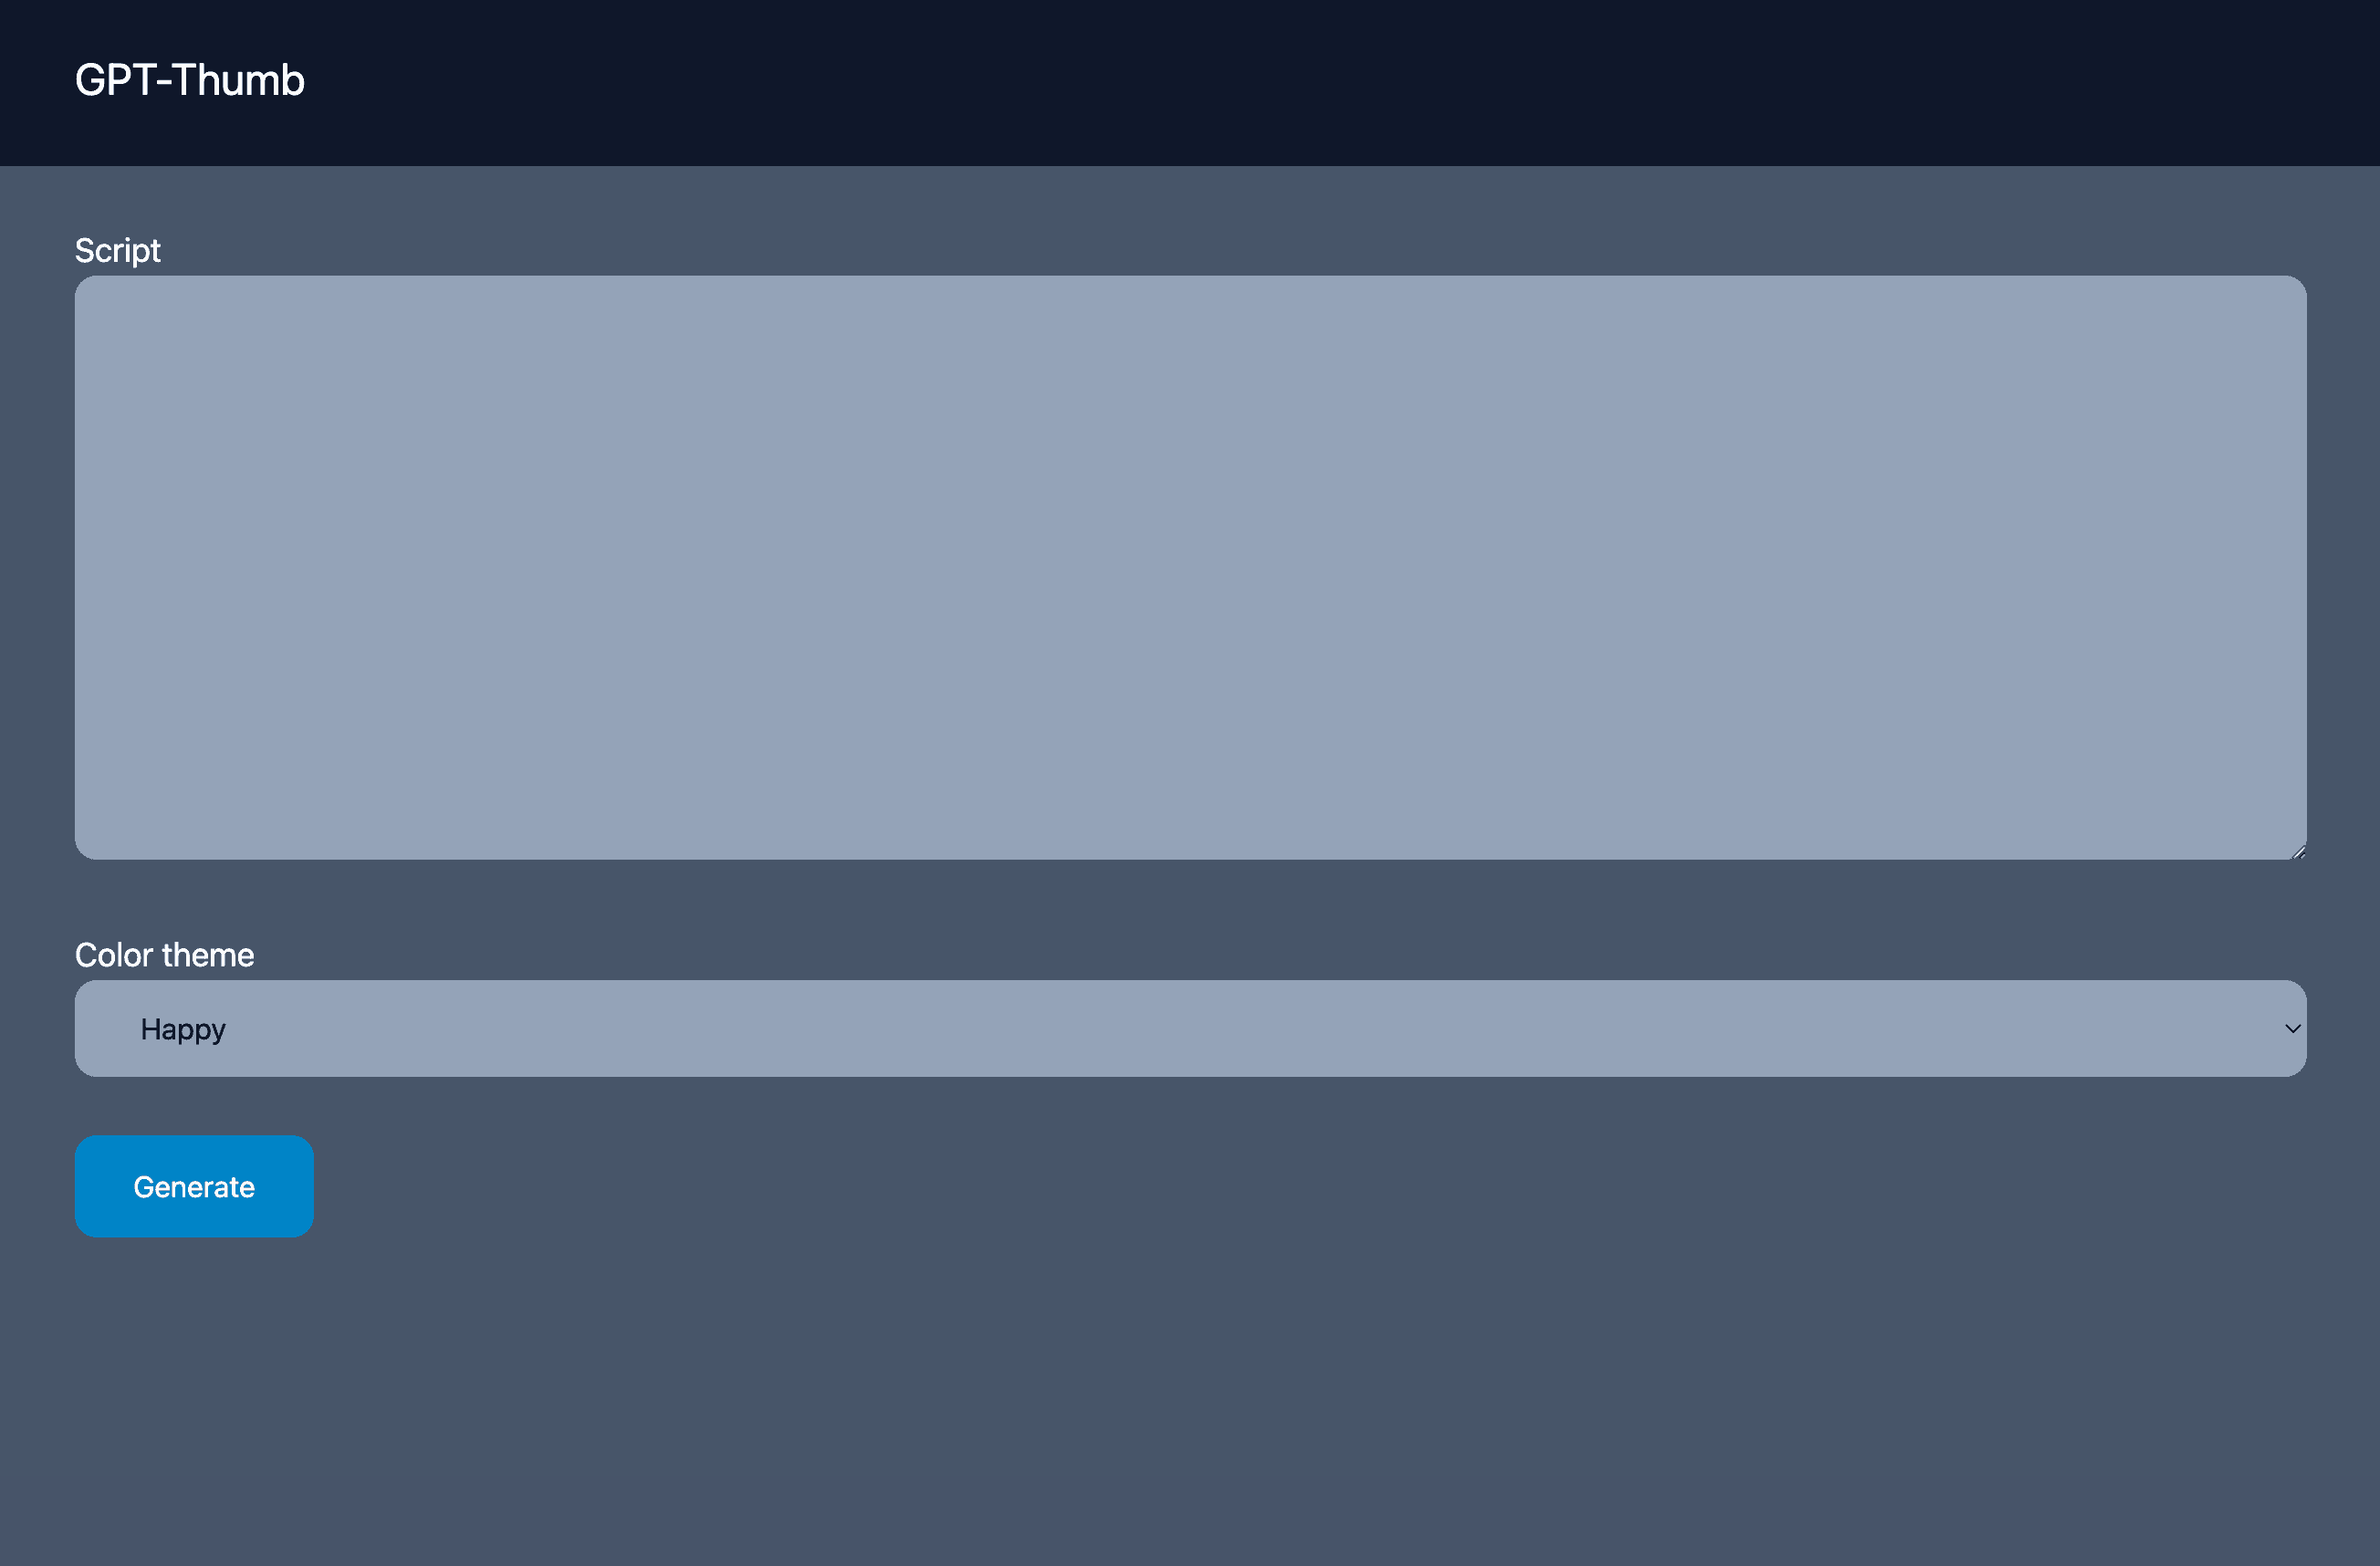
Let’s begin by creating a folder in the root folder called templates. We are going to need two templates. First, let’s create one for the front page of our app. Create a file called “index.html” inside the templates folder. It should look like this:
<!doctype html>
<html>
    <head>
        <meta charset="UTF-8">
        <meta name="viewport" content="width=device-width, initial-scale=1.0">
        <script src="https://cdn.tailwindcss.com"></script>
    </head>
    <body class="bg-slate-600">
        <nav class="py-8 px-12 bg-slate-900">
            <a href="/" class="text-2xl text-white">GPT-Thumb</a>
        </nav>

        <main class="py-8 px-12">
            <form method="post" action="/generate" class="space-y-8">
                <div>
                    <label class="text-lg text-white">Script</label><br>

                    <textarea name="script" id="script" class="w-full h-80 py-4 px-8 bg-slate-400 rounded-xl"></textarea>
                </div>

                <div>
                    <label class="text-lg text-white">Color theme</label><br>

                    <select name="theme" id="theme" class="w-full py-4 px-8 bg-slate-400 rounded-xl">
                        <option value="happy" selected>Happy</option>
                        <option value="dark">Dark</option>
                        <option value="sad">Sad</option>
                        <option value="futuristic">Futuristic</option>
                    </select>
                </div>

                <button id="generate" class="py-4 px-8 bg-sky-600 text-white rounded-xl">Generate</button>
            </form>
        </main>
    </body>
</html>
As you can see, it’s not a very complicated frontend, but does the job.
To make it possible to build the design as rapidly as possible, I have included Tailwind CSS as a CDN. For this design, we have a simple menu at the top, and then a form where you can fill out the script for the video and select a theme you want the thumbnail to be based on.
Okay, next, we are going to create one more file called “result.html” which will be used to present the title and thumbnail when it’s ready. It should look something like this:
<!doctype html>
<html>
    <head>
        <meta charset="UTF-8">
        <meta name="viewport" content="width=device-width, initial-scale=1.0">
        <script src="https://cdn.tailwindcss.com"></script>
    </head>
    <body class="bg-slate-600">
        <nav class="py-8 px-12 bg-slate-900">
            <a href="/" class="text-2xl text-white">GPT-Thumb</a>
        </nav>

        <main class="py-8 px-12">
            <h1 class="mb-12 text-3xl text-white">Result</h1>

            <h2 class="mb-2 text-2xl text-white">YouTube title:</h2>

            <h3 class="mb-6 text-xl text-white">{{ title }}</h3>

            <h2 class="mb-2 text-2xl text-white">YouTube thumbnail:</h2>

            <img src="./thumb.png" />
        </main>
    </body>
</html>
Again, this is a very simple template. The big change here is that we use a couple of flask tags to show the value from the “title”, and then we just statically show an image called thumb.png. We know that this will be the same name every time.
Showing the front page
Let’s create a new file to make Flask present the “index.html” template we just created. In the root folder of our project, create a new file called “app.py”. It should look like this:
import subprocess
import os

from flask import Flask, request, render_template, send_file, redirect
from PIL import Image, ImageDraw, ImageFont
from textwrap import wrap

app = Flask(__name__)

base_dir = os.path.dirname(os.path.abspath(__file__))

SCRIPT_PATH = os.path.join(base_dir, 'generator.gpt')

@app.route('/', methods=['GET'])
def index():
    return render_template('index.html')

if __name__ == '__main__':
    app.run(debug=False)
If you’re new to Flask or Python, you might notice a few new things here. Let’s go through this file:
-First, we import os and subprocess. These are two modules that comes built in from Python. We use “os” to read file and similar from the disk. “subprocess” is a module we need to make it possible to run the “generator.gpt” script we have created.
-Next, we import Flask, PIL and textwrap.
-Flask and the other modules on the same line are things we need to run this app. We’ll come back to these later.
-PIL is the “pillow” library we installed. This is used to read images, write text and draw.
-textdraw is used to help us figuring out the size of the text we’re drawing on the thumbnail.
-Then, we set up a Flask app, define the base root of our app and create a variable with the absolute path for the “generator.gpt” script.
-After all the config, we can set up a route. This is used to render the index.html template. Notice that Flask automatically looks for a folder called “templates” and find templates inside there.
-The last two lines is there for making the app run.
If you now go to the terminal, we can start the Flask app by running this command:
$ python3 app.py
Next, head to the browser, open this url “http://127.0.0.1:5000” and you should see something like this:
Creating some helper functions
To make the code as neat and readable as possible, we need a couple of functions to do some jobs for us. Between the “SCRIPT_PATH” variable the the index-route, add this code:
...
SCRIPT_PATH = os.path.join(base_dir, 'generator.gpt')

def get_y_and_heights(text_wrapped, dimensions, margin, font):
    ascent, descent = font.getmetrics()

    line_heights = [
        font.getmask(text_line).getbbox()[3] + descent + margin
        for text_line in text_wrapped
    ]

    line_heights[-1] -= margin
    height_text = sum(line_heights)
    y = (dimensions[1] - height_text) // 2

    return (y, line_heights)

def get_title():
    titlefile = open('./title.txt','r')
    title = titlefile.read()
    titlefile.close()
    return title

@app.route('/thumb.png')
def thumb_png():
    return send_file('./thumb.png', mimetype='image/png')

@app.route('/', methods=['GET'])
def index():
    return render_template('index.html')
...
I will go through each of these functions.
get_y_and_heights
This function is helping us figuring out how many lines the text will be, and how tall it is. The “y” variable contains the point on our thumbnail where the first part of the text will be located, and the “line_heights” contains information about how tall each of the lines are.
get_title
This function is a little bit simple. This is just used to read the file called “title.txt” and return the value so it can be use elsewhere.
@app.router(’/thumb.png’)
Flask it not really intended to show static files or other types of media files. So we need to create a separate route for this exact purpose. If you now have an image called “thumb.png” in your roor folder, you should be able to visit “http://127.0.0.1:5000/thumb.png” in your browser. You might need to stop and start the Flask server for the changes to take effect.
The generator route
Okay, now that we have the templates and helper functions, we can create the route that will handle the information from the form and run the actual generator script.
Below the route for the thumb, add this code:
@app.route('/generate', methods=['POST'])
def generate():
    script = request.form.get('script')
    theme = request.form.get('theme')

    subprocess.Popen(f"gptscript {SCRIPT_PATH} --theme {theme} --script {script}", shell=True, stdout=subprocess.PIPE).stdout.read()

    font = ImageFont.truetype("Roboto-Black.ttf", 100) # 100 = font size
    img = Image.open("thumb.png")
    draw_interface = ImageDraw.Draw(img, "RGBA")

    title = get_title()

    text_lines = wrap(title, 25) # Number of chars per line

    y, line_heights = get_y_and_heights(
        text_lines,
        (img.width, img.height),
        30, # 30 = Line height
        font
    )

    yStart = (img.height / 2) - (y / 2) - 100
    xStart = (img.width / 2)
    shape = [(xStart - 700, yStart), (xStart + 700, yStart + y + 100)]

    draw_interface.rectangle((shape), fill=(0, 0, 0, 150)) # Background color for rectangle

    # Draw each line of text
    for i, line in enumerate(text_lines):
        line_width = font.getmask(line).getbbox()[2]
        x = ((img.width - line_width) // 2)
        draw_interface.text((x, y), line, font=font, fill="white") # Fill = Text color
        y += line_heights[i]

    # Save the resulting image
    img.save("thumb.png")

    return redirect('/result')
I have added a few comments in this script to help you understand the values I have used.
Let’s also break this script down a little bit:
-First we get the values from the form.
-Next, we use the “subprocess” library we imported to run the generator.gpt script. As you can see, we also pass in the theme and the script. This might take a little while to run.
-Next, we set up a font to use (Change to the one you have downloaded).
-We use “Image” from Pillow (PIL) to read the image from the disk and then set up a “draw_interface”. The draw_interface is used to draw texts and rectangles on an existing image.
-Then we get the title from the text file and use the “wrap” function to calculate how many lines the text will be.
-Next, we get the y and line_height values from the function we created.
-The next “yStart” and “xStart” is a different calculation we need in order to figure out how big the “square” behind the text should be, and where to place it.
-Next, we use the draw_interface to draw the rectangle on the image.
-Then, we loop though the lines of text and draw it on the thumbnail.
-Last but not least, we save the thumbnail and redirects us to the result page.
If you test this in the browser now, the thumbnail will be generated. But since we don’t have a result page yet, you will get an error.
Creating the result page
Below the route we just created, add the following code:
@app.route('/result', methods=['GET'])
def result():
    return render_template('result.html', title=get_title())
One last, but simple route. This renders the “result.html” template we created earlier, and pass in the title of the video so it can be shown.
If you run everything now, you should see something like this:

Summary
And that was it for this tutorial. I hope that you know have a better understanding of how things with GPTScript work. You should now also know a little bit about how to build a frontend for it and similar.
A few suggestions for further improvements:
-When you have the results. Make it possible to “regenerate”. Maybe with comments about what you want to change.
-Add more themes.
-Store the title and images in a database.